Windows Presentation Foundation(WPF)中的 3D 功能使开发人员能够在标记和过程代码中绘制、转换和动画处理 3D 图形。 开发人员可以结合 2D 和 3D 图形来创建丰富的控件、提供复杂的数据插图或增强应用程序界面的用户体验。 WPF 中的 3D 支持并非旨在提供功能齐全的游戏开发平台。 本主题概述了 WPF 图形系统中的 3D 功能。
2D 容器中的 3D
WPF 中的 3D 图形内容封装在可以参与二维元素结构的元素 Viewport3D中。 图形系统将 Viewport3D 二维视觉元素视为与 WPF 中的许多其他元素一样。 Viewport3D 作为一个窗口——即视区——用来观察三维场景。 更准确地说,它是投影 3D 场景的图面。
在传统的 2D 应用程序中,使用 Viewport3D 和使用其他容器元素(如网格或 Canvas)一样。 尽管可以在同一场景图中与其他 2D 绘图对象一 Viewport3D 起使用,但不能在 Viewport3D中将 2D 和 3D 对象相互渗透。 本主题将重点介绍如何在 Viewport3D内绘制 3D 图形。
3D 坐标空间
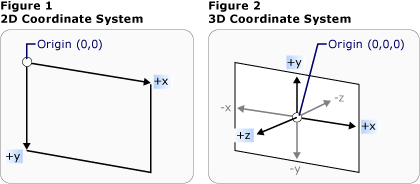
2D 图形的 WPF 坐标系在呈现区域的左上角(通常是屏幕)中找到原点。 在 2D 系统中,正 x 轴值继续向右,正 y 轴值向下继续。 但是,在 3D 坐标系中,原点位于呈现区域的中心,正 x 轴值向右移动,但正 y 轴值向上继续,而正 z 轴值则从原点向外向外,向查看器走去。

传统的 2D 和 3D 坐标系表示形式
这些轴定义的空间是 WPF 中 3D 对象的固定参考帧。 当你在此空间中生成模型并创建灯光和相机来查看它们时,将此固定参考帧或“世界空间”与你为每个模型应用转换时创建的本地参考帧区分开是有帮助的。 还请记住,世界空间中的对象可能看起来完全不同,或者根本不可见,具体取决于光线和相机设置,但相机的位置不会改变世界空间中的对象位置。
相机和投影
在 2D 中工作的开发人员习惯于在二维屏幕上定位绘图基元。 创建 3D 场景时,请务必记住,你确实要创建 3D 对象的 2D 表示形式。 由于 3D 场景看起来因旁观者的观点而异,因此必须指定该观点。 该 Camera 类允许你为 3D 场景指定此观点。
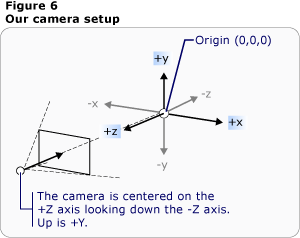
了解 3D 场景在二维图面上如何表示的另一种方法是将场景描述为投影到观看图面上。 这 ProjectionCamera 允许你指定不同的投影及其属性,以更改旁观者如何查看 3D 模型。 一个PerspectiveCamera指定了缩短场景的投影。 换句话说,PerspectiveCamera 提供消失点视角。 可以指定相机在场景坐标空间中的位置、相机的方向和视野,以及定义场景中“向上”方向的矢量。 下图展示了 PerspectiveCamera 的投影。
ProjectionCamera 的 NearPlaneDistance 和 FarPlaneDistance 属性限制相机投影的范围。 由于相机可以位于场景中的任意位置,因此相机实际上可以定位在模型内或非常接近模型,因此很难正确区分对象。 NearPlaneDistance 允许你指定距离相机的最小距离,使对象不会被绘制。 相反,FarPlaneDistance 允许你指定一个与相机的最远绘制距离,超出此距离的对象将不会被绘制,这可以确保那些太远而无法识别的对象不会包含在场景中。

相机位置
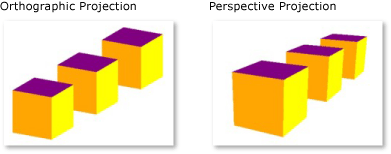
OrthographicCamera 指定 3D 模型到 2D 视觉图面的正交投影。 与其他相机一样,它指定位置、查看方向和“向上”方向。 与 PerspectiveCamera 不同的是,OrthographicCamera 描述的是没有包含透视缩短效应的投影。 换句话说,OrthographicCamera 描述了一个其边相互平行的视图框,而不是一个其边在相机处相交的视图框。 下图显示了与使用 PerspectiveCamera 和 OrthographicCamera查看的模型相同的模型。

透视和正交投影
以下代码显示了一些典型的相机设置。
// Defines the camera used to view the 3D object. In order to view the 3D object,
// the camera must be positioned and pointed such that the object is within view
// of the camera.
PerspectiveCamera myPCamera = new PerspectiveCamera();

// Specify where in the 3D scene the camera is.
myPCamera.Position = new Point3D(0, 0, 2);

// Specify the direction that the camera is pointing.
myPCamera.LookDirection = new Vector3D(0, 0, -1);

// Define camera's horizontal field of view in degrees.
myPCamera.FieldOfView = 60;

// Asign the camera to the viewport
myViewport3D.Camera = myPCamera;
' Defines the camera used to view the 3D object. In order to view the 3D object,
' the camera must be positioned and pointed such that the object is within view
' of the camera.
Dim myPCamera As New PerspectiveCamera()

' Specify where in the 3D scene the camera is.
myPCamera.Position = New Point3D(0, 0, 2)

' Specify the direction that the camera is pointing.
myPCamera.LookDirection = New Vector3D(0, 0, -1)

' Define camera's horizontal field of view in degrees.
myPCamera.FieldOfView = 60

' Asign the camera to the viewport
myViewport3D.Camera = myPCamera
模型和网格基元
Model3D 是表示泛型 3D 对象的抽象基类。 若要生成 3D 场景,需要一些对象才能查看,以及构成场景图的对象派生自 Model3D。 目前,WPF 支持对几何图形进行 GeometryModel3D建模。 Geometry此模型的属性采用网格基元。
若要生成模型,请首先生成基元或网格。 3D 基元是构成单个 3D 实体的顶点集合。 大多数 3D 系统提供在最简单的封闭图上建模的基元:由三个顶点定义的三角形。 由于三角形的三点是平面的,因此你可以继续添加三角形,以便为更复杂的形状建模,称为网格。
WPF 3D 系统当前提供 MeshGeometry3D 类,可用于指定任何几何图形;它当前不支持预定义的 3D 基元,如球体和立方体形式。 开始创建MeshGeometry3D,通过指定三角形顶点列表作为其Positions属性。 每个顶点都指定为一个 Point3D。 (在 XAML 中,将此属性指定为三个表示每个顶点坐标的数字列表。根据几何图形,网格可能由许多三角形组成,其中一些三角形共享相同的角(顶点)。 若要正确绘制网格,WPF 需要有关哪些顶点由哪些三角形共享的信息。 可以通过指定包含TriangleIndices属性的三角形索引列表来提供此信息。 此列表指定了 Positions 中的点形成三角形的顺序。
<GeometryModel3D>
  <GeometryModel3D.Geometry>
          <MeshGeometry3D
              Positions="-1 -1 0  1 -1 0  -1 1 0  1 1 0"
              Normals="0 0 1  0 0 1  0 0 1  0 0 1"
              TextureCoordinates="0 1  1 1  0 0  1 0   "
              TriangleIndices="0 1 2  1 3 2" />
      </GeometryModel3D.Geometry>
      <GeometryModel3D.Material>
          <DiffuseMaterial>
              <DiffuseMaterial.Brush>
                  <SolidColorBrush Color="Cyan" Opacity="0.3"/>
              </DiffuseMaterial.Brush>
          </DiffuseMaterial>
      </GeometryModel3D.Material>
  <!-- Translate the plane. -->
      <GeometryModel3D.Transform>
          <TranslateTransform3D
            OffsetX="2" OffsetY="0" OffsetZ="-1"   >
          </TranslateTransform3D>
      </GeometryModel3D.Transform>
  </GeometryModel3D>
在前面的示例中, Positions 列表指定四个顶点来定义矩形网格。 该 TriangleIndices 属性指定两组三个索引的列表。 列表中的每个数字都指向 Positions 列表中的一个偏移量。 例如,列表指定的 Positions 前三个顶点是 (-1,-1,0), (1,-1,0)以及 (-1,1,0)。 列表 TriangleIndices 的前三个指定索引为 0、1 和 2,对应于列表 Positions 中的第一个、第二个和第三个点。 因此,构成矩形模型的第一个三角形将由(-1,-1,0)到(1,-1,0)再到(-1,1,0)构成,第二个三角形将以类似方式确定。
可以通过为模型指定值 Normals 和 TextureCoordinates 属性来继续定义模型。 为了呈现模型的图面,图形系统需要有关图面在任何给定三角形上面对的方向的信息。 它使用此信息对模型进行照明计算:直接面向光源的表面看起来比与光源成角度的表面更亮。 尽管 WPF 可以使用位置坐标确定默认的法向量,但还可以指定不同的法向量来近似曲线图面的外观。
该 TextureCoordinates 属性指定一组 Point,这些 Point 告知图形系统如何将决定纹理绘制方式的坐标映射到网格的顶点。 TextureCoordinates 指定为介于零和 1 之间的值(含)。 与 Normals 属性一样,图形系统可以计算默认纹理坐标,但可以选择设置不同的纹理坐标来控制包含重复模式一部分的纹理的映射。 关于纹理坐标的更多信息,请参阅后续主题或 Managed Direct3D SDK。
以下示例演示如何在过程代码中创建多维数据集模型的一张人脸。 可以将整个立方体绘制为单个 GeometryModel3D;本示例将立方体的面绘制为不同的模型,以便稍后将单独的纹理应用于每个面。
MeshGeometry3D side1Plane = new MeshGeometry3D();
Private side1Plane As New MeshGeometry3D()
side1Plane.Positions.Add(new Point3D(-0.5, -0.5, -0.5));
side1Plane.Positions.Add(new Point3D(-0.5, 0.5, -0.5));
side1Plane.Positions.Add(new Point3D(0.5, 0.5, -0.5));
side1Plane.Positions.Add(new Point3D(0.5, 0.5, -0.5));
side1Plane.Positions.Add(new Point3D(0.5, -0.5, -0.5));
side1Plane.Positions.Add(new Point3D(-0.5, -0.5, -0.5));

side1Plane.TriangleIndices.Add(0);
side1Plane.TriangleIndices.Add(1);
side1Plane.TriangleIndices.Add(2);
side1Plane.TriangleIndices.Add(3);
side1Plane.TriangleIndices.Add(4);
side1Plane.TriangleIndices.Add(5);

side1Plane.Normals.Add(new Vector3D(0, 0, -1));
side1Plane.Normals.Add(new Vector3D(0, 0, -1));
side1Plane.Normals.Add(new Vector3D(0, 0, -1));
side1Plane.Normals.Add(new Vector3D(0, 0, -1));
side1Plane.Normals.Add(new Vector3D(0, 0, -1));
side1Plane.Normals.Add(new Vector3D(0, 0, -1));

side1Plane.TextureCoordinates.Add(new Point(1, 0));
side1Plane.TextureCoordinates.Add(new Point(1, 1));
side1Plane.TextureCoordinates.Add(new Point(0, 1));
side1Plane.TextureCoordinates.Add(new Point(0, 1));
side1Plane.TextureCoordinates.Add(new Point(0, 0));
side1Plane.TextureCoordinates.Add(new Point(1, 0));
side1Plane.Positions.Add(New Point3D(-0.5, -0.5, -0.5))
side1Plane.Positions.Add(New Point3D(-0.5, 0.5, -0.5))
side1Plane.Positions.Add(New Point3D(0.5, 0.5, -0.5))
side1Plane.Positions.Add(New Point3D(0.5, 0.5, -0.5))
side1Plane.Positions.Add(New Point3D(0.5, -0.5, -0.5))
side1Plane.Positions.Add(New Point3D(-0.5, -0.5, -0.5))

side1Plane.TriangleIndices.Add(0)
side1Plane.TriangleIndices.Add(1)
side1Plane.TriangleIndices.Add(2)
side1Plane.TriangleIndices.Add(3)
side1Plane.TriangleIndices.Add(4)
side1Plane.TriangleIndices.Add(5)

side1Plane.Normals.Add(New Vector3D(0, 0, -1))
side1Plane.Normals.Add(New Vector3D(0, 0, -1))
side1Plane.Normals.Add(New Vector3D(0, 0, -1))
side1Plane.Normals.Add(New Vector3D(0, 0, -1))
side1Plane.Normals.Add(New Vector3D(0, 0, -1))
side1Plane.Normals.Add(New Vector3D(0, 0, -1))

side1Plane.TextureCoordinates.Add(New Point(1, 0))
side1Plane.TextureCoordinates.Add(New Point(1, 1))
side1Plane.TextureCoordinates.Add(New Point(0, 1))
side1Plane.TextureCoordinates.Add(New Point(0, 1))
side1Plane.TextureCoordinates.Add(New Point(0, 0))
side1Plane.TextureCoordinates.Add(New Point(1, 0))
将材料应用于模型
要使网格看起来像一个三维对象,它必须有一个应用纹理来覆盖由其顶点和三角形定义的表面,以便它可以由相机点亮和投影。 在 2D 中,可以使用 Brush 该类将颜色、图案、渐变或其他视觉内容应用于屏幕区域。 但是,3D 对象的外观是照明模型的一个功能,而不仅仅是应用于它们的颜色或图案。 实际物体根据表面的质量以不同的方式反射光:光泽和闪亮的表面看起来与粗糙或哑光表面不同,有些物体似乎吸收光,而另一些物体则发光。 可以将所有用于 2D 对象的画笔应用于 3D 对象,但不能直接应用。
若要定义模型图面的特征,WPF 使用 Material 抽象类。 Material 的具体子类决定了模型表面的一些外观特征,每个子类还提供一个 Brush 属性,你可以向其传递 SolidColorBrush、TileBrush 或 VisualBrush。
DiffuseMaterial 指定将画笔效果应用于模型,就像该模型被漫反射光照一样。 使用漫射材质时,最接近于直接在 2D 模型上使用画笔,并且模型表面不会如光亮表面般反射光。
SpecularMaterial 指定画笔将作用于模型,仿佛模型表面是坚硬或闪亮的,能够反射高光。 可以通过为SpecularPower属性指定一个值来设定纹理呈现反射特性或“光泽”的程度。
EmissiveMaterial 允许你指定应用纹理,使其看起来就像模型发出与画笔颜色相同的光。 这不会使模型成为光源;但是,如果采用漫射材质或高光材质纹理,它将以不同的方式与阴影交互。
为了获得更好的性能,GeometryModel3D 的反面(即因位于相机对面而不可见的那些面)被剔除出场景。 为了将 Material 指定应用于模型(如平面)的背面,请设置模型的 BackMaterial 属性。
若要实现一些表面质量(如发光或反射效果),可能需要依次将不同的画笔应用于模型。 可以通过使用 MaterialGroup 类来应用和重复使用多个材料。 MaterialGroup 的子级将按顺序应用于多个渲染过程,从第一个直到最后一个。
以下代码示例演示如何将纯色和绘图作为画笔应用于 3D 模型。
<GeometryModel3D.Material>
    <DiffuseMaterial>
        <DiffuseMaterial.Brush>
            <SolidColorBrush Color="Cyan" Opacity="0.3"/>
        </DiffuseMaterial.Brush>
    </DiffuseMaterial>
</GeometryModel3D.Material>
<DrawingBrush x:Key="patternBrush" Viewport="0,0,0.1,0.1" TileMode="Tile">
  <DrawingBrush.Drawing>
    <DrawingGroup>
      <DrawingGroup.Children>
        <GeometryDrawing Geometry="M0,0.1 L0.1,0 1,0.9, 0.9,1z"
          Brush="Gray" />
        <GeometryDrawing Geometry="M0.9,0 L1,0.1 0.1,1 0,0.9z"
          Brush="Gray" />
        <GeometryDrawing Geometry="M0.25,0.25 L0.5,0.125 0.75,0.25 0.5,0.5z"
          Brush="#FFFF00" />
        <GeometryDrawing Geometry="M0.25,0.75 L0.5,0.875 0.75,0.75 0.5,0.5z"
          Brush="Black" />
        <GeometryDrawing Geometry="M0.25,0.75 L0.125,0.5 0.25,0.25 0.5,0.5z"
          Brush="#FF0000" />
        <GeometryDrawing Geometry="M0.75,0.25 L0.875,0.5 0.75,0.75 0.5,0.5z"
          Brush="MediumBlue" />
      </DrawingGroup.Children>
    </DrawingGroup>
  </DrawingBrush.Drawing>
</DrawingBrush>
DiffuseMaterial side5Material = new DiffuseMaterial((Brush)Application.Current.Resources["patternBrush"]);
Dim side5Material As New DiffuseMaterial(CType(Application.Current.Resources("patternBrush"), Brush))
照亮场景
在3D图形中,灯光的作用与在现实世界中的作用相同:它们使表面变得可见。 更为重要的是,灯光决定了场景中的哪个部分将包含在投影中。 WPF 中的光源对象能够创建各种光影效果,并基于各种真实世界灯光的行为进行建模。 在场景中至少要包括一个光源,否则模型将不可见。
以下灯派生自基类 Light:
AmbientLight:提供环境照明,无论对象的位置或方向如何,都统一地照亮所有对象。
DirectionalLight:像遥远的光源一样照亮。 方向灯已 Direction 指定为 Vector3D,但没有指定位置。
PointLight:像附近的光源一样照亮。 PointLights 有一个位置,并从该位置投光。 场景中的对象根据光的位置和距离来照亮。 PointLightBase 公开一个 Range 属性,该属性确定超出哪些模型不会被光线照亮的距离。 PointLight 还公开衰减属性,该属性确定光的强度如何随着距离而减弱。 你可以为光的衰减指定常量、线性或二次插值。
SpotLight:继承自 PointLight. 聚光灯像 PointLight 一样照亮,同时具有位置和方向。 它们通过InnerConeAngle和OuterConeAngle属性,以度为单位投影出一个圆锥形区域的光线。
灯光是 Model3D 对象,因此你可以转换和设置光线属性的动画,包括位置、颜色、方向和范围。
<ModelVisual3D.Content>
    <AmbientLight Color="#333333" />
</ModelVisual3D.Content>
DirectionalLight myDirLight = new DirectionalLight();
Private myDirLight As New DirectionalLight()
myDirLight.Color = Colors.White;
myDirLight.Direction = new Vector3D(-3, -4, -5);
myDirLight.Color = Colors.White
myDirLight.Direction = New Vector3D(-3, -4, -5)
modelGroup.Children.Add(myDirLight);
modelGroup.Children.Add(myDirLight)
转换模型
创建模型时,它们在场景中具有特定位置。 若要在场景中移动这些模型、旋转模型或更改其大小,则更改定义模型本身的顶点并不实用。 相反,就像在 2D 中一样,将转换应用于模型。
每个模型对象都有一个 Transform 属性,可以使用该属性移动、重新定位或调整模型的大小。 当你应用一个转换时,你实际上会将模型的所有点根据转换指定的向量或值进行偏移。 换句话说,你已转换模型在其中定义的坐标空间(“模型空间”),但你尚未更改构成整个场景坐标系(“世界空间”)中模型几何图形的值。
有关转换模型的详细信息,请参阅 3D 转换概述。
对模型进行动画处理
WPF 3D 实现参与与 2D 图形相同的计时和动画系统。 换句话说,若要对 3D 场景进行动画处理,请对其模型的属性进行动画处理。 可以直接对基元的属性进行动画处理,但通常更容易对更改模型的位置或外观的转换进行动画处理。 由于转换可以应用于 Model3DGroup 对象和单个模型,因此可以将一组动画应用于 Model3DGroup 的子级,并将另一组动画应用于一组子对象。 还可以通过对场景照明的属性进行动画处理来实现各种视觉效果。 最后,你可以选择通过对相机位置或视野进行动画处理来设置投影本身的动画。 有关 WPF 计时和动画系统的背景信息,请参阅 动画概述、 情节提要概述和 冻结对象概述 主题。
若要在 WPF 中对对象进行动画处理,请创建时间线、定义动画(这确实是一些属性值随时间变化)并指定要向其应用动画的属性。 由于 3D 场景中的所有对象都是子 Viewport3D级,因此要应用于场景的任何动画所针对的属性都是 Viewport3D 的属性。
假设你想要使模型看起来摇摆不定。 可以选择在模型上应用RotateTransform3D,并将其旋转轴从一个向量动画到另一个向量。 下面的代码示例演示如何将 Vector3DAnimation 应用于转换的 Rotation3D 的 Axis 属性,假设 RotateTransform3D 是使用 TransformGroup 应用于模型的多个转换之一。
//Define a rotation
RotateTransform3D myRotateTransform = new RotateTransform3D(new AxisAngleRotation3D(new Vector3D(0, 1, 0), 1));
'Define a rotation
Dim myRotateTransform As New RotateTransform3D(New AxisAngleRotation3D(New Vector3D(0, 1, 0), 1))
Vector3DAnimation myVectorAnimation = new Vector3DAnimation(new Vector3D(-1, -1, -1), new Duration(TimeSpan.FromMilliseconds(5000)));
myVectorAnimation.RepeatBehavior = RepeatBehavior.Forever;
Dim myVectorAnimation As New Vector3DAnimation(New Vector3D(-1, -1, -1), New Duration(TimeSpan.FromMilliseconds(5000)))
myVectorAnimation.RepeatBehavior = RepeatBehavior.Forever
myRotateTransform.Rotation.BeginAnimation(AxisAngleRotation3D.AxisProperty, myVectorAnimation);
myRotateTransform.Rotation.BeginAnimation(AxisAngleRotation3D.AxisProperty, myVectorAnimation)
//Add transformation to the model
cube1TransformGroup.Children.Add(myRotateTransform);
'Add transformation to the model
cube1TransformGroup.Children.Add(myRotateTransform)
向窗口添加 3D 内容
若要呈现场景,请将模型和灯光添加到Model3DGroup,然后将Model3DGroup设置为ModelVisual3D的Content。 将 ModelVisual3D 添加到 Viewport3D 的 Children 集合中。 通过设置Camera属性,将相机添加到Viewport3D中。
最后,将 Viewport3D 添加到窗口中。 Viewport3D当包含在布局元素(如 Canvas)的内容时,请通过设置视区3D 的大小Height和Width属性(继承自 FrameworkElement) 来指定 Viewport3D 的大小。
<UserControl x:Class="HostingWpfUserControlInWf.UserControl1"
    xmlns="http://schemas.microsoft.com/winfx/2006/xaml/presentation"
    xmlns:x="http://schemas.microsoft.com/winfx/2006/xaml"
    >

    <Grid>

      <!-- Place a Label control at the top of the view. -->
      <Label
                HorizontalAlignment="Center"
                TextBlock.TextAlignment="Center"
                FontSize="20"
                Foreground="Red"
                Content="Model: Cone"/>

      <!-- Viewport3D is the rendering surface. -->
      <Viewport3D Name="myViewport" >

        <!-- Add a camera. -->
        <Viewport3D.Camera>
          <PerspectiveCamera
                        FarPlaneDistance="20"
                        LookDirection="0,0,1"
                        UpDirection="0,1,0"
                        NearPlaneDistance="1"
                        Position="0,0,-3"
                        FieldOfView="45" />
        </Viewport3D.Camera>

        <!-- Add models. -->
        <Viewport3D.Children>

          <ModelVisual3D>
            <ModelVisual3D.Content>

              <Model3DGroup >
                <Model3DGroup.Children>

                  <!-- Lights, MeshGeometry3D and DiffuseMaterial objects are added to the ModelVisual3D. -->
                  <DirectionalLight Color="#FFFFFFFF" Direction="3,-4,5" />

                  <!-- Define a red cone. -->
                  <GeometryModel3D>

                    <GeometryModel3D.Geometry>
                      <MeshGeometry3D
    Positions="0.293893 -0.5 0.404509  0.475528 -0.5 0.154509  0 0.5 0  0.475528 -0.5 0.154509  0 0.5 0  0 0.5 0  0.475528 -0.5 0.154509  0.475528 -0.5 -0.154509  0 0.5 0  0.475528 -0.5 -0.154509  0 0.5 0  0 0.5 0  0.475528 -0.5 -0.154509  0.293893 -0.5 -0.404509  0 0.5 0  0.293893 -0.5 -0.404509  0 0.5 0  0 0.5 0  0.293893 -0.5 -0.404509  0 -0.5 -0.5  0 0.5 0  0 -0.5 -0.5  0 0.5 0  0 0.5 0  0 -0.5 -0.5  -0.293893 -0.5 -0.404509  0 0.5 0  -0.293893 -0.5 -0.404509  0 0.5 0  0 0.5 0  -0.293893 -0.5 -0.404509  -0.475528 -0.5 -0.154509  0 0.5 0  -0.475528 -0.5 -0.154509  0 0.5 0  0 0.5 0  -0.475528 -0.5 -0.154509  -0.475528 -0.5 0.154509  0 0.5 0  -0.475528 -0.5 0.154509  0 0.5 0  0 0.5 0  -0.475528 -0.5 0.154509  -0.293892 -0.5 0.404509  0 0.5 0  -0.293892 -0.5 0.404509  0 0.5 0  0 0.5 0  -0.293892 -0.5 0.404509  0 -0.5 0.5  0 0.5 0  0 -0.5 0.5  0 0.5 0  0 0.5 0  0 -0.5 0.5  0.293893 -0.5 0.404509  0 0.5 0  0.293893 -0.5 0.404509  0 0.5 0  0 0.5 0  "
    Normals="0.7236065,0.4472139,0.5257313  0.2763934,0.4472138,0.8506507  0.5308242,0.4294462,0.7306172  0.2763934,0.4472138,0.8506507  0,0.4294458,0.9030925  0.5308242,0.4294462,0.7306172  0.2763934,0.4472138,0.8506507  -0.2763934,0.4472138,0.8506507  0,0.4294458,0.9030925  -0.2763934,0.4472138,0.8506507  -0.5308242,0.4294462,0.7306172  0,0.4294458,0.9030925  -0.2763934,0.4472138,0.8506507  -0.7236065,0.4472139,0.5257313  -0.5308242,0.4294462,0.7306172  -0.7236065,0.4472139,0.5257313  -0.858892,0.429446,0.279071  -0.5308242,0.4294462,0.7306172  -0.7236065,0.4472139,0.5257313  -0.8944269,0.4472139,0  -0.858892,0.429446,0.279071  -0.8944269,0.4472139,0  -0.858892,0.429446,-0.279071  -0.858892,0.429446,0.279071  -0.8944269,0.4472139,0  -0.7236065,0.4472139,-0.5257313  -0.858892,0.429446,-0.279071  -0.7236065,0.4472139,-0.5257313  -0.5308242,0.4294462,-0.7306172  -0.858892,0.429446,-0.279071  -0.7236065,0.4472139,-0.5257313  -0.2763934,0.4472138,-0.8506507  -0.5308242,0.4294462,-0.7306172  -0.2763934,0.4472138,-0.8506507  0,0.4294458,-0.9030925  -0.5308242,0.4294462,-0.7306172  -0.2763934,0.4472138,-0.8506507  0.2763934,0.4472138,-0.8506507  0,0.4294458,-0.9030925  0.2763934,0.4472138,-0.8506507  0.5308249,0.4294459,-0.7306169  0,0.4294458,-0.9030925  0.2763934,0.4472138,-0.8506507  0.7236068,0.4472141,-0.5257306  0.5308249,0.4294459,-0.7306169  0.7236068,0.4472141,-0.5257306  0.8588922,0.4294461,-0.27907  0.5308249,0.4294459,-0.7306169  0.7236068,0.4472141,-0.5257306  0.8944269,0.4472139,0  0.8588922,0.4294461,-0.27907  0.8944269,0.4472139,0  0.858892,0.429446,0.279071  0.8588922,0.4294461,-0.27907  0.8944269,0.4472139,0  0.7236065,0.4472139,0.5257313  0.858892,0.429446,0.279071  0.7236065,0.4472139,0.5257313  0.5308242,0.4294462,0.7306172  0.858892,0.429446,0.279071  "                   TriangleIndices="0 1 2 3 4 5 6 7 8 9 10 11 12 13 14 15 16 17 18 19 20 21 22 23 24 25 26 27 28 29 30 31 32 33 34 35 36 37 38 39 40 41 42 43 44 45 46 47 48 49 50 51 52 53 54 55 56 57 58 59 " />
                    </GeometryModel3D.Geometry>

                    <GeometryModel3D.Material>
                      <DiffuseMaterial>
                        <DiffuseMaterial.Brush>
                          <SolidColorBrush
                            Color="Red"
                            Opacity="1.0"/>
                        </DiffuseMaterial.Brush>
                      </DiffuseMaterial>
                    </GeometryModel3D.Material>

                  </GeometryModel3D>

                </Model3DGroup.Children>
              </Model3DGroup>

            </ModelVisual3D.Content>

          </ModelVisual3D>

        </Viewport3D.Children>

      </Viewport3D>
    </Grid>

</UserControl>
