-
2025-06-05
このクイック スタートでは、 Azure AI Foundry SDK を使用してローカル開発環境を設定する手順について説明します。 プロンプトを記述し、それをアプリ コードの一部として実行し、実行されている LLM 呼び出しをトレースし、LLM の出力に対して基本的な評価を実行します。
ヒント
この記事の残りの部分では、 ハブ ベースのプロジェクトを使用する方法について説明します。 代わりに Foundry プロジェクト を使用する場合は、この記事の上部にある Foundry プロジェクトを選択します。
[前提条件]
- Azure サブスクリプション。 Azure サブスクリプションをお持ちでない場合は、開始する前に無料アカウントを作成してください。
- ハブ ベースのプロジェクト。 Azure AI Foundry を初めて使用していて、ハブ ベースのプロジェクトがない場合は、この記事の上部にある Foundry プロジェクト を選択して、代わりに Foundry プロジェクトを使用します。
開発環境を設定する
次のパッケージをインストールしてください。
pip install azure-ai-projects azure-ai-inference azure-identity
モデルをデプロイする
ヒント
Azure AI Foundry ポータルで 左側のウィンドウをカスタマイズ できるため、これらの手順に示されている項目とは異なる項目が表示される場合があります。 探しているものが表示されない場合は、左側のペインの下部にある… もっと見るを選択してください。
Azure AI Foundry にサインインします。
ハブ ベースのプロジェクトを選択します。 ハブ ベースのプロジェクトがない場合は、この記事の上部にある Foundry プロジェクト を選択して、代わりに Foundry プロジェクトを使用します。
左側のウィンドウから [モデル カタログ ] を選択します。
モデルの一覧から gpt-4o-mini モデルを選択します。 検索バーを使用して見つけることができます。
モデルの詳細ページで、[デプロイ] を選択します。

[デプロイ名] は既定値のままにします。 [デプロイ] を選択します。
モデルがデプロイされたら、[プレイグラウンドで開く] を選択してモデルをテストします。

チャット アプリをビルドする
chat.py という名前のファイルを作成します。 次のコードをコピーしてそれに貼り付けます。
from azure.ai.projects import AIProjectClient
from azure.identity import DefaultAzureCredential

project_connection_string = "<your-connection-string-goes-here>"

project = AIProjectClient.from_connection_string(
    conn_str=project_connection_string, credential=DefaultAzureCredential()
)

chat = project.inference.get_chat_completions_client()
response = chat.complete(
    model="gpt-4o-mini",
    messages=[
        {
            "role": "system",
            "content": "You are an AI assistant that speaks like a techno punk rocker from 2350. Be cool but not too cool. Ya dig?",
        },
        {"role": "user", "content": "Hey, can you help me with my taxes? I'm a freelancer."},
    ],
)

print(response.choices[0].message.content)
接続文字列を挿入する
コードから Azure AI Foundry Models で Azure OpenAI を呼び出すには、プロジェクト接続文字列が必要です。
Azure AI Foundry プレイグラウンドのクイックスタートで作成した Azure AI Foundry プロジェクト内で接続文字列を見つけます。 プロジェクトを開いて、[概要] ページで接続文字列を見つけます。

接続文字列をコピーし、<your-connection-string-goes-here> ファイル内の を置き換えます。
チャット スクリプトを実行する
スクリプトを実行して、モデルからの応答を確認します。
python chat.py
ユーザーによる入力とプロンプト テンプレートからプロンプトを生成する
このスクリプトでは、ハードコーディングされた入力および出力メッセージが使用されます。 実際のアプリでは、クライアント アプリケーションから入力を受け取り、モデルへの内部命令を含むシステム メッセージを生成し、すべてのメッセージで LLM を呼び出します。
クライアント アプリケーションから入力を受け取り、プロンプト テンプレートを使用してシステム メッセージを生成するようにスクリプトを変更しましょう。
応答を出力するスクリプトの最後の行を削除します。
次に、メッセージとコンテキストを受け取り、プロンプト テンプレートを使用してシステム メッセージを生成し、モデルを呼び出す
get_chat_response関数を定義します。 既存の chat.py ファイルに次のコードを追加します。from azure.ai.inference.prompts import PromptTemplate def get_chat_response(messages, context): # create a prompt template from an inline string (using mustache syntax) prompt_template = PromptTemplate.from_string( prompt_template=""" system: You are an AI assistant that speaks like a techno punk rocker from 2350. Be cool but not too cool. Ya dig? Refer to the user by their first name, try to work their last name into a pun. The user's first name is {{first_name}} and their last name is {{last_name}}. """ ) # generate system message from the template, passing in the context as variables system_message = prompt_template.create_messages(data=context) # add the prompt messages to the user messages return chat.complete( model="gpt-4o-mini", messages=system_message + messages, temperature=1, frequency_penalty=0.5, presence_penalty=0.5, )注
プロンプト テンプレートでは mustache 形式が使用されます。
get_chat_response 関数は、FastAPI または Flask アプリへのルートとして簡単に追加でき、フロントエンド Web アプリケーションからこの関数を呼び出すことができます。
次に、フロントエンド アプリケーションからこの関数への情報の受け渡しをシミュレートします。 chat.py ファイルの末尾に次のコードを追加します。 メッセージに自分の名前を入れたりして、自由に遊んでみてください。
if __name__ == "__main__":
    response = get_chat_response(
        messages=[{"role": "user", "content": "what city has the best food in the world?"}],
        context={"first_name": "Jessie", "last_name": "Irwin"},
    )
    print(response.choices[0].message.content)
修正したスクリプトを実行して、この新しい入力を使用してモデルからの応答を確認します。
python chat.py
次のステップ
このクイック スタートでは、 Azure AI Foundry を使用して次の操作を行います。
- プロジェクトを作成する
- モデルをデプロイする
- チャット補完を実行する
- エージェントを作成して実行する
- エージェントにファイルをアップロードする
Azure AI Foundry SDK は、Python、Java、JavaScript、C# などの複数の言語で利用できます。 このクイック スタートでは、これらの各言語の手順について説明します。
ヒント
この記事の残りの部分では、 Foundry プロジェクトの使用方法を示します。 代わりに ハブ ベースのプロジェクト を使用する場合は、この記事の上部にあるハブ ベースのプロジェクトを選択します。
[前提条件]
- Azure サブスクリプション。 Azure サブスクリプションをお持ちでない場合は、開始する前に無料アカウントを作成してください。
- プロジェクトを使用するために必要な適切なアクセス制御を受け取るために、サブスクリプションの 所有者 である必要があります。
重要
この記事で "(プレビュー)" と付記されている項目は、現在、パブリック プレビュー段階です。 このプレビューはサービス レベル アグリーメントなしで提供されており、運用環境ではお勧めしません。 特定の機能はサポート対象ではなく、機能が制限されることがあります。 詳細については、「 Microsoft Azure プレビューの追加使用条件」を参照してください。
プロジェクトとモデルから始める
Azure AI Foundry ポータルにサインインします。
ホーム ページで、 gpt-4o モデルを検索して選択します。

モデルの詳細ページで、[ このモデルを使用する] を選択します。
プロジェクトに使用する名前を入力し、[ 作成] を選択します。
リソースが作成されると、チャットプレイグラウンドに入ります。
環境を設定する
Azure AI Foundry ポータルを使用するためにインストールする必要はありません。
次のパッケージをインストールします。
pip install openai azure-ai-projects azure-identity-
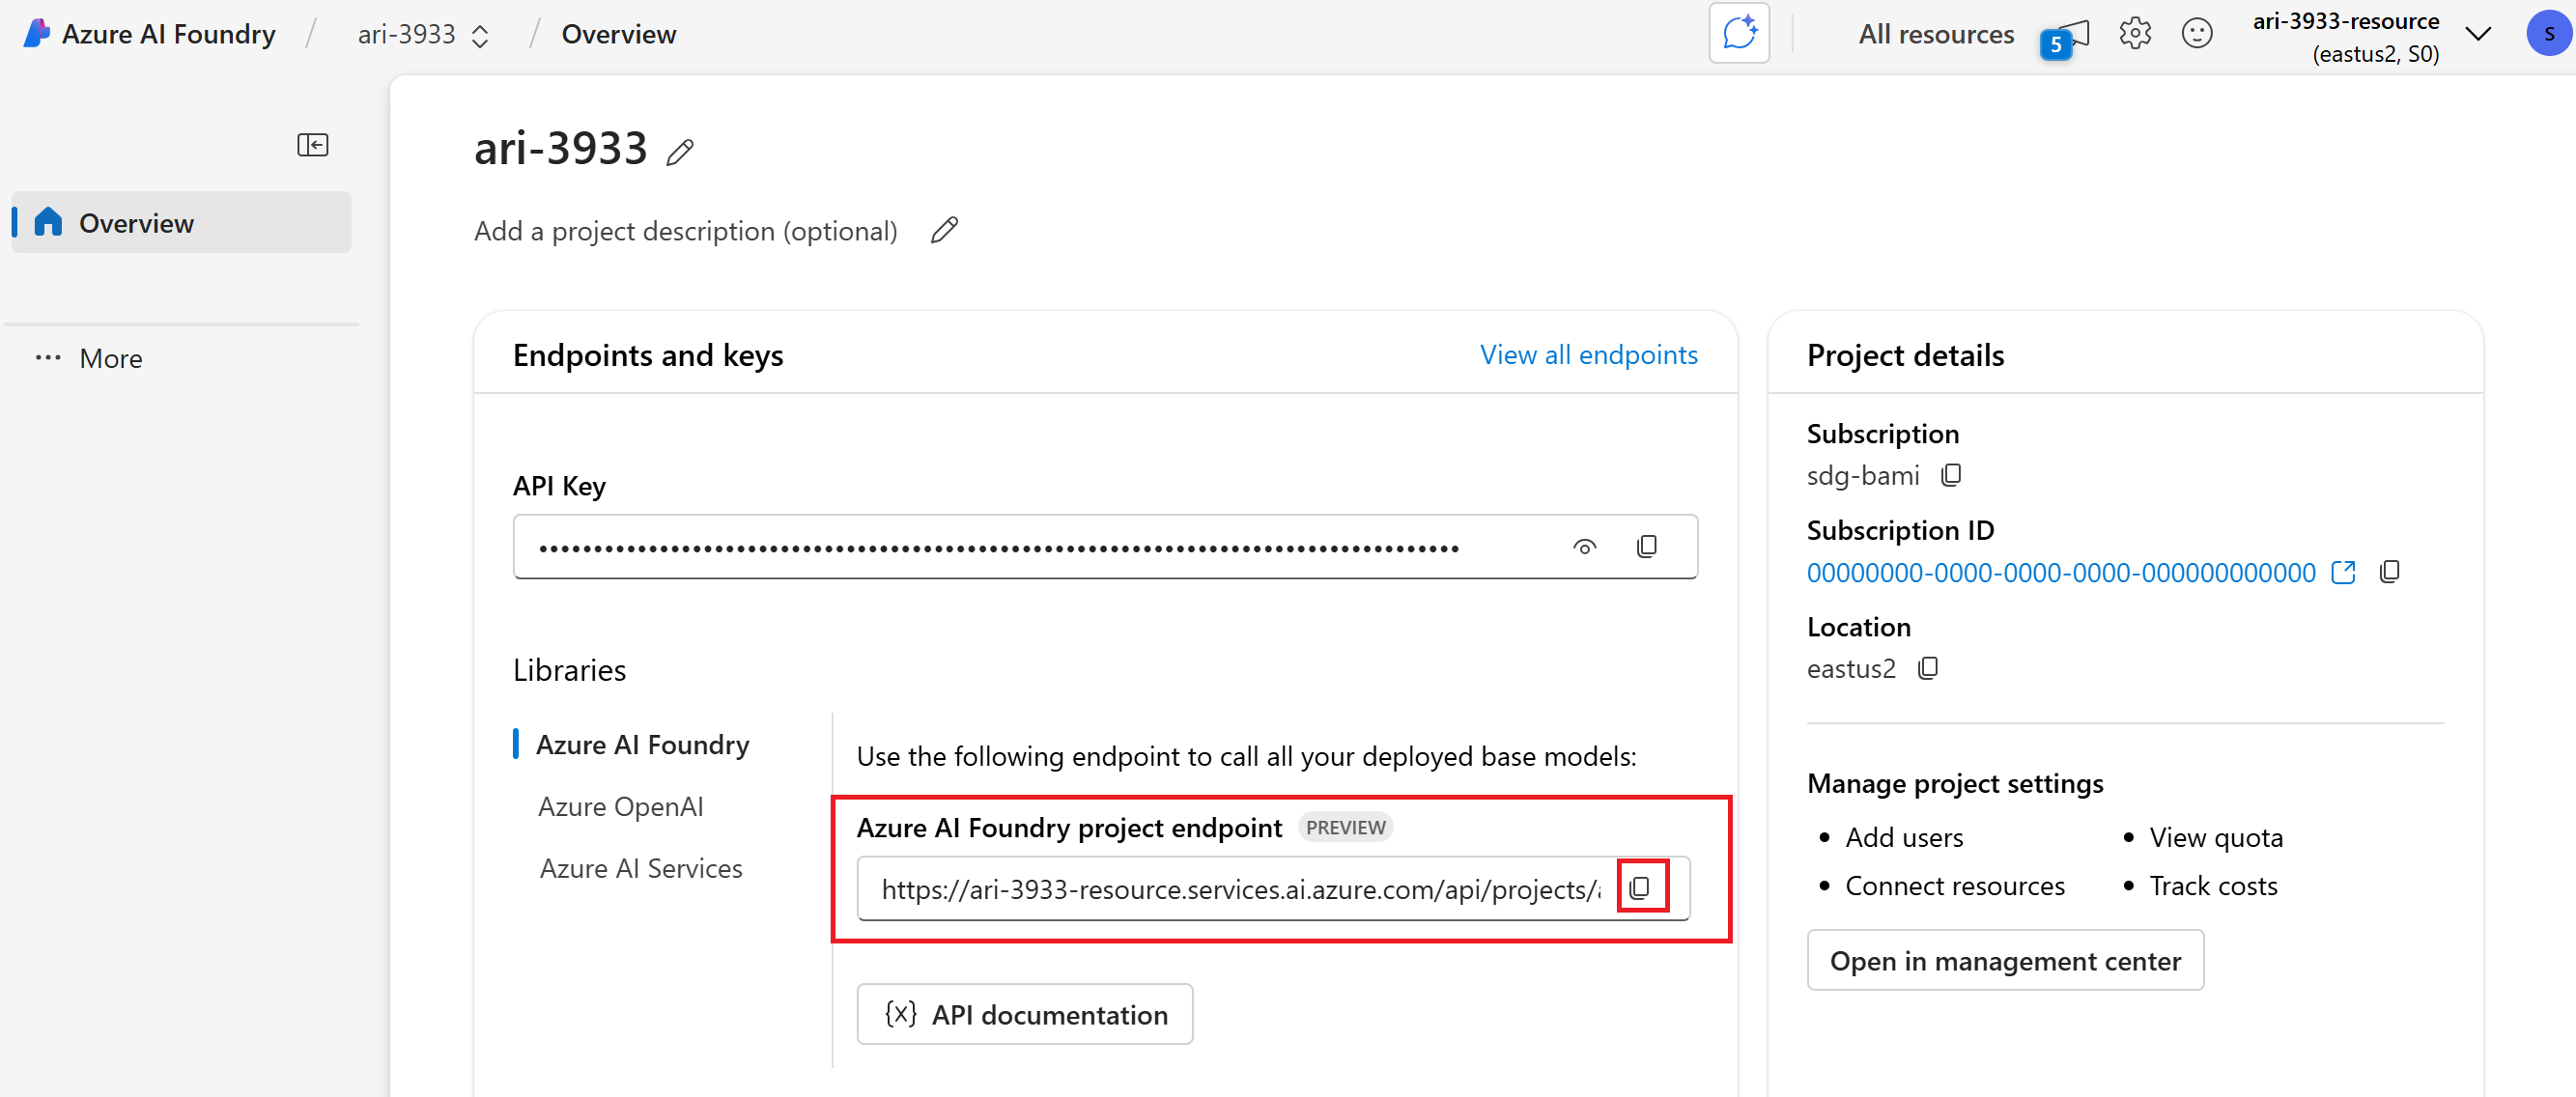
プロジェクトの [概要] セクションで Azure AI Foundry プロジェクト エンドポイントをコピーします。 これはすぐに使用します。
ヒント
Azure AI Foundry プロジェクト エンドポイントが表示されない場合は、ハブ ベースのプロジェクトを使用しています。 (プロジェクト の種類を参照)。 Foundry プロジェクトに切り替えるか、前の手順を使用して作成します。
Python スクリプトを実行する前に、CLI
az login(またはaz login --use-device-code) コマンドを使用して認証を行ってサインインしてください。
注
この記事のすべてのコードは、 GitHub クイック スタートにあります。
-
プロジェクトの [概要] セクションで Azure AI Foundry プロジェクト エンドポイントをコピーします。 これはすぐに使用します。
ヒント
Azure AI Foundry プロジェクト エンドポイントが表示されない場合は、ハブ ベースのプロジェクトを使用しています。 (プロジェクト の種類を参照)。 Foundry プロジェクトに切り替えるか、前の手順を使用して作成します。
スクリプトで使用する環境変数を設定します。
# Azure AI Foundry Endpoint
AZURE_ENDPOINT=your_endpoint_here

# Azure AI Foundry Model Deployment Name
AZURE_DEPLOYMENT=your_deployment_name_here

# Project ID (Optional - will be generated if not provided)
PROJECT_ID=your_project_id_here
MODEL_DEPLOYMENT_NAME=gpt-4o

# Note: This sample uses DefaultAzureCredential for authentication
# Please ensure you are logged in with Azure CLI using 'az login'
# For more authentication options, see: https://learn.microsoft.com/en-us/java/api/overview/azure/identity-readme?view=azure-java-stable
Java スクリプトを実行する前に、CLI
az login(またはaz login --use-device-code) コマンドを使用して認証を行ってください。POM.XMLを Java IDE にダウンロードします。
注
この記事のすべてのコードは、 GitHub クイック スタートにあります。
JavaScript スクリプトを実行する前に、CLI
az login(またはaz login --use-device-code) コマンドを使用して認証を行ってください。package.jsonをダウンロード.
npm installを使用してパッケージをインストールする-
プロジェクトの [概要] セクションで Azure AI Foundry プロジェクト エンドポイントをコピーします。 これはすぐに使用します。
ヒント
Azure AI Foundry プロジェクト エンドポイントが表示されない場合は、ハブ ベースのプロジェクトを使用しています。 (プロジェクト の種類を参照)。 Foundry プロジェクトに切り替えるか、前の手順を使用して作成します。
スクリプトで使用する環境変数を設定します。
MODEL_DEPLOYMENT_NAME=gpt-4o
PROJECT_ENDPOINT=https://<your-foundry-resource-name>.services.ai.azure.com/api/projects/<your-foundry-project-name>
注
この記事のすべてのコードは、 GitHub クイック スタートにあります。
パッケージをインストールします。
.NET プロジェクトで Azure AI サービスを操作するには、いくつかの NuGet パッケージをインストールする必要があります。 統合ターミナルで .NET CLI を使用して NuGet パッケージを追加します。
# Add Azure AI SDK packages dotnet add package Azure.Identity dotnet add package Azure.AI.Projects dotnet add package Azure.AI.Agents.Persistent dotnet add package Azure.AI.Inference-
プロジェクトの [概要] セクションで Azure AI Foundry プロジェクト エンドポイントをコピーします。 これはすぐに使用します。
ヒント
Azure AI Foundry プロジェクト エンドポイントが表示されない場合は、ハブ ベースのプロジェクトを使用しています。 (プロジェクト の種類を参照)。 Foundry プロジェクトに切り替えるか、前の手順を使用して作成します。
スクリプトで使用する環境変数を設定します。
AZURE_AI_ENDPOINT=https://your.services.ai.azure.com/api/projects/project
AZURE_AI_MODEL=your_model_name
C# スクリプトを実行する前に、必ず CLI
az login(またはaz login --use-device-code) コマンドを使用して認証を行ってください。
注
この記事のすべてのコードは、 GitHub クイック スタートにあります。
次のコマンドを実行する前に、必ず CLI
az login(またはaz login --use-device-code) コマンドを使用してサインインして認証してください。一時的なアクセス トークンを取得します。 有効期限は 60 分から 90 分です。その後、更新する必要があります。
az account get-access-token --scope https://ai.azure.com/.default結果を環境変数
AZURE_AI_AUTH_TOKENとして保存します。
注
この記事のすべてのコードは、 GitHub クイック スタートにあります。
チャット補完を実行する
チャットの完了は、AI アプリケーションの基本的な構成要素です。 チャットの完了を使用すると、メッセージの一覧を送信し、モデルから応答を取得できます。
- チャットプレイグラウンドで、プロンプトに入力し、[ 送信 ] ボタンを選択します。
- モデルは、[応答] ウィンドウで 応答 を返します。
エンドポイントを次のコードの endpoint に置き換える:
from azure.ai.projects import AIProjectClient
from azure.identity import DefaultAzureCredential

project = AIProjectClient(
    endpoint="https://your-foundry-resource-name.ai.azure.com/api/projects/project-name",
    credential=DefaultAzureCredential(),
)

models = project.inference.get_azure_openai_client(api_version="2024-10-21")
response = models.chat.completions.create(
    model="gpt-4o",
    messages=[
        {"role": "system", "content": "You are a helpful writing assistant"},
        {"role": "user", "content": "Write me a poem about flowers"},
    ],
)

print(response.choices[0].message.content)
package com.azure.ai.foundry.samples;

import com.azure.ai.foundry.samples.utils.ConfigLoader;
import com.azure.ai.projects.ProjectsClient;
import com.azure.ai.projects.ProjectsClientBuilder;
import com.azure.ai.projects.models.chat.ChatClient;
import com.azure.ai.projects.models.chat.ChatCompletion;
import com.azure.ai.projects.models.chat.ChatCompletionOptions;
import com.azure.ai.projects.models.chat.ChatMessage;
import com.azure.ai.projects.models.chat.ChatRole;
import com.azure.identity.DefaultAzureCredential;
import com.azure.identity.DefaultAzureCredentialBuilder;
import com.azure.ai.projects.models.chat.ChatCompletionResponse;


import java.util.Arrays;
import java.util.List;

/**
 * This sample demonstrates how to use the chat completion API with the Azure AI Foundry SDK.
 *
 * Chat completions allow you to have interactive, conversational interactions with AI models
 * by providing a list of messages and receiving AI-generated responses that maintain context
 * across the conversation.
 *
 * This sample shows:
 * 1. How to authenticate with Azure AI Foundry using DefaultAzureCredential
 * 2. How to create a chat client for a specific model deployment
 * 3. How to structure a conversation with system and user messages
 * 4. How to configure and send a chat completion request
 * 5. How to process and display the AI-generated response
 *
 * Prerequisites:
 * - An Azure account with access to Azure AI Foundry
 * - Azure CLI installed and logged in ('az login')
 * - Environment variables set in .env file (AZURE_ENDPOINT, AZURE_DEPLOYMENT)
 */
public class ChatCompletionSample {
    public static void main(String[] args) {
        // Load configuration values from the .env file
        // These include the service endpoint and the deployment name of the model to use
        String endpoint = ConfigLoader.getAzureEndpoint();
        String deploymentName = ConfigLoader.getAzureDeployment();

        // Get DefaultAzureCredential for authentication
        // This uses the most appropriate authentication method based on the environment
        // For local development, it will use your Azure CLI login credentials
        DefaultAzureCredential credential = ConfigLoader.getDefaultCredential();

        // Create a projects client to interact with Azure AI Foundry services
        // The client requires an authentication credential and an endpoint
        ProjectsClient client = new ProjectsClientBuilder()
            .credential(credential)
            .endpoint(endpoint)
            .buildClient();

        // Get a chat client for the specified model deployment
        // This client provides access to chat completion functionality
        ChatClient chatClient = client.getChatClient(deploymentName);

        // Create a list of chat messages to form the conversation
        // This includes a system message to set the assistant's behavior
        // and a user message containing the user's question or prompt
        List<ChatMessage> messages = Arrays.asList(
            new ChatMessage(ChatRole.SYSTEM, "You are a helpful assistant."),
            new ChatMessage(ChatRole.USER, "Tell me about Azure AI Foundry.")
        );

        // Configure chat completion options including the messages, temperature, and token limit
        // - Temperature controls randomness: lower values (like 0.2) give more focused responses,
        //   higher values (like 0.8) give more creative responses
        // - MaxTokens limits the length of the response
        ChatCompletionOptions options = new ChatCompletionOptions(messages)
            .setTemperature(0.7)  // Balanced between deterministic and creative
            .setMaxTokens(800);   // Limit response length

        System.out.println("Sending chat completion request...");

        // Send the request and get the AI-generated completion
        ChatCompletion completion = chatClient.getChatCompletion(options);

        // Display the response
        System.out.println("\nResponse from assistant:");
        System.out.println(completion.getChoices().get(0).getMessage().getContent());

        // Display usage statistics
        System.out.println("\nUsage Statistics:");
        System.out.println("Prompt Tokens: " + completion.getUsage().getPromptTokens());
        System.out.println("Completion Tokens: " + completion.getUsage().getCompletionTokens());
        System.out.println("Total Tokens: " + completion.getUsage().getTotalTokens());
    }
}
// Get the Azure AI endpoint and deployment name from environment variables
const endpoint = process.env.PROJECT_ENDPOINT;
const deployment = process.env.MODEL_DEPLOYMENT_NAME || 'gpt-4o';

// Create an Azure OpenAI Client
const project = new AIProjectClient(endpoint, new DefaultAzureCredential());
const client = await project.inference.azureOpenAI({
    // The API version should match the version of the Azure OpenAI resource
    apiVersion: "2024-12-01-preview"
});

// Create a chat completion
const chatCompletion = await client.chat.completions.create({
    model: deployment,
    messages: [
        { role: "system", content: "You are a helpful writing assistant" },
        { role: "user", content: "Write me a poem about flowers" },
    ],
});
console.log(`\n==================== 🌷 COMPLETIONS POEM ====================\n`);
console.log(chatCompletion.choices[0].message.content);
using Azure;
using Azure.Identity;
using Azure.AI.Projects;
using Azure.AI.Inference;

var projectEndpoint = new Uri(System.Environment.GetEnvironmentVariable("AZURE_AI_ENDPOINT"));
var modelDeploymentName = System.Environment.GetEnvironmentVariable("AZURE_AI_MODEL");
var credential = new DefaultAzureCredential();

AIProjectClient client = new AIProjectClient(projectEndpoint, credential);

ChatCompletionsClient chatClient = client.GetChatCompletionsClient();

var requestOptions = new ChatCompletionsOptions()
{
    Messages =
        {
            new ChatRequestSystemMessage("You are a helpful assistant."),
            new ChatRequestUserMessage("How many feet are in a mile?"),
        },
    Model = modelDeploymentName
};
Response<ChatCompletions> response = chatClient.Complete(requestOptions);
Console.WriteLine(response.Value.Content);
YOUR-FOUNDRY-RESOURCE-NAMEを実際の値に置き換えます。
curl --request POST --url 'https://YOUR-FOUNDRY-RESOURCE-NAME.services.ai.azure.com/openai/deployments/gpt-4o/chat/completions?api-version=2024-10-21' \
-h 'authorization: Bearer $AZURE_AI_AUTH_TOKEN' \
-h 'content-type: application/json' \
-d '{
        "messages": [
            {"role": "system",
            "content": "You are a helpful writing assistant"},
            {"role": "user",
            "content": "Write me a poem about flowers"}
        ],
        "model": "gpt-4o"
    }'
エージェントとのチャット
エージェントには、ツールを使用して強力な機能があります。 エージェントとチャットすることから始めます。
エージェントを試す準備ができたら、既定のエージェントが自動的に作成されます。 このエージェントとチャットするには:
- 左側のウィンドウで、[ プレイグラウンド] を選択します。
- [エージェント] プレイグラウンド カードで、[Let's go] を選択します。
- 「あなたは便利なライティング アシスタントです」などの手順を追加します。
- 「花に関する詩を書いてください」など、エージェントとチャットを始めます。
エンドポイントを次のコードの endpoint に置き換える:
from azure.ai.projects import AIProjectClient
from azure.identity import DefaultAzureCredential
from azure.ai.agents.models import ListSortOrder, FilePurpose

project = AIProjectClient(
    endpoint="https://your-foundry-resource-name.ai.azure.com/api/projects/project-name",
    credential=DefaultAzureCredential(),
)

agent = project.agents.create_agent(
    model="gpt-4o",
    name="my-agent",
    instructions="You are a helpful writing assistant")

thread = project.agents.threads.create()
message = project.agents.messages.create(
    thread_id=thread.id,
    role="user",
    content="Write me a poem about flowers")

run = project.agents.runs.create_and_process(thread_id=thread.id, agent_id=agent.id)
if run.status == "failed":
    # Check if you got "Rate limit is exceeded.", then you want to get more quota
    print(f"Run failed: {run.last_error}")

# Get messages from the thread
messages = project.agents.messages.list(thread_id=thread.id)

# Get the last message from the sender
messages = project.agents.messages.list(thread_id=thread.id, order=ListSortOrder.ASCENDING)
for message in messages:
    if message.run_id == run.id and message.text_messages:
        print(f"{message.role}: {message.text_messages[-1].text.value}")

# Delete the agent once done
project.agents.delete_agent(agent.id)
print("Deleted agent")
package com.azure.ai.foundry.samples;

import com.azure.ai.foundry.samples.utils.ConfigLoader;
import com.azure.ai.projects.ProjectsClient;
import com.azure.ai.projects.ProjectsClientBuilder;
import com.azure.ai.projects.models.agent.Agent;
import com.azure.ai.projects.models.agent.AgentClient;
import com.azure.ai.projects.models.agent.AgentMessage;
import com.azure.ai.projects.models.agent.AgentOptions;
import com.azure.ai.projects.models.agent.AgentRole;
import com.azure.ai.projects.models.agent.AgentRun;
import com.azure.ai.projects.models.agent.AgentRunStatus;
import com.azure.ai.projects.models.agent.AgentThread;
import com.azure.identity.DefaultAzureCredential;

import java.util.List;

/**
 * This sample demonstrates how to create and run an agent using the Azure AI Foundry SDK.
 *
 * Agents in Azure AI Foundry are specialized AI assistants that can be customized with
 * specific instructions and capabilities to perform particular tasks. They maintain conversation
 * history in threads and can be deployed for various use cases.
 *
 * This sample shows:
 * 1. How to authenticate with Azure AI Foundry using DefaultAzureCredential
 * 2. How to create an agent with specific instructions and capabilities
 * 3. How to create a thread for conversation with the agent
 * 4. How to send messages to the agent and run it
 * 5. How to wait for the agent to complete its execution
 * 6. How to retrieve and display the agent's response
 *
 * Prerequisites:
 * - An Azure account with access to Azure AI Foundry
 * - Azure CLI installed and logged in ('az login')
 * - Environment variables set in .env file (AZURE_ENDPOINT, AZURE_DEPLOYMENT)
 */
public class AgentSample {
    public static void main(String[] args) {
        // Load configuration values from the .env file
        // These include the service endpoint and the deployment name of the model to use
        String endpoint = ConfigLoader.getAzureEndpoint();
        String deploymentName = ConfigLoader.getAzureDeployment();

        // Get DefaultAzureCredential for authentication
        // This uses the most appropriate authentication method based on the environment
        // For local development, it will use your Azure CLI login credentials
        DefaultAzureCredential credential = ConfigLoader.getDefaultCredential();

        // Create a projects client to interact with Azure AI Foundry services
        // The client requires an authentication credential and an endpoint
        ProjectsClient client = new ProjectsClientBuilder()
            .credential(credential)
            .endpoint(endpoint)
            .buildClient();

        // Get an agent client, which provides operations for working with AI agents
        // This includes creating, configuring, and running agents
        AgentClient agentClient = client.getAgentClient();

        // Create a new agent with specialized capabilities and instructions
        // The agent is configured with a name, description, instructions, and underlying model
        System.out.println("Creating agent...");
        Agent agent = agentClient.createAgent(new AgentOptions()
            .setName("Research Assistant")                       // Descriptive name for the agent
            .setDescription("An agent that helps with research tasks")  // Brief description of the agent's purpose
            .setInstructions("You are a research assistant. Help users find information and summarize content.") // Detailed instructions for the agent's behavior
            .setModel(deploymentName));                          // The underlying AI model to power the agent

        System.out.println("Agent created: " + agent.getName() + " (ID: " + agent.getId() + ")");

        // Create a thread for the conversation with the agent
        // Threads maintain conversation history and state across multiple interactions
        System.out.println("Creating thread...");
        AgentThread thread = agentClient.createThread();
        System.out.println("Thread created: " + thread.getId());

        // Create a user message
        AgentMessage userMessage = new AgentMessage()
            .setRole(AgentRole.USER)
            .setContent("Explain what cloud computing is and list three benefits.");

        // Run the agent
        System.out.println("Running agent...");
        AgentRun run = agentClient.createRun(thread.getId(), agent.getId(), userMessage);
        System.out.println("Run created: " + run.getId());

        // Wait for the run to complete
        AgentRun completedRun = waitForRunCompletion(agentClient, thread.getId(), run.getId());
        System.out.println("Run completed with status: " + completedRun.getStatus());

        // Get messages from the thread
        List<AgentMessage> messages = agentClient.getMessages(thread.getId());

        // Display the assistant's response
        System.out.println("\nConversation:");
        for (AgentMessage message : messages) {
            System.out.println(message.getRole() + ": " + message.getContent());
        }
    }

    private static AgentRun waitForRunCompletion(AgentClient agentClient, String threadId, String runId) {
        AgentRun run = agentClient.getRun(threadId, runId);

        while (run.getStatus() == AgentRunStatus.QUEUED || run.getStatus() == AgentRunStatus.IN_PROGRESS) {
            try {
                System.out.println("Run status: " + run.getStatus() + " - waiting...");
                Thread.sleep(1000); // Wait for 1 second before checking again
                run = agentClient.getRun(threadId, runId);
            } catch (InterruptedException e) {
                Thread.currentThread().interrupt();
                throw new RuntimeException("Thread was interrupted", e);
            }
        }

        return run;
    }
}
const endpoint = process.env.PROJECT_ENDPOINT;
const deployment = process.env.MODEL_DEPLOYMENT_NAME || 'gpt-4o';
const client = new AIProjectClient(endpoint, new DefaultAzureCredential());

// Create an Agent
const agent = await client.agents.createAgent(deployment, {
    name: 'my-agent',
    instructions: 'You are a helpful agent'
});
console.log(`\n==================== 🕵️  POEM AGENT ====================`);

// Create a thread and message
const thread = await client.agents.threads.create();
const prompt = 'Write me a poem about flowers';
console.log(`\n---------------- 📝 User Prompt ---------------- \n${prompt}`);
await client.agents.messages.create(thread.id, 'user', prompt);

// Create run
let run = await client.agents.runs.create(thread.id, agent.id);

// Wait for run to complete
console.log(`\n---------------- 🚦 Run Status ----------------`);
while (['queued', 'in_progress', 'requires_action'].includes(run.status)) {
    // Avoid adding a lot of messages to the console
    await new Promise((resolve) => setTimeout(resolve, 1000));
    run = await client.agents.runs.get(thread.id, run.id);
    console.log(`Run status: ${run.status}`);
}

console.log('\n---------------- 📊 Token Usage ----------------');
console.table([run.usage]);

const messagesIterator = await client.agents.messages.list(thread.id);
const assistantMessage = await getAssistantMessage(messagesIterator);
console.log('\n---------------- 💬 Response ----------------');
printAssistantMessage(assistantMessage);

// Clean up
console.log(`\n---------------- 🧹 Clean Up Poem Agent ----------------`);
await client.agents.deleteAgent(agent.id);
console.log(`Deleted Agent, Agent ID: ${agent.id}`);
using Azure;
using Azure.Identity;
using Azure.AI.Agents.Persistent;

// Creating the Client for agents
var projectEndpoint = System.Environment.GetEnvironmentVariable("AZURE_AI_ENDPOINT");
var modelDeploymentName = System.Environment.GetEnvironmentVariable("AZURE_AI_MODEL");
PersistentAgentsClient client = new(projectEndpoint, new DefaultAzureCredential());

// Create an Agent with toolResources and process Agent run
PersistentAgent agent = client.Administration.CreateAgent(
        model: modelDeploymentName,
        name: "SDK Test Agent - Tutor",
        instructions: "You are a personal electronics tutor. Write and run code to answer questions.",
        tools: new List<ToolDefinition> { new CodeInterpreterToolDefinition() });

// Create thread for communication
PersistentAgentThread thread = client.Threads.CreateThread();

// Create message to thread
PersistentThreadMessage messageResponse = client.Messages.CreateMessage(
    thread.Id,
    MessageRole.User,
    "I need to solve the equation `3x + 11 = 14`. Can you help me?");

// Run the Agent
ThreadRun run = client.Runs.CreateRun(thread, agent);

// Wait for the run to complete
do
{
    Thread.Sleep(TimeSpan.FromMilliseconds(500));
    run = client.Runs.GetRun(thread.Id, run.Id);
}
while (run.Status == RunStatus.Queued
    || run.Status == RunStatus.InProgress);
Pageable<PersistentThreadMessage> messages = client.Messages.GetMessages(
    threadId: thread.Id,
    order: ListSortOrder.Ascending
);
// Print the messages in the thread
WriteMessages(messages);

// Delete the thread and agent after use
client.Threads.DeleteThread(thread.Id);
client.Administration.DeleteAgent(agent.Id);

// Temporary function to use a list of messages in the thread and write them to the console.
static void WriteMessages(IEnumerable<PersistentThreadMessage> messages)
{
    foreach (PersistentThreadMessage threadMessage in messages)
    {
        Console.Write($"{threadMessage.CreatedAt:yyyy-MM-dd HH:mm:ss} - {threadMessage.Role,10}: ");
        foreach (MessageContent contentItem in threadMessage.ContentItems)
        {
            if (contentItem is MessageTextContent textItem)
            {
                Console.Write(textItem.Text);
            }
            else if (contentItem is MessageImageFileContent imageFileItem)
            {
                Console.Write($"<image from ID: {imageFileItem.FileId}");
            }
            Console.WriteLine();
        }
    }
}
YOUR-FOUNDRY-RESOURCE-NAMEとYOUR-PROJECT-NAMEを実際の値に置き換えます。
# Create agent
curl --request POST --url "https://YOUR-FOUNDRY-RESOURCE-NAME.services.ai.azure.com/api/projects/YOUR-PROJECT-NAME/assistants?api-version=v1" \
    -h "authorization: Bearer $AZURE_AI_AUTH_TOKEN" \
    -h "content-type: application/json" \
    -d '{
            "model": "gpt-4o",
            "name": "my-agent",
            "instructions": "You are a helpful writing assistant"
        }'
#Lets say agent ID created is asst_123456789. Use this to run the agent

# Create thread
curl --request POST --url 'https://YOUR-FOUNDRY-RESOURCE-NAME.services.ai.azure.com/api/projects/YOUR-PROJECT-NAME/threads?api-version=v1' \
    -h 'authorization: Bearer $AZURE_AI_AUTH_TOKEN' \
    -h 'content-type: application/json'

#Lets say thread ID created is thread_123456789. Use this in the next step

# Create message using thread ID
curl --request POST --url 'https://YOUR-FOUNDRY-RESOURCE-NAME.services.ai.azure.com/api/projects/YOUR-PROJECT-NAME/threads/thread_123456789/messages?api-version=v1' \
    -h 'authorization: Bearer $AZURE_AI_AUTH_TOKEN' \
    -h 'content-type: application/json' \
    -d '{
            "role": "user",
            "content": "Write me a poem about flowers"
        }'

# Run thread with the agent - use both agent id and thread id
curl --request POST --url 'https://YOUR-FOUNDRY-RESOURCE-NAME.services.ai.azure.com/api/projects/YOUR-PROJECT-NAME/threads/thread_123456789/runs?api-version=v1' \
    -h 'authorization: Bearer $AZURE_AI_AUTH_TOKEN' \
    -h 'content-type: application/json' \
    --data '{
        "assistant_id": "asst_123456789"
    }'

# List the messages in the thread using thread ID
curl --request GET --url 'https://YOUR-FOUNDRY-RESOURCE-NAME.services.ai.azure.com/api/projects/YOUR-PROJECT-NAME/threads/thread_123456789/messages?api-version=v1' \
    -h 'authorization: Bearer $AZURE_AI_AUTH_TOKEN' \
    -h 'content-type: application/json'

# Delete agent once done using agent id
curl --request DELETE --url 'https://YOUR-FOUNDRY-RESOURCE-NAME.services.ai.azure.com/api/projects/YOUR-PROJECT-NAME/assistants/asst_123456789?api-version=v1' \
    -h 'authorization: Bearer $AZURE_AI_AUTH_TOKEN' \
    -h 'content-type: application/json'
エージェントにファイルを追加する
次に、知識の取得を可能にするファイル検索ツールを追加しましょう。
- product_info_1.md をダウンロードしてエージェントに渡します。
- エージェントの [セットアップ] ウィンドウで、必要に応じて下にスクロールして ナレッジを見つけます。
- [] を選択し、[] を追加します。
- [ ファイル] を選択して 、product_info_1.md ファイルをアップロードします。
- [ファイルの追加] で [ローカル ファイルの選択] を選択します。
- [ アップロードして保存] を選択します。
- "You are a helpful assistant and can search information from uploaded files" (あなたは役に立つアシスタントであり、アップロードされたファイルから情報を検索できます) などのエージェントの指示を変更します。
- 何か質問をしてください。たとえば、「こんにちは、Contosoの製品について何を知っていますか?」
- さらにファイルを追加するには、AgentVectorStore で ... を選択し、[ 管理] を選択します。
エンドポイントを次のコードの endpoint に置き換える:
from azure.ai.projects import AIProjectClient
from azure.identity import DefaultAzureCredential
from azure.ai.agents.models import ListSortOrder, FileSearchTool

project = AIProjectClient(
    endpoint="https://your-foundry-resource-name.ai.azure.com/api/projects/project-name",
    credential=DefaultAzureCredential(),
)

# Upload file and create vector store
file = project.agents.files.upload(file_path="./product_info_1.md", purpose=FilePurpose.AGENTS)
vector_store = project.agents.vector_stores.create_and_poll(file_ids=[file.id], name="my_vectorstore")

# Create file search tool and agent
file_search = FileSearchTool(vector_store_ids=[vector_store.id])
agent = project.agents.create_agent(
    model="gpt-4o",
    name="my-assistant",
    instructions="You are a helpful assistant and can search information from uploaded files",
    tools=file_search.definitions,
    tool_resources=file_search.resources,
)

# Create thread and process user message
thread = project.agents.threads.create()
project.agents.messages.create(thread_id=thread.id, role="user", content="Hello, what Contoso products do you know?")
run = project.agents.runs.create_and_process(thread_id=thread.id, agent_id=agent.id)

# Handle run status
if run.status == "failed":
    print(f"Run failed: {run.last_error}")

# Print thread messages
messages = project.agents.messages.list(thread_id=thread.id, order=ListSortOrder.ASCENDING)
for message in messages:
    if message.run_id == run.id and message.text_messages:
        print(f"{message.role}: {message.text_messages[-1].text.value}")

# Cleanup resources
project.agents.vector_stores.delete(vector_store.id)
project.agents.files.delete(file_id=file.id)
project.agents.delete_agent(agent.id)
package com.azure.ai.foundry.samples;

import com.azure.ai.foundry.samples.utils.ConfigLoader;
import com.azure.ai.projects.ProjectsClient;
import com.azure.ai.projects.ProjectsClientBuilder;
import com.azure.ai.projects.models.agent.Agent;
import com.azure.ai.projects.models.agent.AgentClient;
import com.azure.ai.projects.models.agent.AgentMessage;
import com.azure.ai.projects.models.agent.AgentOptions;
import com.azure.ai.projects.models.agent.AgentRole;
import com.azure.ai.projects.models.agent.AgentRun;
import com.azure.ai.projects.models.agent.AgentRunStatus;
import com.azure.ai.projects.models.agent.AgentThread;
import com.azure.ai.projects.models.agent.FileTool;
import com.azure.ai.projects.models.file.File;
import com.azure.ai.projects.models.file.FileClient;
import com.azure.identity.DefaultAzureCredential;

import java.io.IOException;
import java.nio.file.Files;
import java.nio.file.Path;
import java.util.List;

/**
 * This sample demonstrates how to create an agent with file search capability using the Azure AI Foundry SDK.
 *
 * File search agents can analyze and extract information from documents, allowing users to ask
 * questions about the content of those documents. This extends the capabilities of regular agents
 * by giving them access to specific information contained in files.
 *
 * This sample shows:
 * 1. How to authenticate with Azure AI Foundry using DefaultAzureCredential
 * 2. How to create and upload a sample document
 * 3. How to create an agent with file search capabilities
 * 4. How to configure the agent with access to specific files
 * 5. How to run the agent and ask questions about the document content
 * 6. How to retrieve and display the agent's responses
 *
 * Use cases for file search agents include:
 * - Document analysis and summarization
 * - Question answering from technical documentation
 * - Data extraction from structured files
 * - Research assistance across multiple documents
 *
 * Prerequisites:
 * - An Azure account with access to Azure AI Foundry
 * - Azure CLI installed and logged in ('az login')
 * - Environment variables set in .env file (AZURE_ENDPOINT, AZURE_DEPLOYMENT)
 */
public class FileSearchAgentSample {
    public static void main(String[] args) {
        // Load configuration values from the .env file
        // These include the service endpoint and the deployment name of the model to use
        String endpoint = ConfigLoader.getAzureEndpoint();
        String deploymentName = ConfigLoader.getAzureDeployment();

        // Get DefaultAzureCredential for authentication
        // This uses the most appropriate authentication method based on the environment
        // For local development, it will use your Azure CLI login credentials
        DefaultAzureCredential credential = ConfigLoader.getDefaultCredential();

        // Create a projects client to interact with Azure AI Foundry services
        // The client requires an authentication credential and an endpoint
        ProjectsClient client = new ProjectsClientBuilder()
            .credential(credential)
            .endpoint(endpoint)
            .buildClient();

        try {
            // Create a sample document containing information about cloud computing
            // In a real application, you would use your own existing documents
            Path tempFile = createSampleDocument();

            // Get a file client to handle file operations
            // This is used to upload files that the agent will search through
            FileClient fileClient = client.getFileClient();

            // Upload the file to Azure AI Foundry
            // The uploaded file will be available for the agent to search and analyze
            System.out.println("Uploading file: " + tempFile);
            File uploadedFile = fileClient.uploadFile(tempFile.toString());
            System.out.println("File uploaded with ID: " + uploadedFile.getId());

            // Get an agent client
            AgentClient agentClient = client.getAgentClient();

            // Create an agent with file search capability
            System.out.println("Creating agent with file search capability...");
            Agent agent = agentClient.createAgent(new AgentOptions()
                .setName("Document Assistant")
                .setDescription("An agent that helps with document searching")
                .setInstructions("You are a document assistant. Help users find information in their documents.")
                .setModel(deploymentName)
                .addTool(new FileTool()
                    .addFile(uploadedFile.getId())));

            System.out.println("Agent created: " + agent.getName() + " (ID: " + agent.getId() + ")");

            // Create a thread for the conversation
            System.out.println("Creating thread...");
            AgentThread thread = agentClient.createThread();
            System.out.println("Thread created: " + thread.getId());

            // Create a user message
            AgentMessage userMessage = new AgentMessage()
                .setRole(AgentRole.USER)
                .setContent("Find and list the benefits of cloud computing from my document.");

            // Run the agent
            System.out.println("Running agent...");
            AgentRun run = agentClient.createRun(thread.getId(), agent.getId(), userMessage);
            System.out.println("Run created: " + run.getId());

            // Wait for the run to complete
            AgentRun completedRun = waitForRunCompletion(agentClient, thread.getId(), run.getId());
            System.out.println("Run completed with status: " + completedRun.getStatus());

            // Get messages from the thread
            List<AgentMessage> messages = agentClient.getMessages(thread.getId());

            // Display the assistant's response
            System.out.println("\nConversation:");
            for (AgentMessage message : messages) {
                System.out.println(message.getRole() + ": " + message.getContent());
            }

            // Clean up the temporary file
            Files.deleteIfExists(tempFile);

        } catch (IOException e) {
            System.err.println("Error working with files: " + e.getMessage());
            e.printStackTrace();
        }
    }

    private static Path createSampleDocument() throws IOException {
        String content = "# Cloud Computing Overview\n\n" +
                "Cloud computing is the delivery of computing services—including servers, storage, databases, networking, software, analytics, and intelligence—over the Internet ("the cloud") to offer faster innovation, flexible resources, and economies of scale.\n\n" +
                "## Benefits of Cloud Computing\n\n" +
                "1. **Cost Savings**: Cloud computing eliminates the capital expense of buying hardware and software and setting up and running on-site data centers.\n\n" +
                "2. **Scalability**: Cloud services can be scaled up or down based on demand, providing businesses with flexibility as their needs change.\n\n" +
                "3. **Performance**: The biggest cloud computing services run on a worldwide network of secure data centers, which are regularly upgraded to the latest generation of fast and efficient computing hardware.\n\n" +
                "4. **Reliability**: Cloud computing makes data backup, disaster recovery, and business continuity easier and less expensive because data can be mirrored at multiple redundant sites on the cloud provider's network.\n\n" +
                "5. **Security**: Many cloud providers offer a broad set of policies, technologies, and controls that strengthen your security posture overall.";

        Path tempFile = Files.createTempFile("cloud-computing-info-", ".md");
        Files.writeString(tempFile, content);
        return tempFile;
    }

    private static AgentRun waitForRunCompletion(AgentClient agentClient, String threadId, String runId) {
        AgentRun run = agentClient.getRun(threadId, runId);

        while (run.getStatus() == AgentRunStatus.QUEUED || run.getStatus() == AgentRunStatus.IN_PROGRESS) {
            try {
                System.out.println("Run status: " + run.getStatus() + " - waiting...");
                Thread.sleep(1000); // Wait for 1 second before checking again
                run = agentClient.getRun(threadId, runId);
            } catch (InterruptedException e) {
                Thread.currentThread().interrupt();
                throw new RuntimeException("Thread was interrupted", e);
            }
        }

        return run;
    }
}
// Upload a file named product_info_1.md
console.log(`\n==================== 🕵️  FILE AGENT ====================`);
const __dirname = path.dirname(fileURLToPath(import.meta.url));
const filePath = path.join(__dirname, '../data/product_info_1.md');
const fileStream = fs.createReadStream(filePath);
fileStream.on('data', (chunk) => {
    console.log(`Read ${chunk.length} bytes of data.`);
});
const file = await client.agents.files.upload(fileStream, 'assistants', {
    fileName: 'product_info_1.md'
});
console.log(`Uploaded file, ID: ${file.id}`);
const vectorStore = await client.agents.vectorStores.create({
    fileIds: [file.id],
    name: 'my_vectorstore'
});
console.log('\n---------------- 🗃️ Vector Store Info ----------------');
console.table([
    {
        'Vector Store ID': vectorStore.id,
        'Usage (bytes)': vectorStore.usageBytes,
        'File Count': vectorStore.fileCounts?.total ?? 'N/A'
    }
]);

// Create an Agent and a FileSearch tool
const fileSearchTool = ToolUtility.createFileSearchTool([vectorStore.id]);
const fileAgent = await client.agents.createAgent(deployment, {
    name: 'my-file-agent',
    instructions: 'You are a helpful assistant and can search information from uploaded files',
    tools: [fileSearchTool.definition],
    toolResources: fileSearchTool.resources,
});

// Create a thread and message
const fileSearchThread = await client.agents.threads.create({ toolResources: fileSearchTool.resources });
const filePrompt = 'What are the steps to setup the TrailMaster X4 Tent?';
console.log(`\n---------------- 📝 User Prompt ---------------- \n${filePrompt}`);
await client.agents.messages.create(fileSearchThread.id, 'user', filePrompt);

// Create run
let fileSearchRun = await client.agents.runs.create(fileSearchThread.id, fileAgent.id).stream();

for await (const eventMessage of fileSearchRun) {
    if (eventMessage.event === DoneEvent.Done) {
        console.log(`Run completed: ${eventMessage.data}`);
    }
    if (eventMessage.event === ErrorEvent.Error) {
        console.log(`An error occurred. ${eventMessage.data}`);
    }
}

const fileSearchMessagesIterator = await client.agents.messages.list(fileSearchThread.id);
const fileAssistantMessage = await getAssistantMessage(fileSearchMessagesIterator);
console.log(`\n---------------- 💬 Response ---------------- \n`);
printAssistantMessage(fileAssistantMessage);

// Clean up
console.log(`\n---------------- 🧹 Clean Up File Agent ----------------`);
client.agents.vectorStores.delete(vectorStore.id);
client.agents.files.delete(file.id);
client.agents.deleteAgent(fileAgent.id);
console.log(`Deleted VectorStore, File, and FileAgent. FileAgent ID: ${fileAgent.id}`);
using Azure;
using Azure.Identity;
using Azure.AI.Agents.Persistent;

// Creating the Client for agents and vector stores
var projectEndpoint = System.Environment.GetEnvironmentVariable("AZURE_AI_ENDPOINT");
var modelDeploymentName = System.Environment.GetEnvironmentVariable("AZURE_AI_MODEL");
PersistentAgentsClient client = new(projectEndpoint, new DefaultAzureCredential());

PersistentAgentFileInfo uploadedAgentFile = client.Files.UploadFile(
    filePath: "product_info_1.md",
    purpose: PersistentAgentFilePurpose.Agents);

// Create a vector store with the file and wait for it to be processed.
// If you do not specify a vector store, create_message will create a vector store with a default expiration policy of seven days after they were last active

Dictionary<string, string> fileIds = new()
{
    { uploadedAgentFile.Id, uploadedAgentFile.Filename }
};

PersistentAgentsVectorStore vectorStore = client.VectorStores.CreateVectorStore(
    name: "my_vector_store");

// Add file ID to vector store.
VectorStoreFile vctFile = client.VectorStores.CreateVectorStoreFile(
    vectorStoreId: vectorStore.Id,
    fileId: uploadedAgentFile.Id
);

Console.WriteLine($"Added file to vector store. The id file in the vector store is {vctFile.Id}.");

FileSearchToolResource fileSearchToolResource = new FileSearchToolResource();
fileSearchToolResource.VectorStoreIds.Add(vectorStore.Id);

// Create an Agent with toolResources and process Agent run
PersistentAgent agent = client.Administration.CreateAgent(
        model: modelDeploymentName,
        name: "SDK Test Agent - Retrieval",
        instructions: "You are a helpful agent that can help fetch data from files you know about.",
        tools: new List<ToolDefinition> { new FileSearchToolDefinition() },
        toolResources: new ToolResources() { FileSearch = fileSearchToolResource });

// Create thread for communication
PersistentAgentThread thread = client.Threads.CreateThread();

// Create message to thread
PersistentThreadMessage messageResponse = client.Messages.CreateMessage(
    thread.Id,
    MessageRole.User,
    "Can you give me information on how to mount the product?");

// Run the Agent
ThreadRun run = client.Runs.CreateRun(thread, agent);

// Wait for the run to complete
// This is a blocking call, so it will wait until the run is completed
do
{
    Thread.Sleep(TimeSpan.FromMilliseconds(500));
    run = client.Runs.GetRun(thread.Id, run.Id);
}
while (run.Status == RunStatus.Queued
    || run.Status == RunStatus.InProgress);

// Create a list of messages in the thread and write them to the console.
Pageable<PersistentThreadMessage> messages = client.Messages.GetMessages(
    threadId: thread.Id,
    order: ListSortOrder.Ascending
);
WriteMessages(messages, fileIds);

// Delete the thread and agent after use
client.VectorStores.DeleteVectorStore(vectorStore.Id);
client.Files.DeleteFile(uploadedAgentFile.Id);
client.Threads.DeleteThread(thread.Id);
client.Administration.DeleteAgent(agent.Id);

// Helper method to write messages to the console
static void WriteMessages(IEnumerable<PersistentThreadMessage> messages, Dictionary<string, string> fileIds)
{
    foreach (PersistentThreadMessage threadMessage in messages)
    {
        Console.Write($"{threadMessage.CreatedAt:yyyy-MM-dd HH:mm:ss} - {threadMessage.Role,10}: ");
        foreach (MessageContent contentItem in threadMessage.ContentItems)
        {
            if (contentItem is MessageTextContent textItem)
            {
                if (threadMessage.Role == MessageRole.Agent && textItem.Annotations.Count > 0)
                {
                    string strMessage = textItem.Text;
                    foreach (MessageTextAnnotation annotation in textItem.Annotations)
                    {
                        if (annotation is MessageTextFilePathAnnotation pathAnnotation)
                        {
                            strMessage = replaceReferences(fileIds, pathAnnotation.FileId, pathAnnotation.Text, strMessage);
                        }
                        else if (annotation is MessageTextFileCitationAnnotation citationAnnotation)
                        {
                            strMessage = replaceReferences(fileIds, citationAnnotation.FileId, citationAnnotation.Text, strMessage);
                        }
                    }
                    Console.Write(strMessage);
                }
                else
                {
                    Console.Write(textItem.Text);
                }
            }
            else if (contentItem is MessageImageFileContent imageFileItem)
            {
                Console.Write($"<image from ID: {imageFileItem.FileId}");
            }
            Console.WriteLine();
        }
    }
}

// Helper method to replace file references in the text
static string replaceReferences(Dictionary<string, string> fileIds, string fileID, string placeholder, string text)
{
    if (fileIds.TryGetValue(fileID, out string replacement))
        return text.Replace(placeholder, $" [{replacement}]");
    else
        return text.Replace(placeholder, $" [{fileID}]");
}
YOUR-FOUNDRY-RESOURCE-NAMEとYOUR-PROJECT-NAMEを実際の値に置き換えます。
#Upload the file
curl --request POST --url 'https://YOUR-FOUNDRY-RESOURCE-NAME.services.ai.azure.com/api/projects/YOUR-PROJECT-NAME/files?api-version=v1' \
    -h 'authorization: Bearer $AZURE_AI_AUTH_TOKEN' \
    -f purpose="assistant" \
    -f file="@product_info_1.md" #File object (not file name) to be uploaded.
#Lets say file ID created is assistant-123456789. Use this in the next step

# create vector store
curl --request POST --url 'https://YOUR-FOUNDRY-RESOURCE-NAME.services.ai.azure.com/api/projects/YOUR-PROJECT-NAME/vector_stores?api-version=v1' \
-h 'authorization: Bearer $AZURE_AI_AUTH_TOKEN' \
-h 'content-type: application/json' \
-d '{
        "name": "my_vectorstore",
        "file_ids": ["assistant-123456789"]
    }'
#Lets say Vector Store ID created is vs_123456789. Use this in the next step

# Create Agent for File Search
curl --request POST --url 'https://YOUR-FOUNDRY-RESOURCE-NAME.services.ai.azure.com/api/projects/YOUR-PROJECT-NAME/assistants?api-version=v1' \
    -h 'authorization: Bearer $AZURE_AI_AUTH_TOKEN' \
    -h 'content-type: application/json' \
    -d '{
        "model": "gpt-4o",
        "name": "my-assistant",
        "instructions": "You are a helpful assistant and can search information from uploaded files",
        "tools": [{"type": "file_search"}],
        "tool_resources": {"file_search": {"vector_store_ids": ["vs_123456789"]}}
    }'
#Lets say agent ID created is asst_123456789. Use this to run the agent

# Create thread
curl --request POST --url 'https://YOUR-FOUNDRY-RESOURCE-NAME.services.ai.azure.com/api/projects/YOUR-PROJECT-NAME/threads?api-version=v1' \
    -h 'authorization: Bearer $AZURE_AI_AUTH_TOKEN' \
    -h 'content-type: application/json'
#Lets say thread ID created is thread_123456789. Use this in the next step

# Create message using thread ID
curl --request POST --url 'https://YOUR-FOUNDRY-RESOURCE-NAME.services.ai.azure.com/api/projects/YOUR-PROJECT-NAME/threads/thread_123456789/messages?api-version=v1' \
    -h 'authorization: Bearer $AZURE_AI_AUTH_TOKEN' \
    -h 'content-type: application/json' \
    -d '{
            "role": "user",
            "content": "Hello, what Contoso products do you know?"
        }'

# Run thread with the agent - use both agent id and thread id
curl --request POST --url 'https://YOUR-FOUNDRY-RESOURCE-NAME.services.ai.azure.com/api/projects/YOUR-PROJECT-NAME/threads/thread_123456789/runs?api-version=v1' \
    -h 'authorization: Bearer $AZURE_AI_AUTH_TOKEN' \
    -h 'content-type: application/json' \
    --data '{
        "assistant_id": "asst_123456789"
    }'

# List the messages in the thread using thread ID
curl --request GET --url 'https://YOUR-FOUNDRY-RESOURCE-NAME.services.ai.azure.com/api/projects/YOUR-PROJECT-NAME/threads/thread_123456789/messages?api-version=v1' \
    -h 'authorization: Bearer $AZURE_AI_AUTH_TOKEN' \
    -h 'content-type: application/json'

# Delete agent once done using agent id
curl --request DELETE --url 'https://YOUR-FOUNDRY-RESOURCE-NAME.services.ai.azure.com/api/projects/YOUR-PROJECT-NAME/assistants/asst_123456789?api-version=v1' \
    -h 'authorization: Bearer $AZURE_AI_AUTH_TOKEN' \
    -h 'content-type: application/json'
リソースをクリーンアップする
不要になった場合は、プロジェクトに関連付けられているリソース グループを削除します。
Azure AI Foundry ポータルで、右上隅にあるプロジェクト名を選択します。 次に、リソース グループのリンクを選択して、Azure portal で開きます。 リソース グループを選択し、[削除] を選択 します。 リソース グループを削除することを確認します。
関連コンテンツ
フィードバック
このページはお役に立ちましたか?