Migrating your Data from MySQL to Capella
- Capella Operational
- tutorial
Using MySQL as a starting point, this guide demonstrates how to migrate your existing data from SQL tables to a Couchbase Capella instance.
Introduction
In this tutorial,
you will make use of cbimport to migrate an example test database from MySQL to Couchbase Capella.
Prerequisites
Before you make a start, you will need a Capella instance to run the tutorial. If you do not currently have an instance, then you can create a Capella trial here ⇒ Capella Trial
You will also need to download and install the Server Development Tools package,
which includes the cbimport command line application.
You will find installation instructions for the Server Development Tools package here ⇒ Server Development Tools package
If you’re running through the examples, then you will also need an existing MySQL installation with the preexisting table structure defined in the following section.
This tutorial makes use of the MySQL JSON functions that were introduced in version 5.7.22.
Make sure you have installed MySQL version 5.7.22 or later.
|
Student Record database
The database we will convert will consist of a relational structure with three tables:

We will convert this table structure to a document model suitable for storage in our Couchbase bucket:

You will see that our document model is not an exact mapping of the SQL database:
we have taken the enrollments records and added them directly as a list of sub-documents
within each student record:
[
{"student-id": 1,
"enrollments": [{"course-id": 3, "final-score": null, "date-enrolled": "2024-04-18", "date-completed": null}, {"course-id": 1, "final-score": null, "date-enrolled": "2025-03-05", "date-completed": null}], "student-name": "Harriet Hill", "date-of-birth": "1970-03-06"},
{"student-id": 2, "enrollments": [{"course-id": 1, "final-score": null, "date-enrolled": "2025-03-01", "date-completed": null}], "student-name": "Steven Morris", "date-of-birth": "1984-03-05"},
{"student-id": 3, "enrollments": [{"course-id": null, "final-score": null, "date-enrolled": null, "date-completed": null}], "student-name": "Jenny Mills", "date-of-birth": "1969-11-06"}
]
Extract your Course data from MySQL
The first stage of your migration is to extract the data a file format that the cbimport utility can work with.
cbimport can work with comma-separated value files or JSON-formatted files.
Because we already know that we will be embedding our enrollment records into the record for each student,
makes sense to use the more versatile JSON structure.
Fortunately, MySQL has a number of SQL functions that make working with JSON data fairly straightforward,
so we’ll start by migrating the course table into a JSON file:
course tableSELECT JSON_OBJECT(
'course-id', course.`course-id`,
'course-name', course.`course-name`,
'faculty', course.faculty,
'credit-points', course.`credit-points`
) FROM course
INTO OUTFILE '/var/lib/mysql-files/courses.json'|
for Windows users.
When setting out the |
Using the JSON_OBJECT function, the command will SELECT every record in the table and output it to a file.
Each line of the file will correspond to a single record:
{"faculty": "Art", "course-id": 1, "course-name": "Art History", "credit-points": 50}
{"faculty": "Art", "course-id": 2, "course-name": "Fine Art", "credit-points": 30}
{"faculty": "Design", "course-id": 3, "course-name": "Graphic Design", "credit-points": 70}
{"faculty": "English", "course-id": 4, "course-name": "Creative Writing", "credit-points": 70}
Strictly speaking, the JSON output is not a well-formed JSON document because it isn’t structured as an array.
Nevertheless, cbimport will read each line as a separate record.
|
Extract your Student data from MySQL
This case is slightly different because we want to include the enrollment details with each student record
We can handle this JSON structure by using a more involved SELECT: As well as extracting the student records, we can simultaneously pull in the enrollments for each student:
students and their enrollments.SELECT JSON_OBJECT(
'student-id', student.`student-id`,
'student-name', student.name,
'date-of-birth', student.`date-of-birth`,
'enrollments', IF (COUNT(enrollment.`course-id`) = 0, JSON_ARRAY(), JSON_ARRAYAGG(
JSON_OBJECT(
'course-id', enrollment.`course-id`,
'date-enrolled', enrollment.`date-enrolled`,
'date-completed', enrollment.`date-completed`,
'final-score', enrollment.`score`
)
))
)
FROM student
LEFT OUTER JOIN enrollment ON enrollment.`student-id` = student.`student-id`
GROUP BY student.`student-id`
INTO OUTFILE '/var/lib/mysql-files/students.json';In addition to the JSON_OBJECT function call that extracts the student details,
we are also using the JSON_ARRAYAGG function to build an array within each student record.
The data for this list is retrieved through the LEFT OUTER JOIN
which provides the foreign key link between the student and the enrollment record.
We also use the IF (COUNT(enrollment. statement
to ensure that there are existing enrollment records attached to the current student.
If there are no enrollment records, then that portion of the query uses course-id) = 0JSON_ARRAY() to return an empty list.
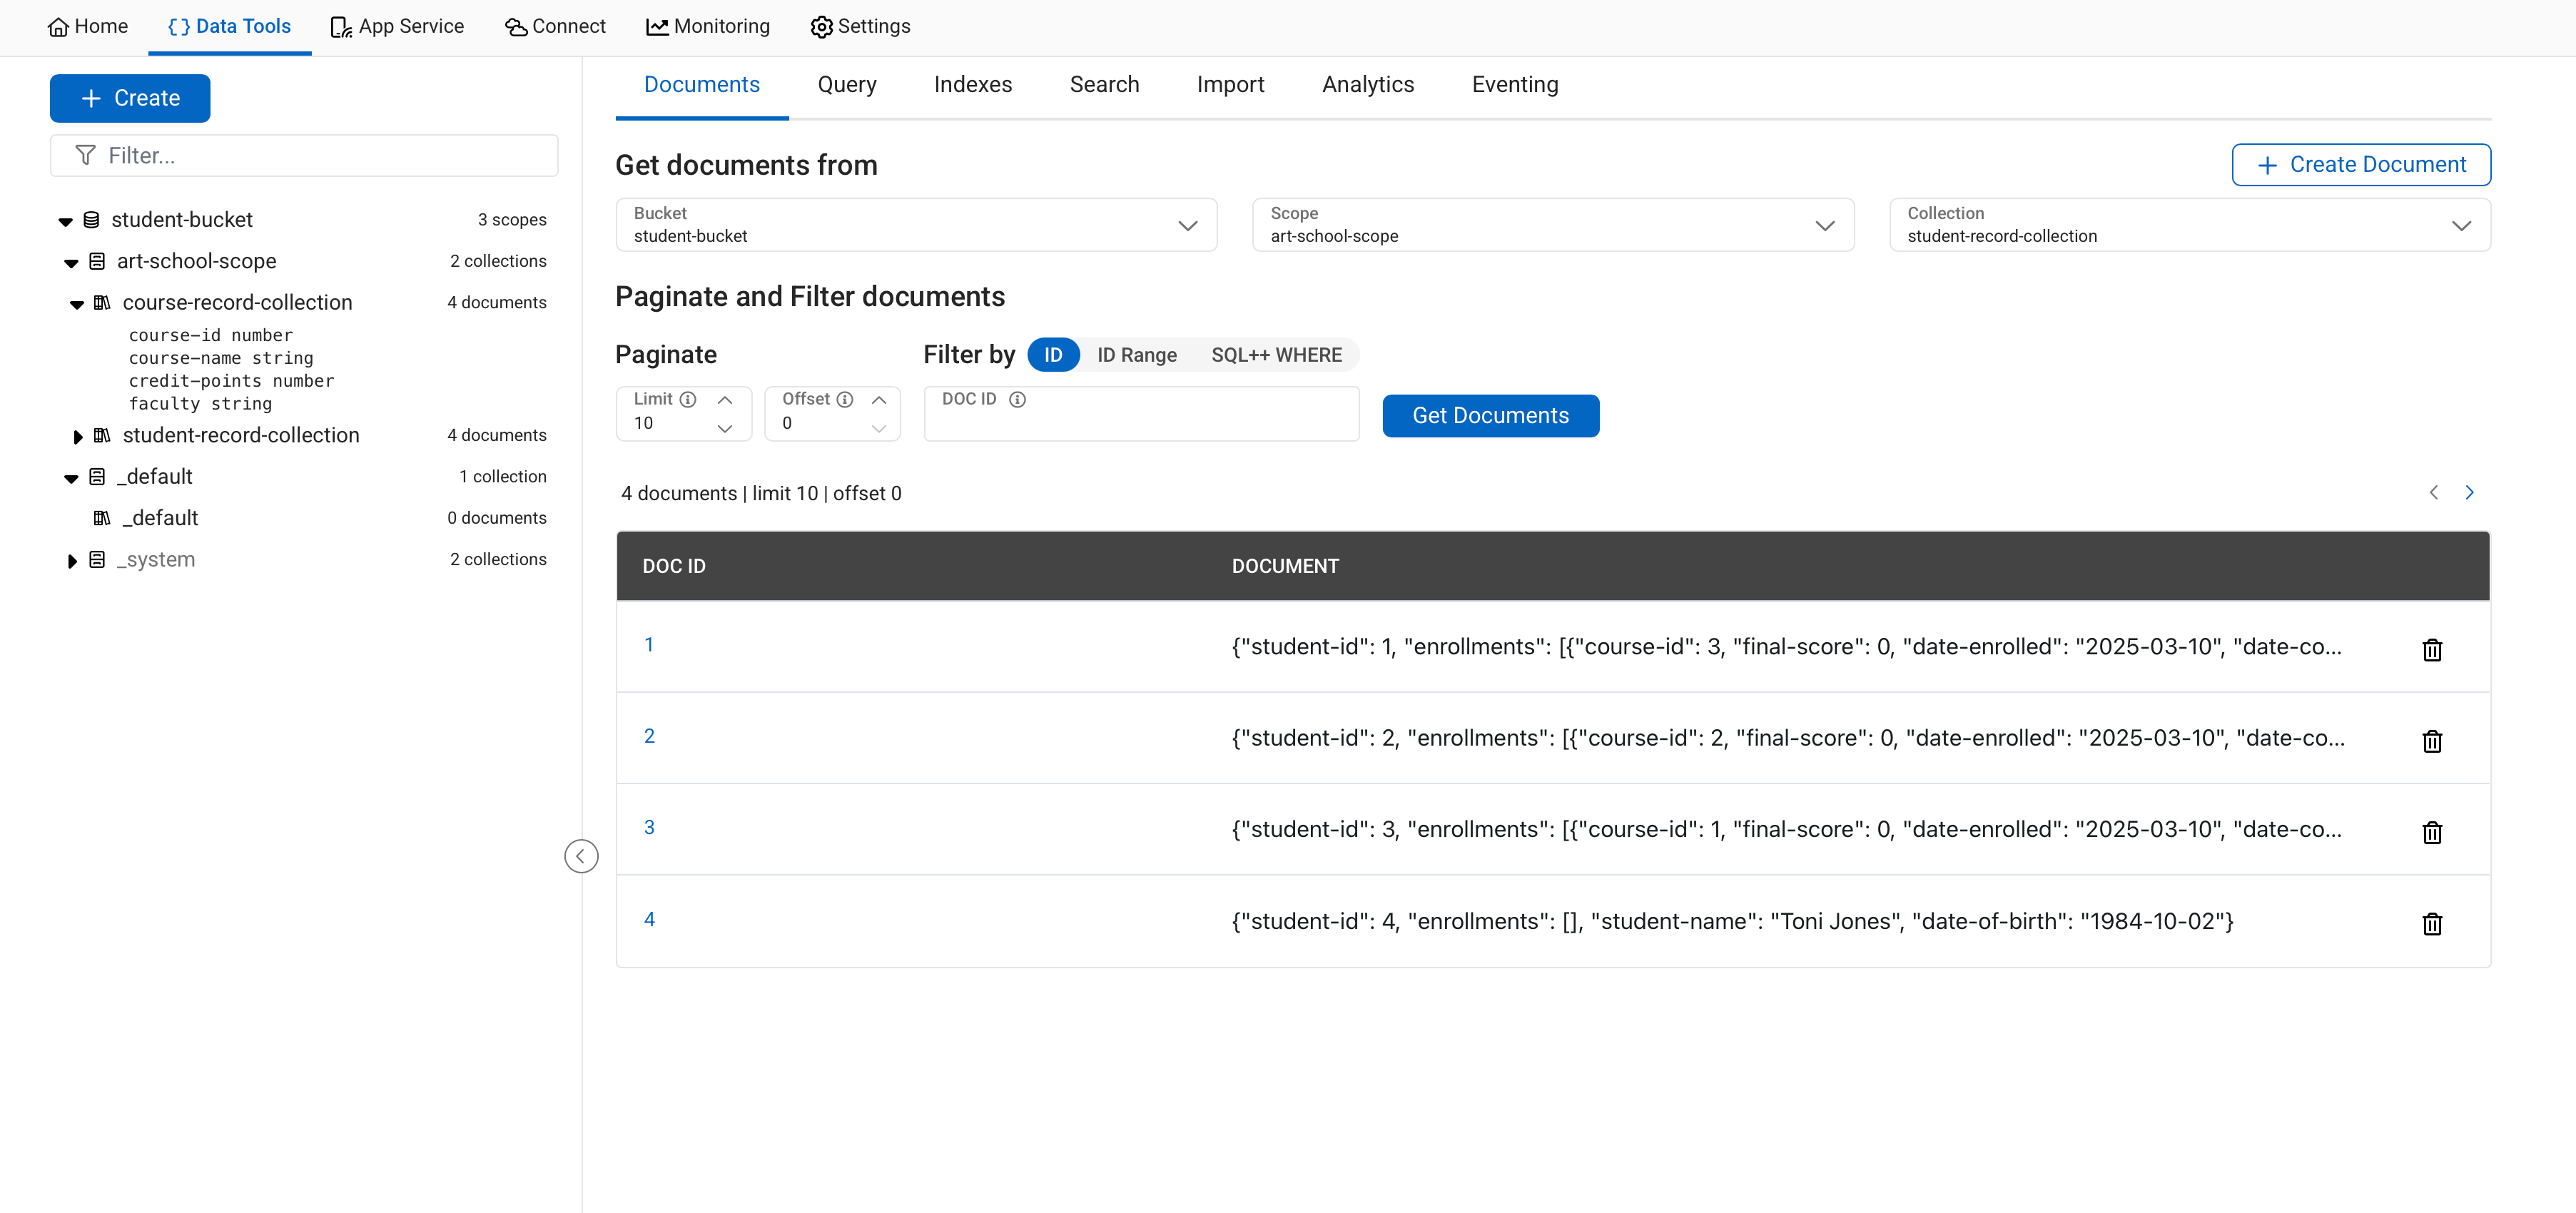
{"student-id": 1, "enrollments": [{"course-id": 3, "final-score": 0, "date-enrolled": "2025-03-10", "date-completed": null}, {"course-id": 1, "final-score": 0, "date-enrolled": "2025-03-10", "date-completed": null}], "student-name": "Hilary Wells", "date-of-birth": "1990-08-09"}
{"student-id": 2, "enrollments": [{"course-id": 2, "final-score": 0, "date-enrolled": "2025-03-10", "date-completed": null}], "student-name": "Ashley Matthews", "date-of-birth": "1987-07-01"}
{"student-id": 3, "enrollments": [{"course-id": 1, "final-score": 0, "date-enrolled": "2025-03-10", "date-completed": null}], "student-name": "Boregard Johnson", "date-of-birth": "1985-03-23"}
{"student-id": 4, "enrollments": [], "student-name": "Toni Jones", "date-of-birth": "1984-10-02"}
Create your cluster, bucket, scope, and collections
Working on your Capella instance, you must first create the cluster (or use an existing cluster if you have one available). We will assume that you are creating a cluster from scratch. You will also need to create the bucket, scope, and collections to accept the student data.
-
Sign in to your Capella instance. You will be presented showing the operational clusters along with the project that the cluster is attached to.
-
Press the Create Cluster button.
-
Now create a new project with a name of your choice.
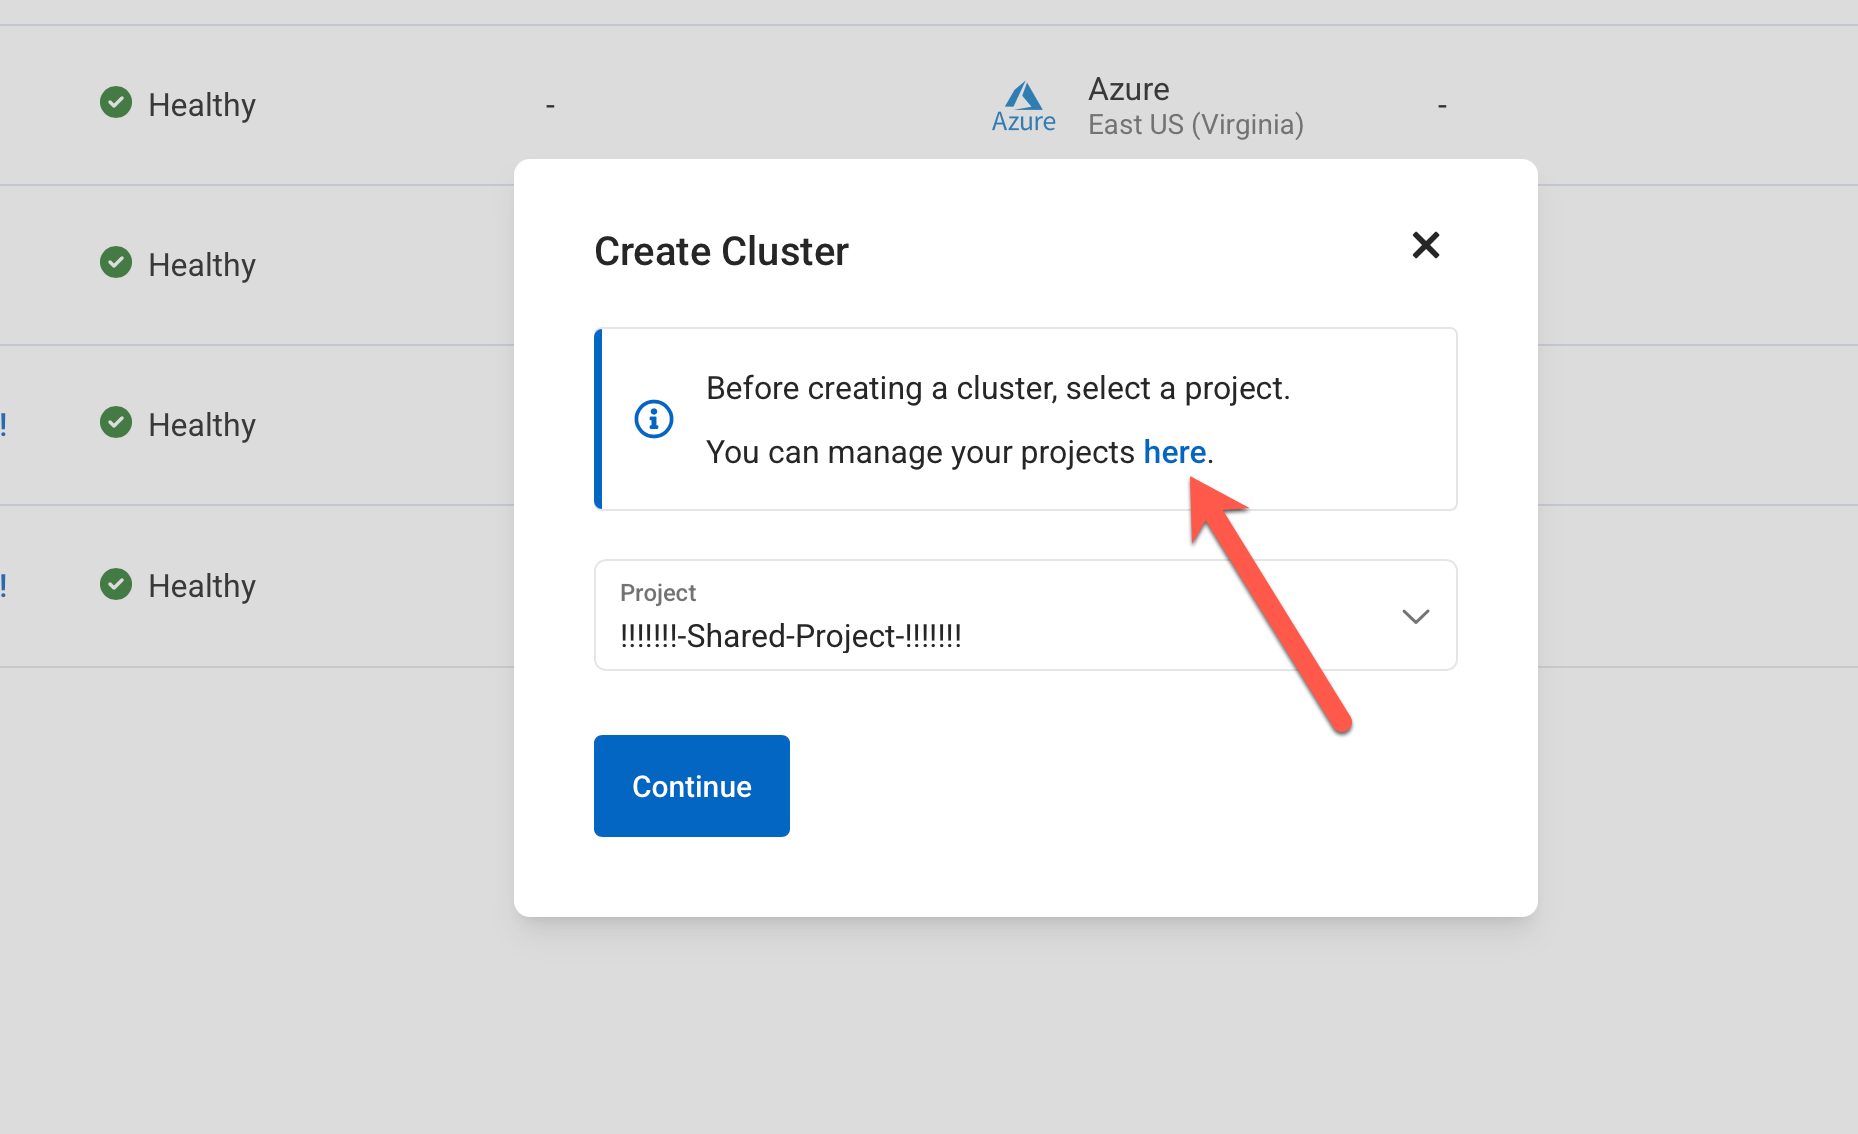
-
You will now be given the opportunity to create a new cluster which will be attached to your project. For this exercise, we’re going to create a new project for our data migration, so click on the link to take you to the Project list.
-
Press the Create Project button on the top right of the list. This will take you to a dialog from where you can fill in the name of your new project.

-
Enter a name for your project, then press Create Project
-
Capella will create a new project for you and then switch back to the Project List. You can navigate to your project by clicking on the link in the top left of the screen.
You can also navigate to your project by finding it in the Project List and clicking on its link. -
On your project page, click on Create Cluster
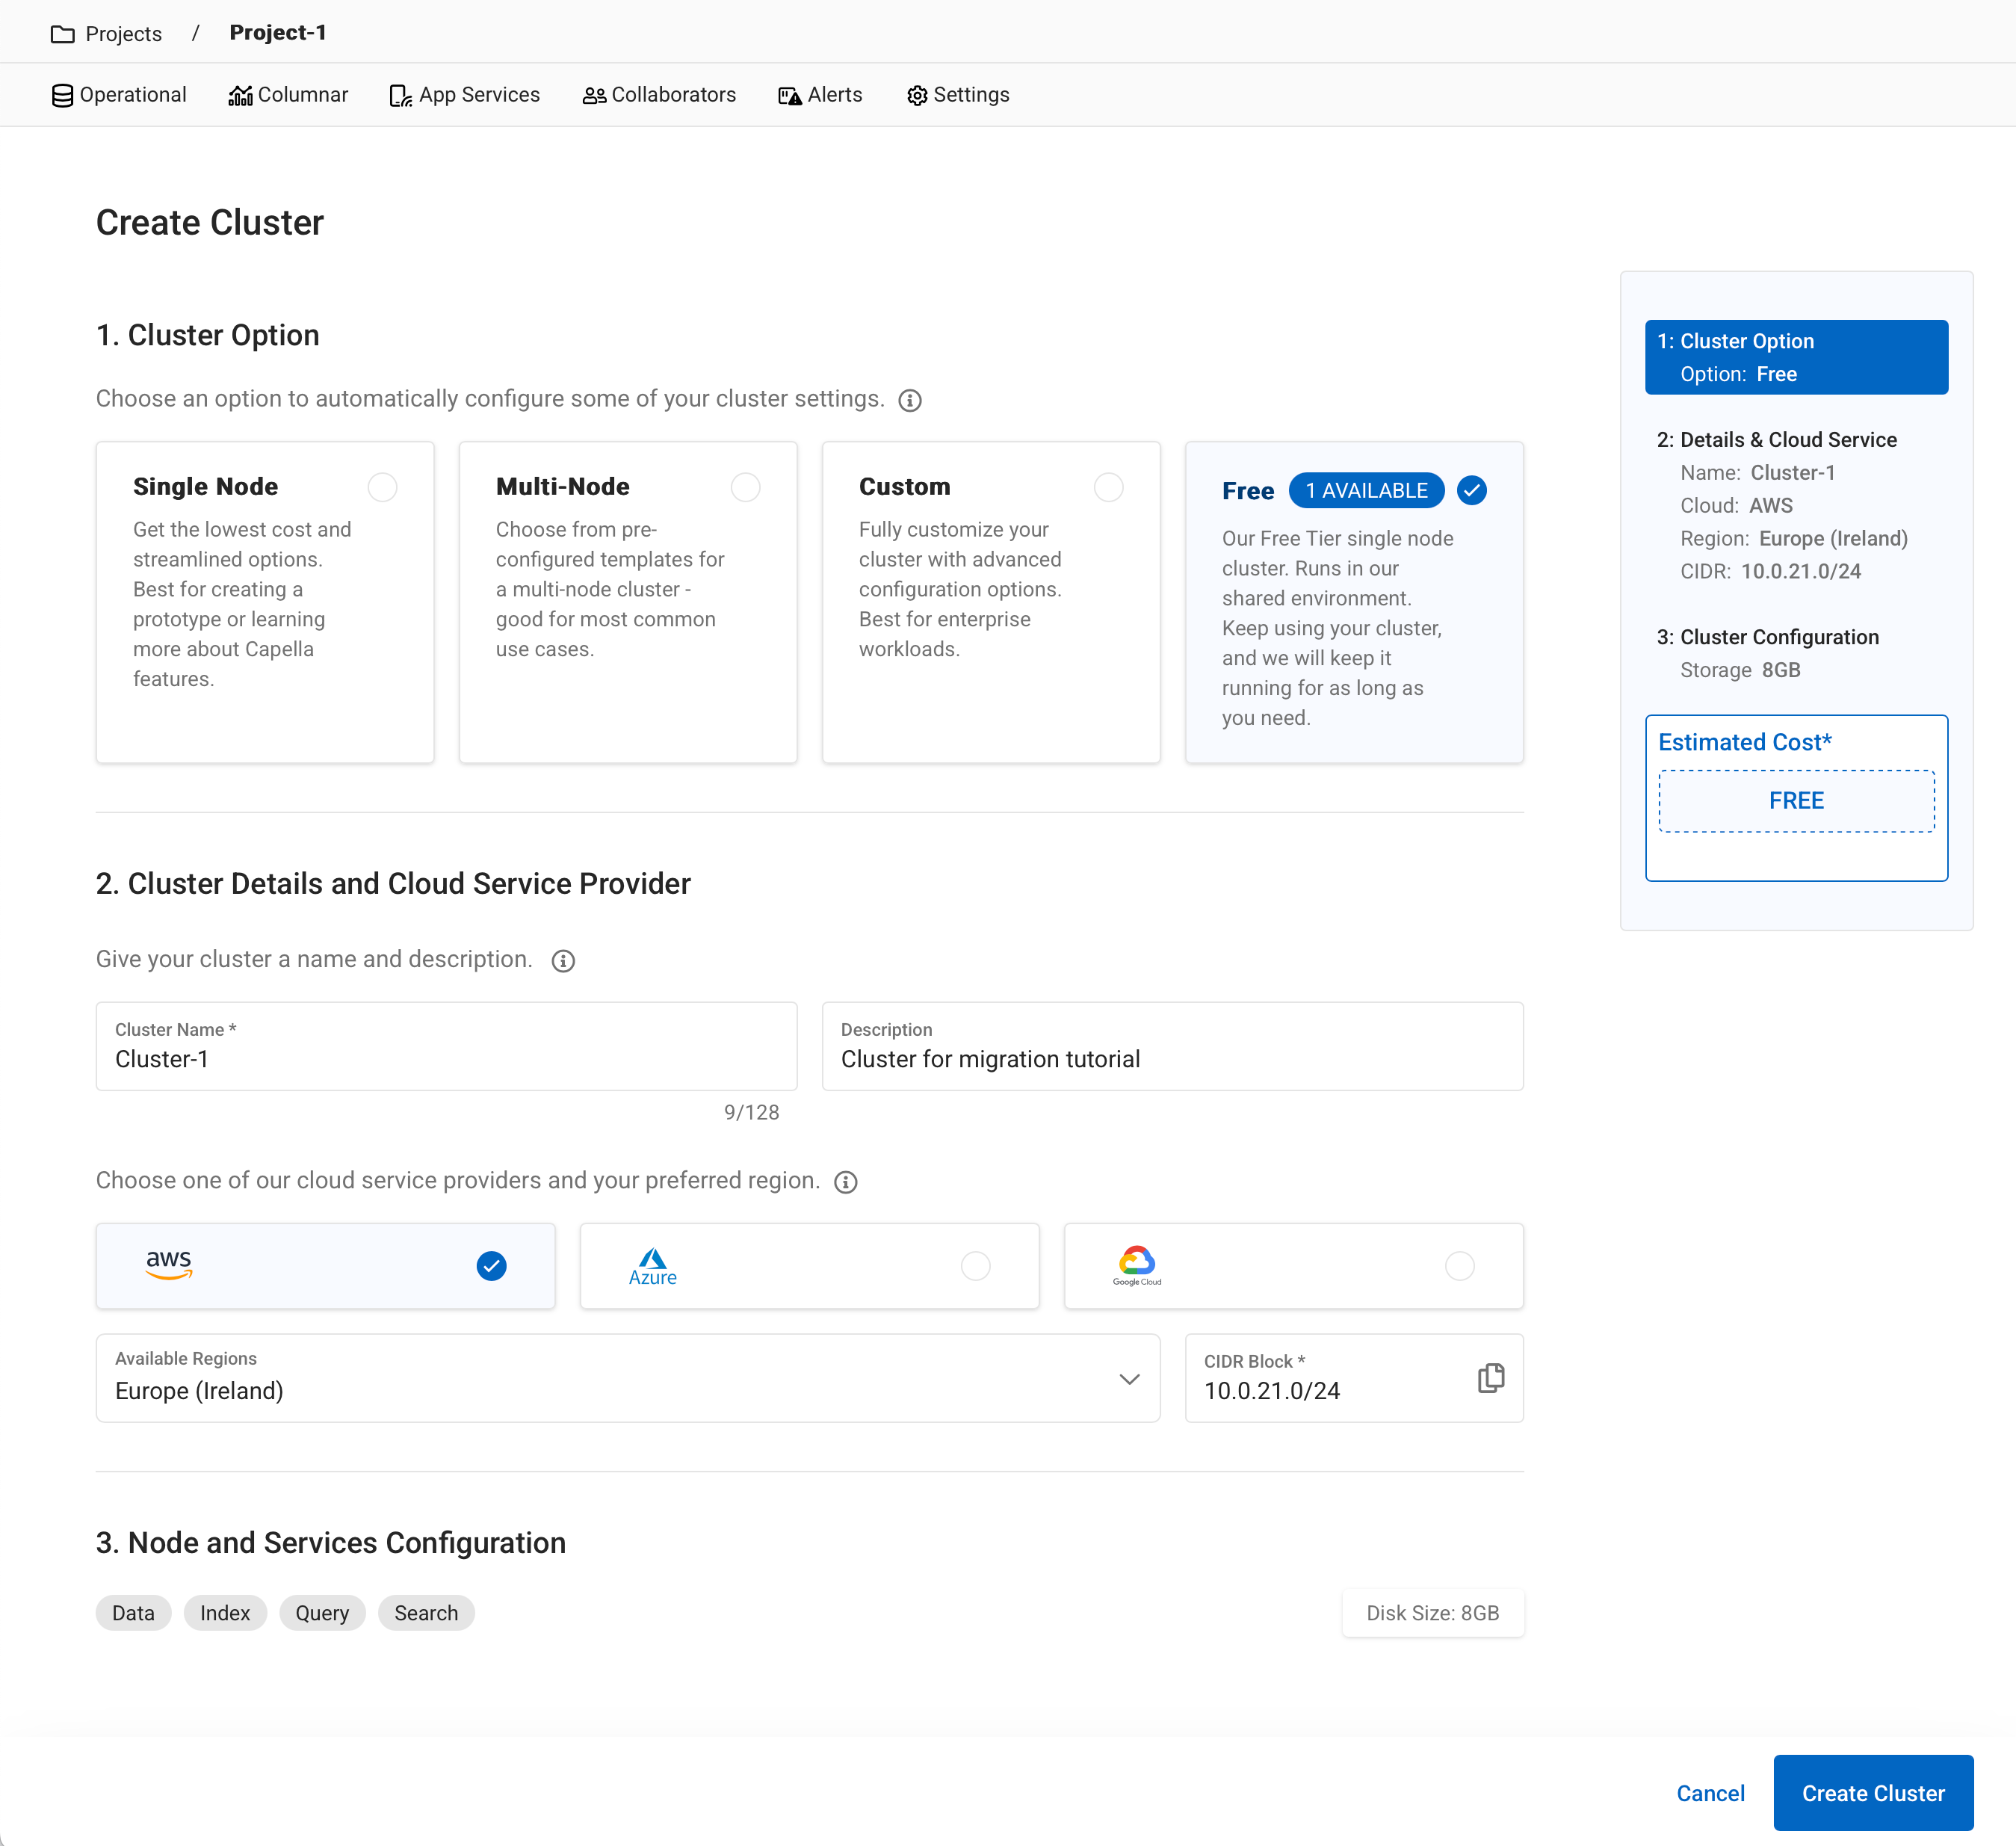
-
Select your cluster options (you may use the free option if it’s available), then press Create Cluster.
After a short interval, your new cluster will be provisioned.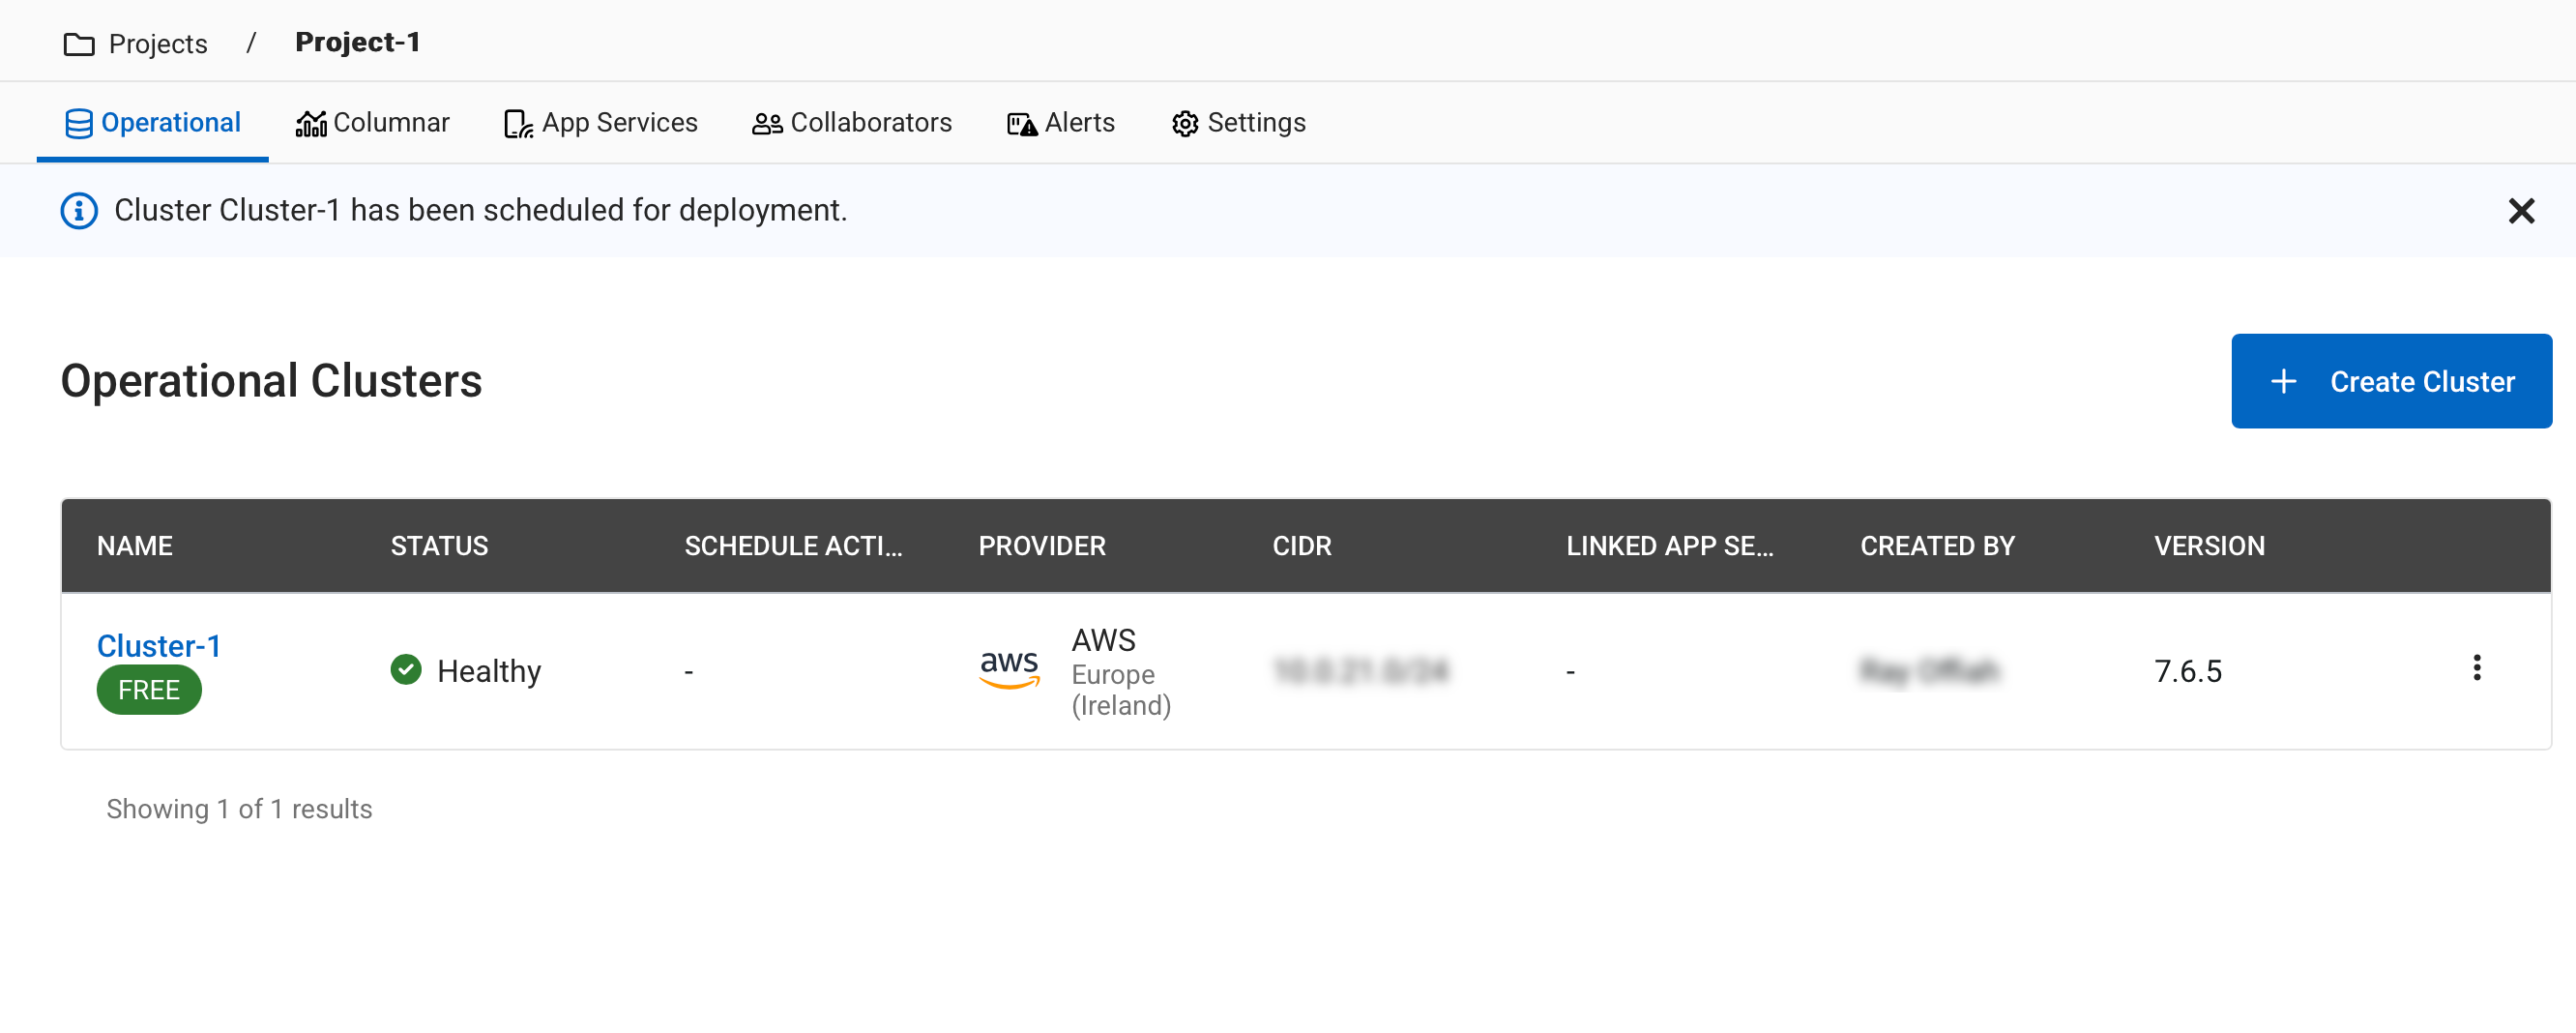
Now that we have created the cluster, we need to add a ___location to hold the migrated data.
-
Click on the name of your cluster from the Operational Clusters page. This will take you to the Cluster details page.

-
From here, click on the Import Data button. This will take you to the Data Tools page.
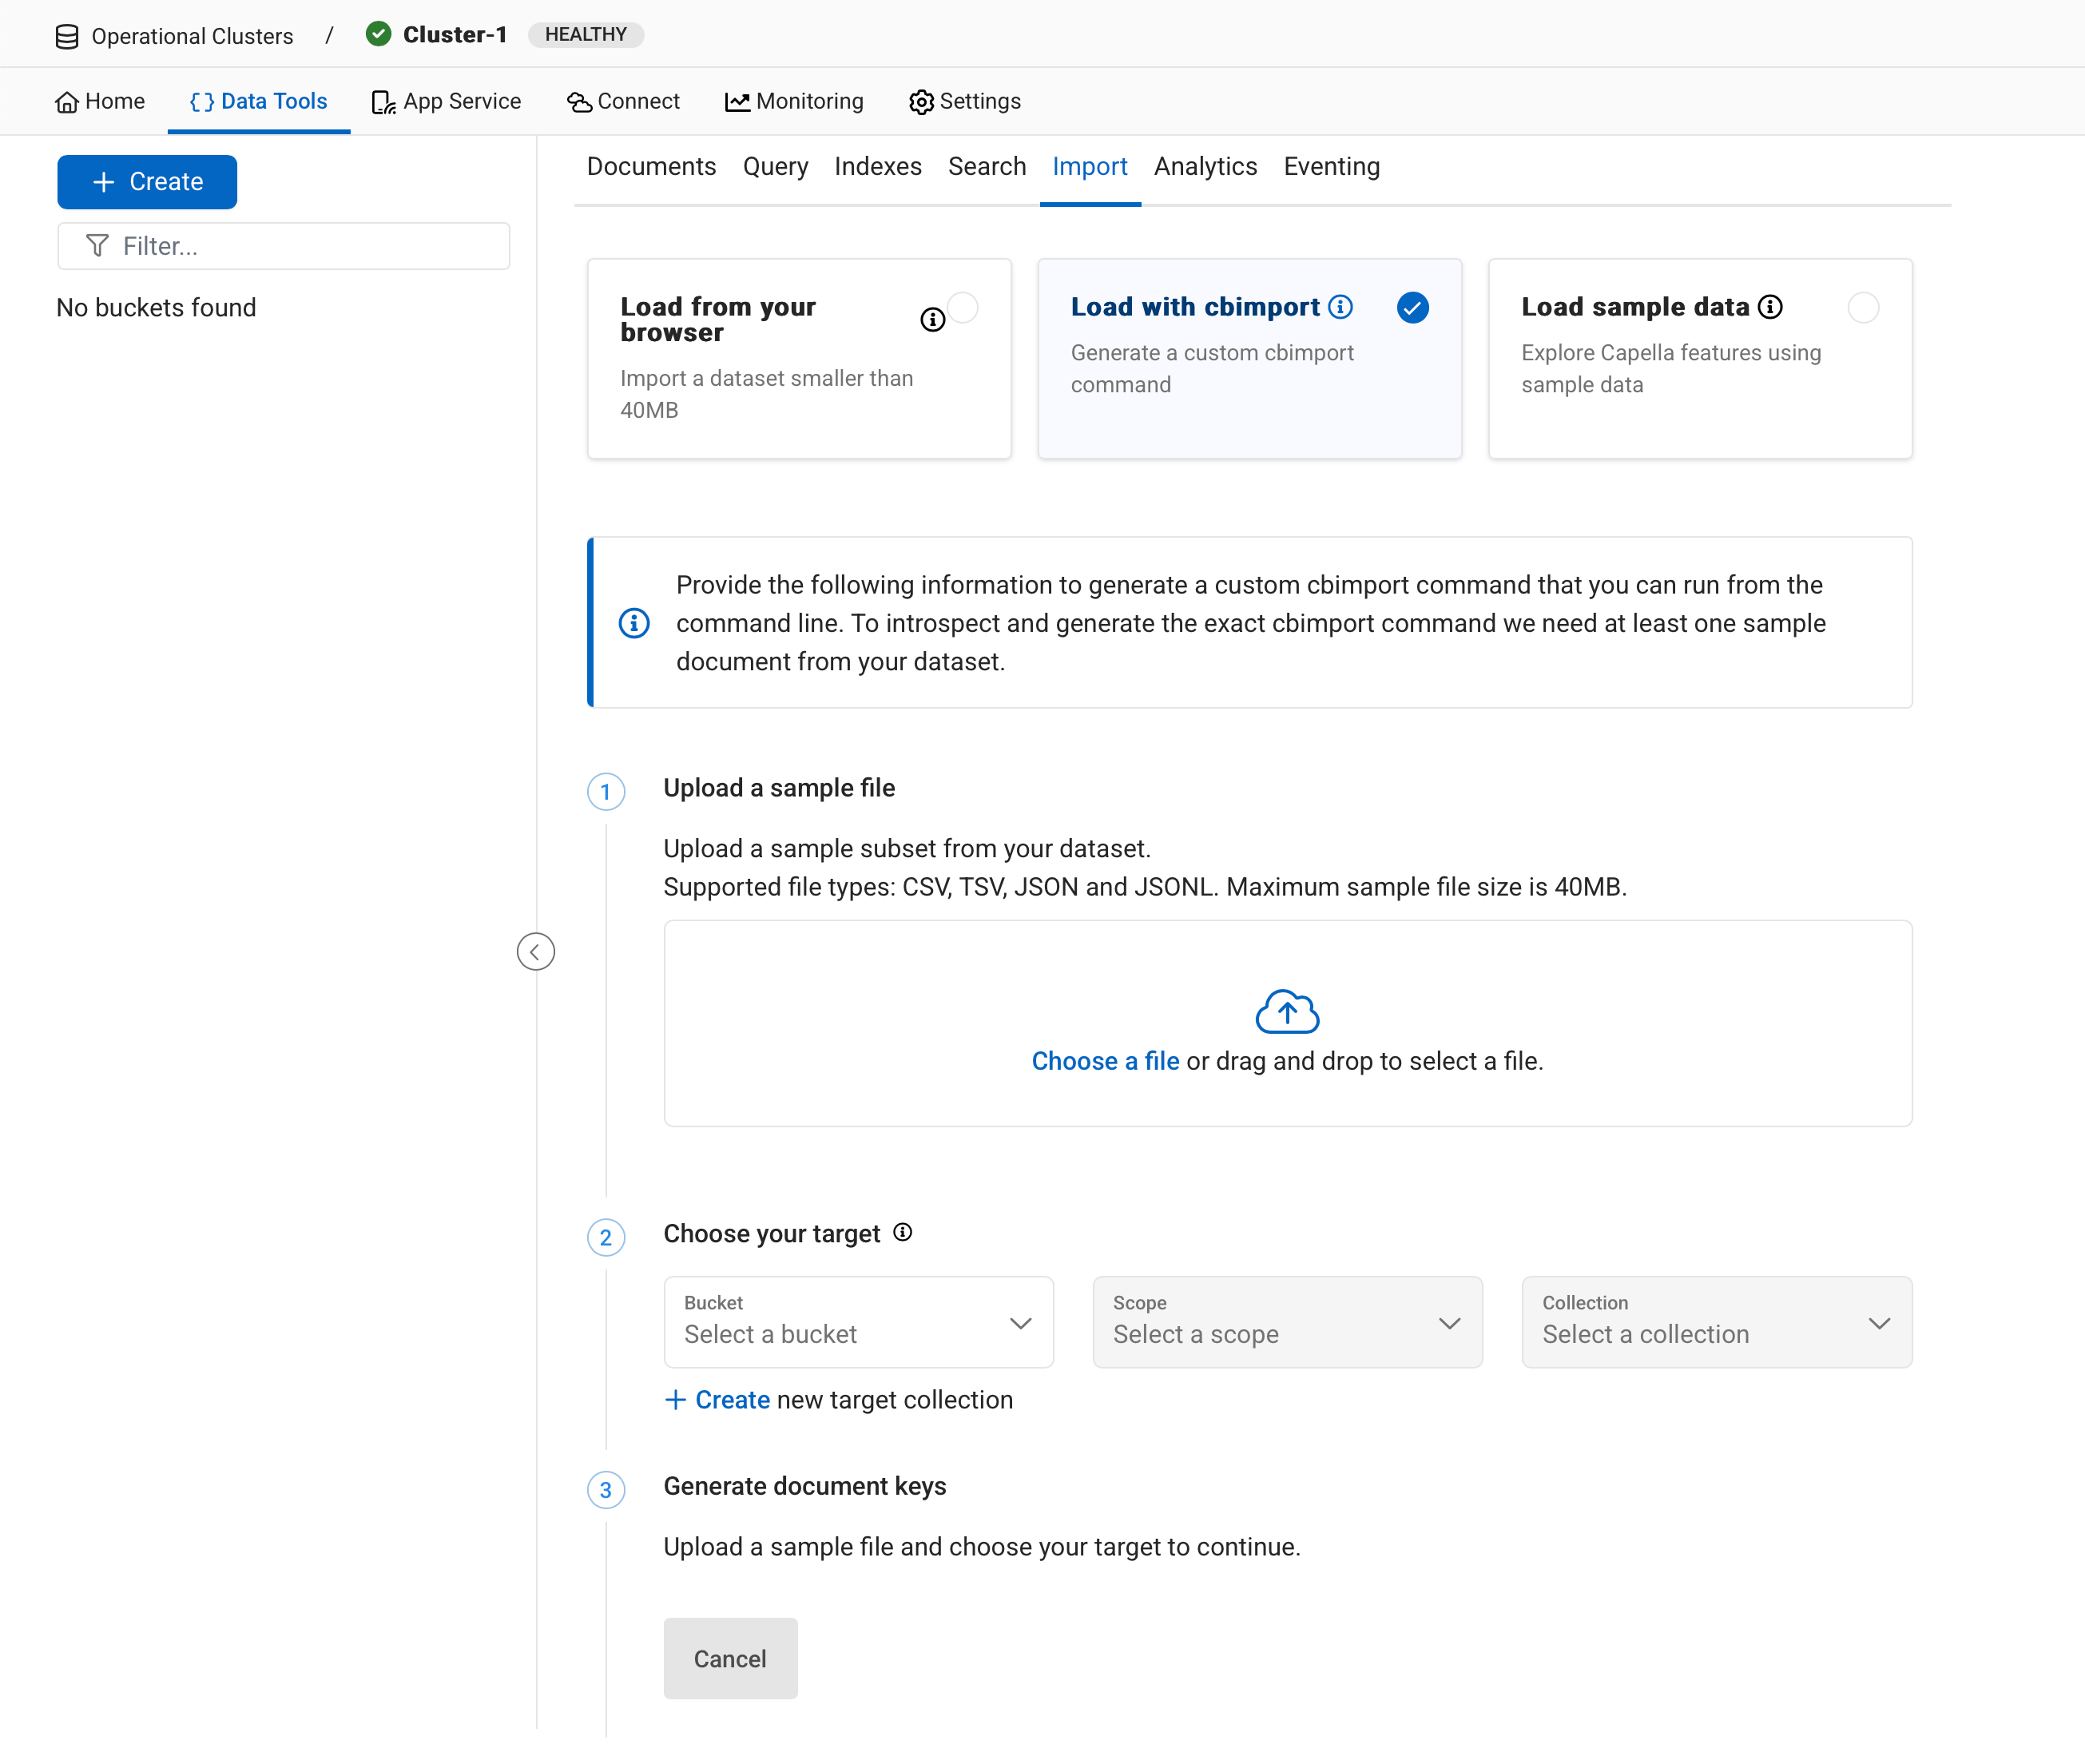
-
Select Load with cbimport in the central panel.
-
Click on the +Create button in the panel on the left. You will now be presented with a dialog for creating a bucket.
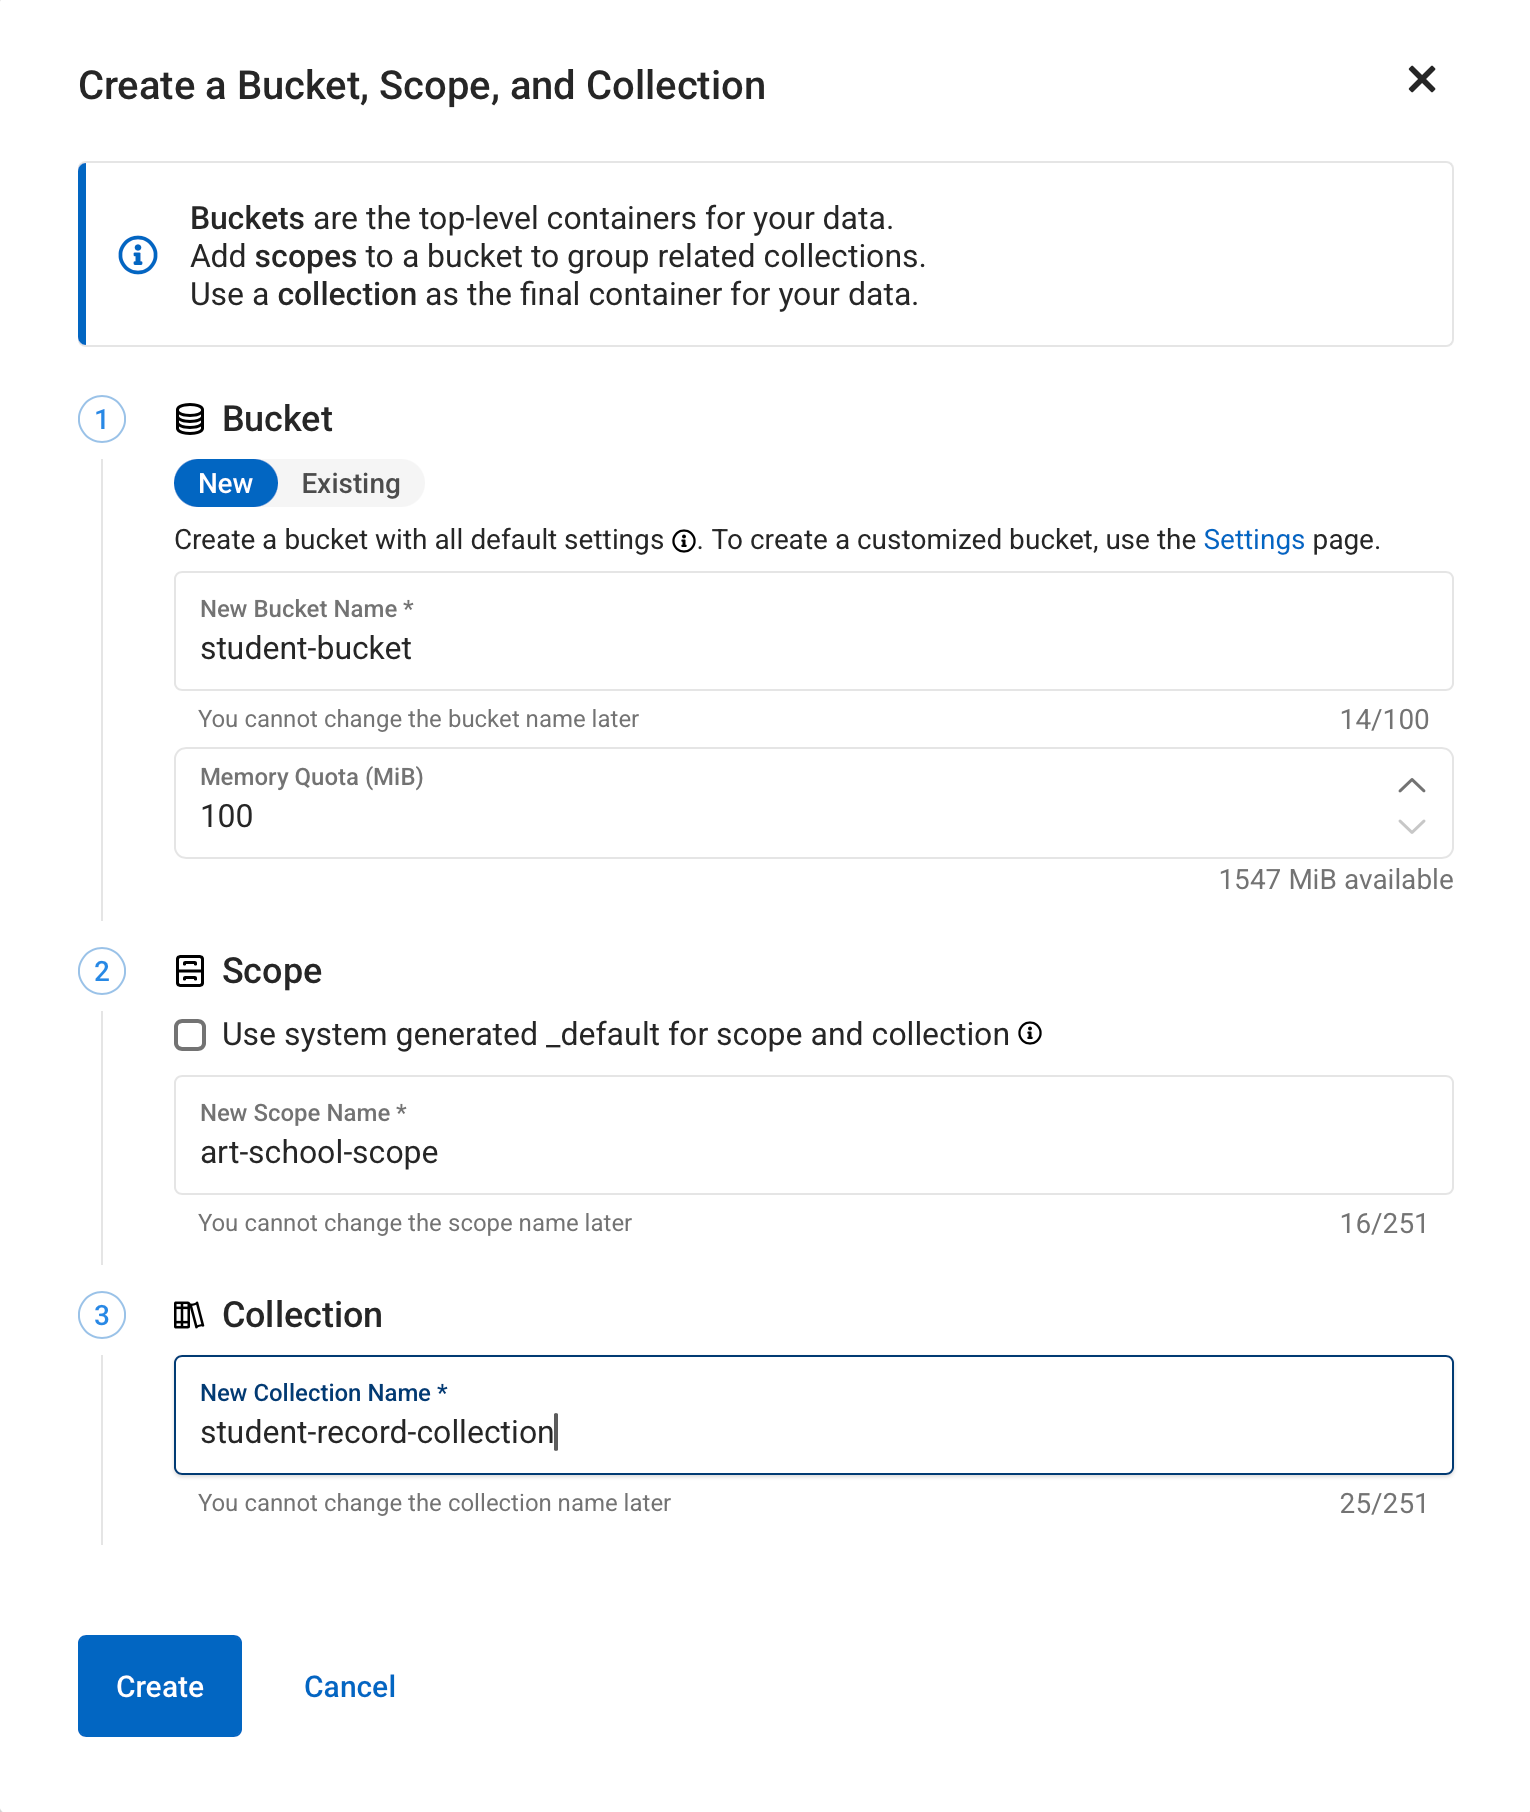
-
Fill in
student-bucketfor the name of your bucket. -
Fill in
art-school-scopefor the scope. -
Fill in
student-record-collectionfor the collection inside the scope. -
Click on Create
-
We still need to create another collection to hold the course records, so press +Create again.
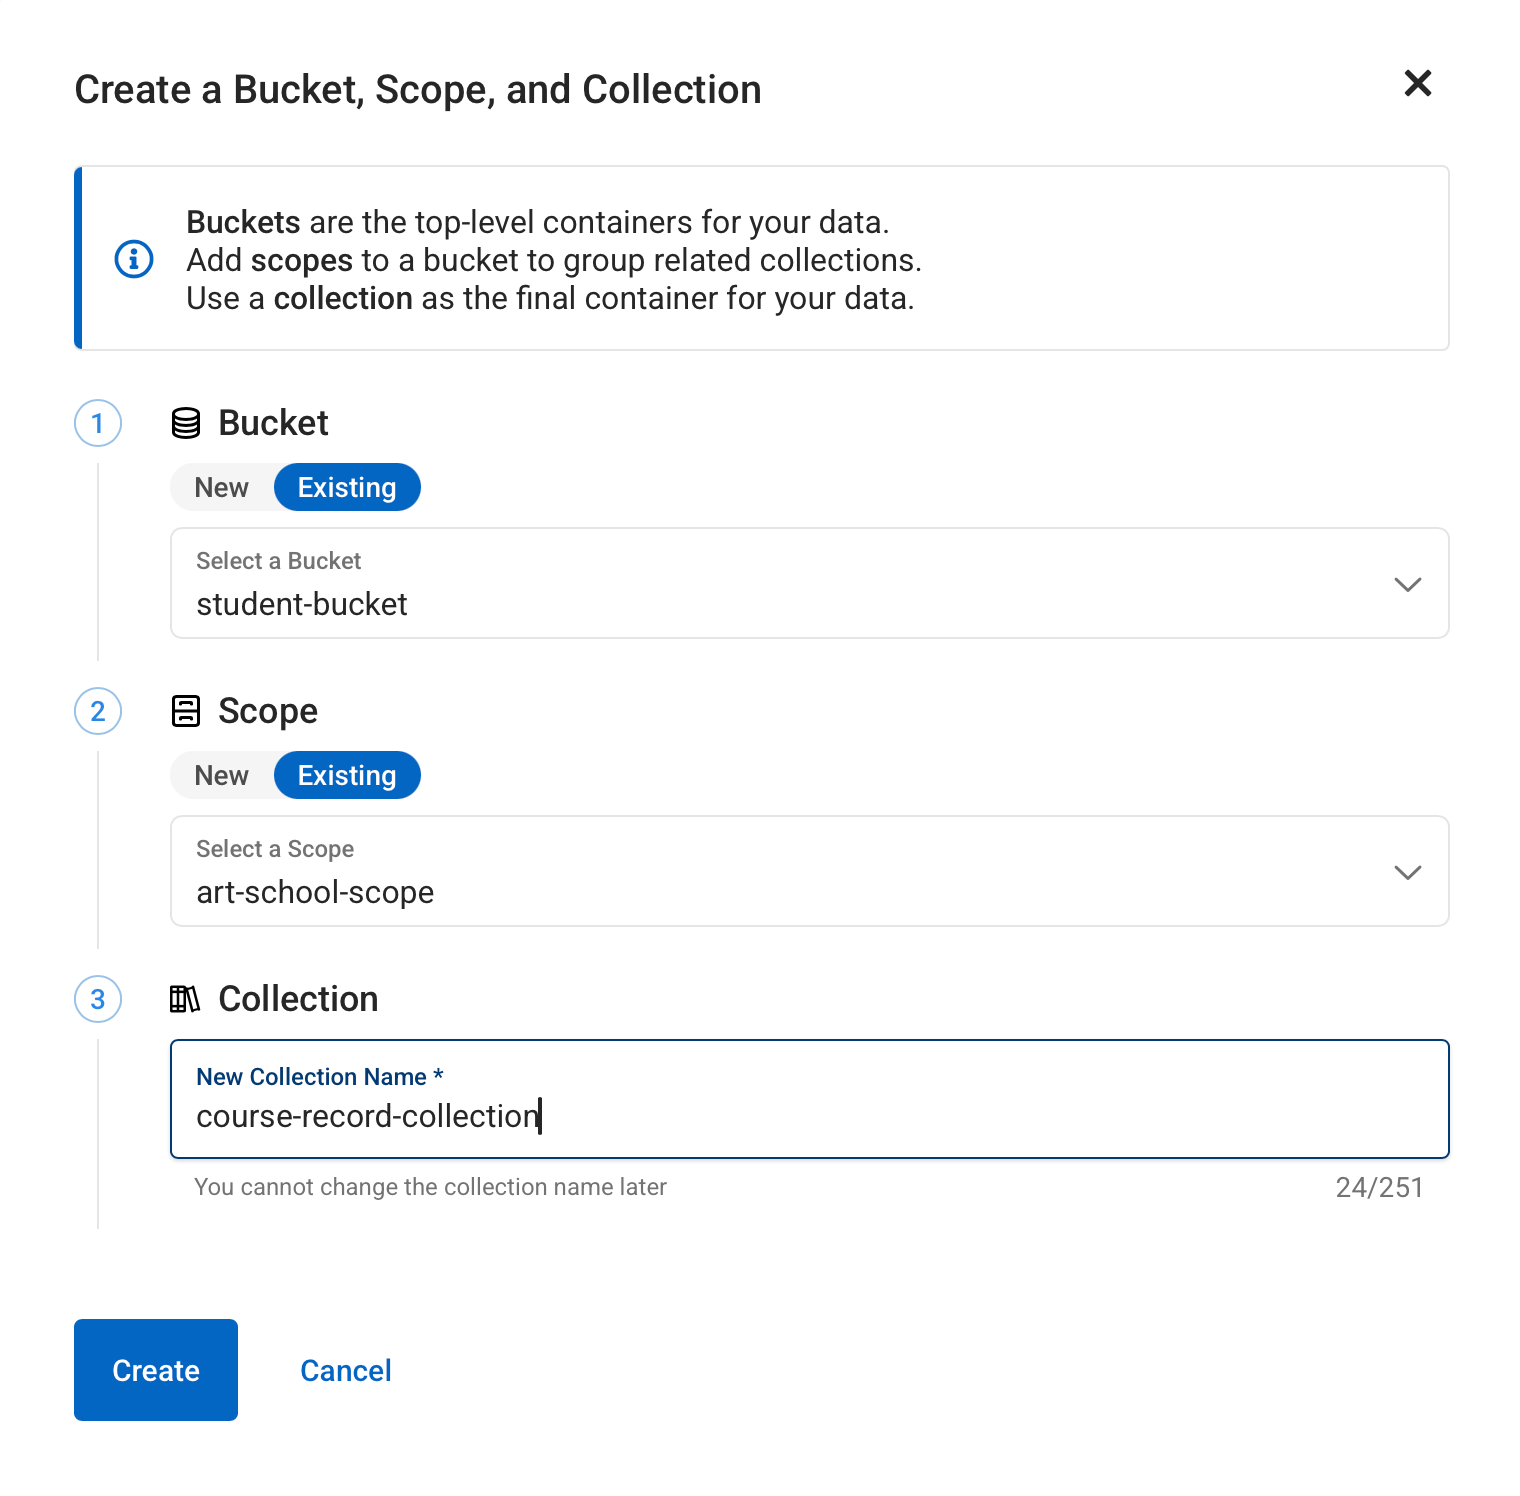
-
Make sure that you are adding to an existing bucket (
student-bucket) and scope (art-school-scope). Now add another collection:course-record-collectiomn.
Before running cbimport from your local machine,
you need to add your machine’s IP address to Capella’s allowed list.
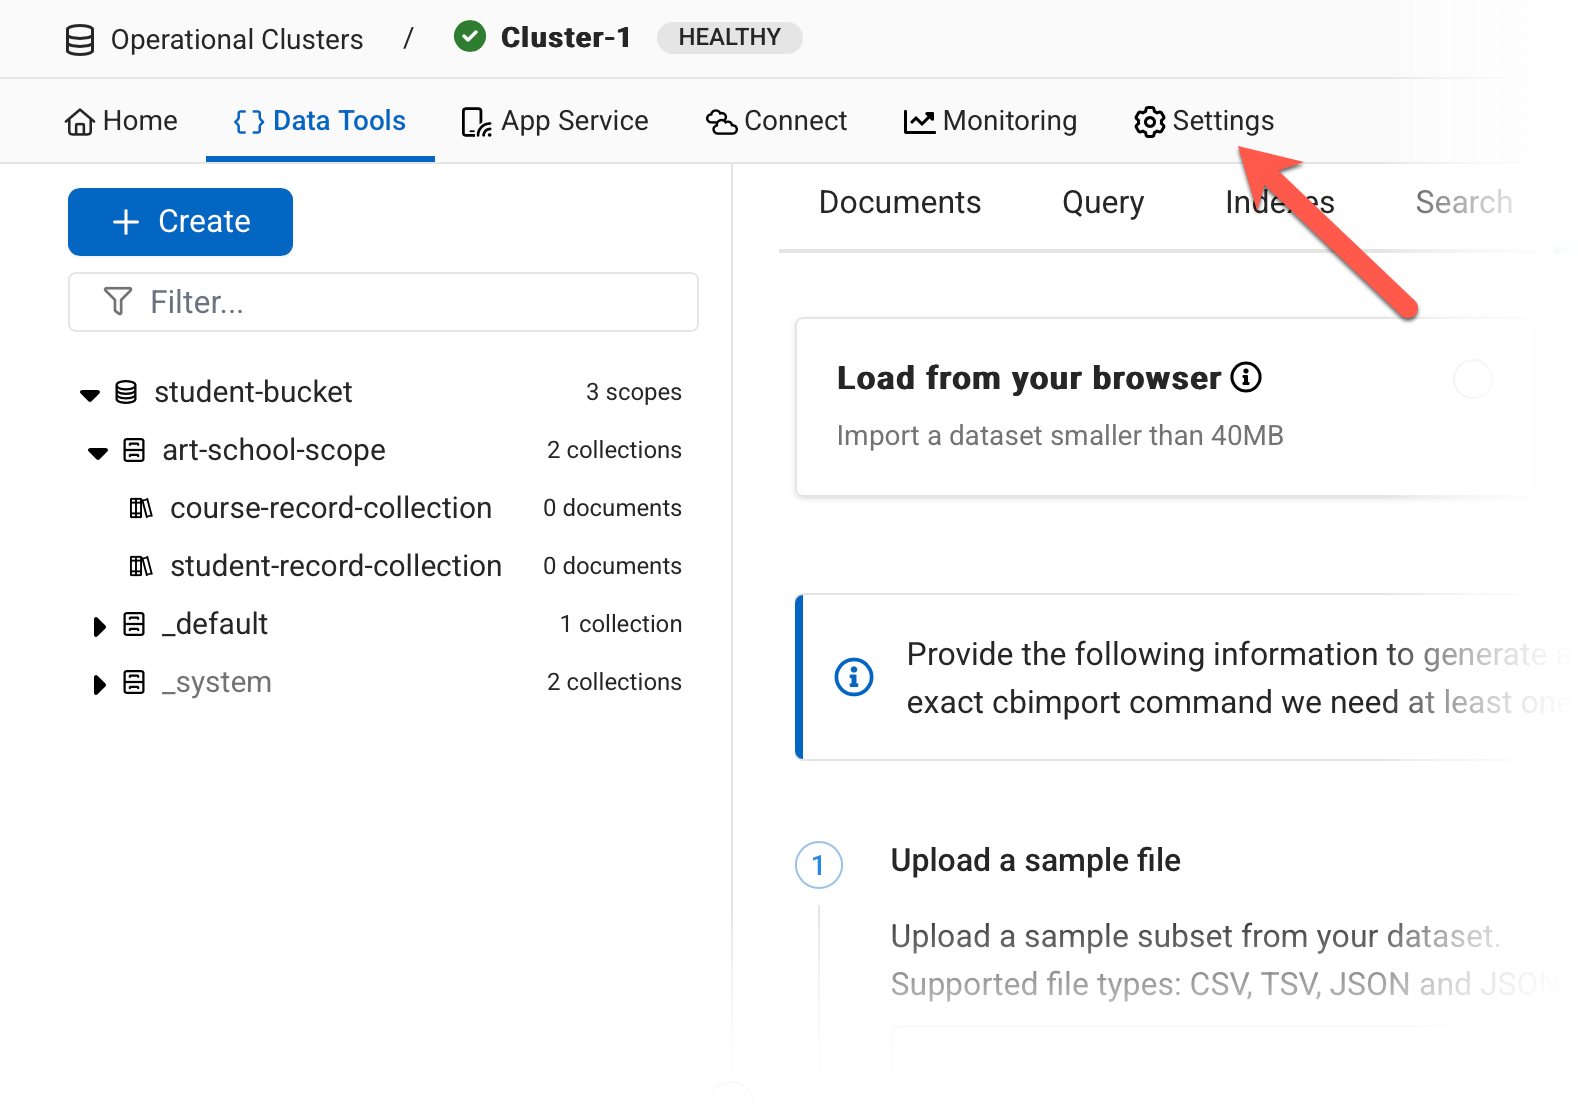
Navigate to your cluster’s security settings and add your IP to the "Allowed IP addresses" list.
-
Click on Settings from the top level menu.
-
From the left-hand menu, select
-
Click the + Add Allowed IP button.
-
From the Allowed IP screen, click on Add Current IP address, then click Add Allowed IP

When running cbimport, authentication credentials are required, which you can set up
from Security in Capella.
-
From the Settings page, select
-
Click on the + Create Cluster Access button.

-
Type
importinto theCluster Access Namefield with. -
Add a password.
-
In the
Bucket Level Accesssection, selectstudent-bucketfor the bucket,All Scopesfor the scope, andRead/Writefor Access:
-
Click on Create Cluster Access when you’re done.
To run cbimport, you will need to supply the security certificate for your Capella instance,
which you can download from the settings page.
-
From the top menu, click on Settings
-
Now, from the Cluster Settings screen, click on in the left-hand menu.
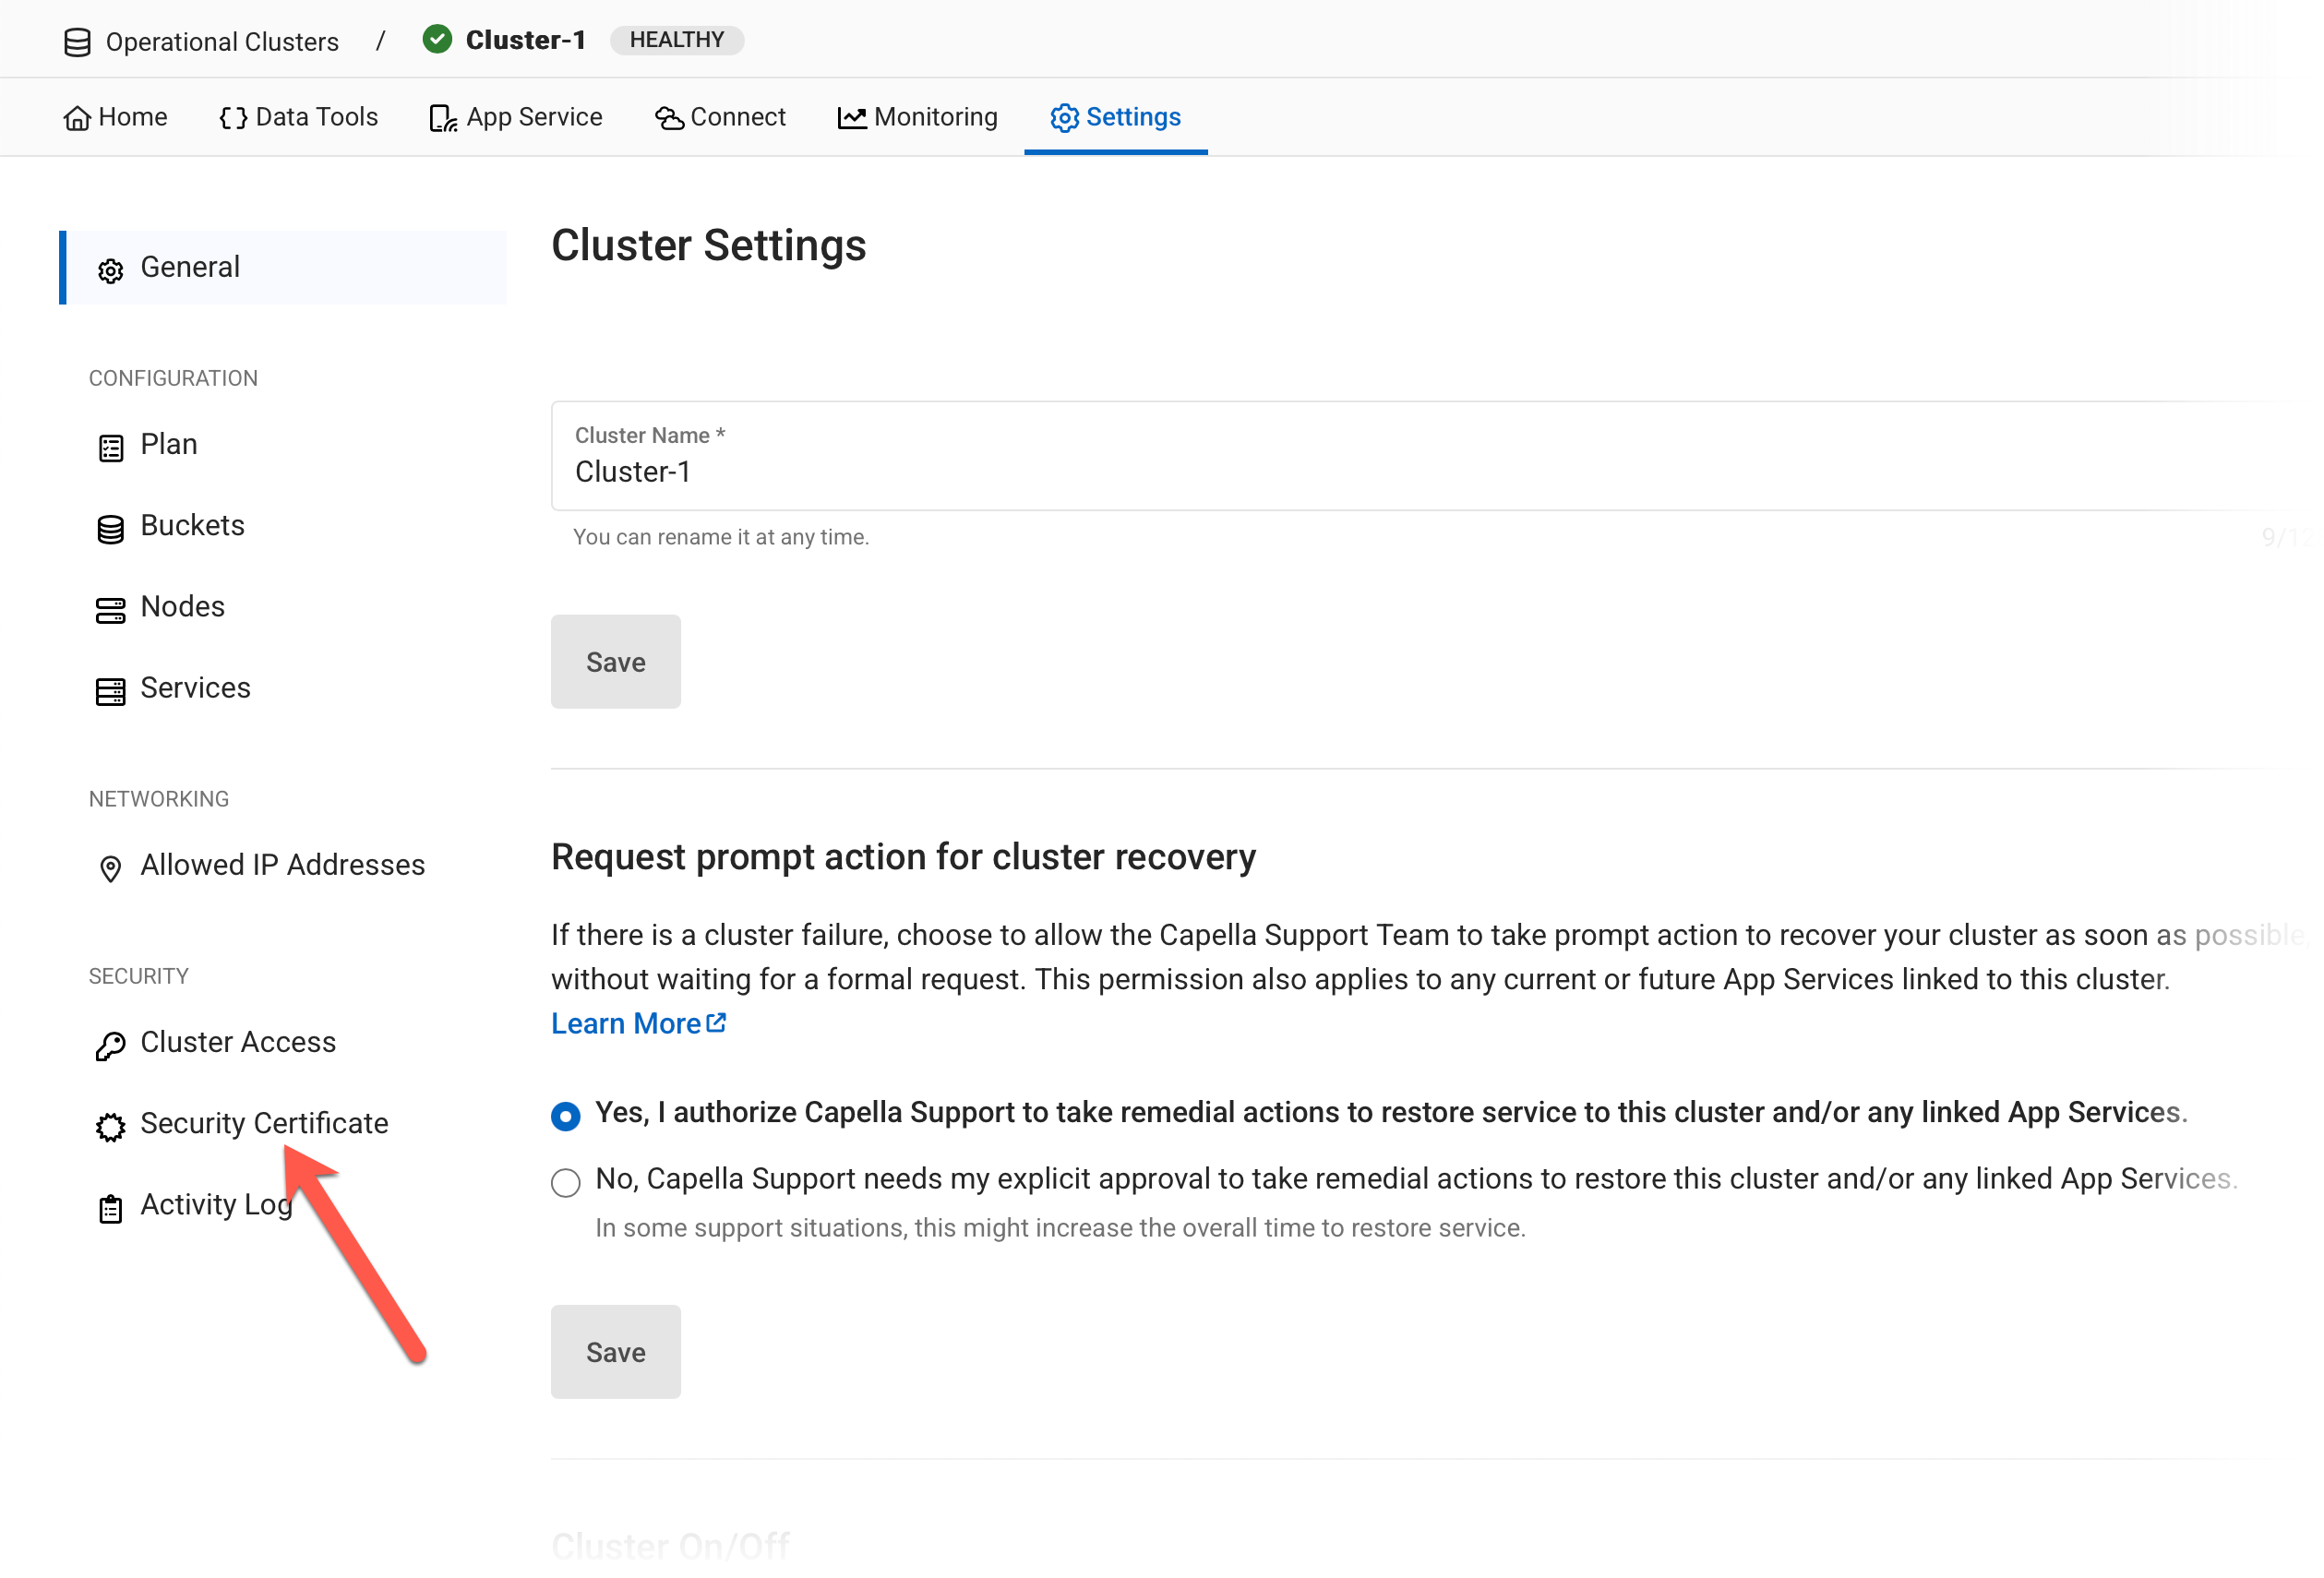
-
On the Security Certificate page, click on Download to download your security certificate for the local machine.
Make a note of the ___location where you stored it. -
Return to the Data Tools page by clicking on the link in the top level menu.
Generate and execute your cbimport command.
The data tooling page can generate a correctly formatted cbimport command line based on your import data.
All you need to do is copy the command to your command line environment
and fill in details such as your access password and the ___location of your security certificate.
cbimport command.-
From the Data Tools page, click on Load with cbimport in the central panel.

-
Locate the
coursesJSON file you created in the Extract your Course data from MySQL section, then drag it into theUpload Sample Filesection in the central panel.Alternatively, you can click on Choose a fileand load the file directly from the file chooser. -
In the
Choose your targetsection, select thestudent-bucket,art-school-scope, and thecourse-record-collection. -
For
Document keys, selectField, then pick thecourse-idfield from the dropdown list.
The Copy generated command field will contain the cbimport statement you will need to execute the import:
cbimport commandcbimport json --format lines --cluster couchbases://cb.wrrmzje92urkkyn.customsubdomain.nonprod-project-avengers.com --username <<username>> --password '<<password>>' --bucket "student-bucket" --scope-collection-exp "art-school-scope.course-record-collection" --dataset 'file://<<path>>/courses.json' --generate-key '%`course-id`%' --cacert <<path to downloaded cert file>>Before you can run the command, you will need to fill in the placeholders with information from your cluster:
-
Username and password. These are the details you created in the Set up cluster access credentials section.
-
the full path to your input source (
courses.json) -
the full path to your downloaded security certificate, which you downloaded in the Download your security certificate section.
Your command should resemble the following:
./cbimport json --format lines \
--cluster couchbases://cb.wrrmzje92urkkyn.customsubdomain.nonprod-project-avengers.com \
--username import --password 'Password' \
--bucket "student-bucket" --scope-collection-exp "art-school-scope.course-record-collection" \
--dataset 'file:///Users/test/courses.json' \
--generate-key '%`course-id`%' \
--cacert /Users/test/Cluster-1-root-certificate.txt
You can repeat the same process to generate and run a cbimport command for the students.json file.
Remember to:
-
Change the
--scope-collection-expparameter to point toart-school-scope.student-record-collection. -
Set the
--datasetparameter to point to thestudents.jsonfile. -
Set the
--generate-keyparameter to'%`course-id`%'