本主题介绍如何使用SolidColorBrush和LinearGradientBrushRadialGradientBrush对象来绘制纯色、线性渐变和径向渐变。
绘制具有纯色的区域
在任何平台中,最常见的操作之一是绘制实心区域 Color。 若要完成此任务,Windows Presentation Foundation (WPF) 提供类 SolidColorBrush 。 以下各节介绍了使用 a SolidColorBrush.
在“XAML”中使用 SolidColorBrush
若要在 XAML 中使用纯色绘制区域,请使用以下选项之一。
按名称选择预定义的纯色画笔。 例如,可以将按钮 Background 设置为“Red”或“MediumBlue”。 有关其他预定义纯色画笔的列表,请参阅 Brushes 类的静态属性。 下面是一个示例。
<!-- This button's background is painted with a red SolidColorBrush,
     described using a named color. -->
<Button Background="Red">A Button</Button>
通过指定红色、绿色和蓝色的数量来组合成单一纯色,从 32 位调色板中选择颜色。 从 32 位调色板中指定颜色的格式为“#rrggbb”,其中 rr 是两位数十六进制数字,指定红色的相对量, gg 指定绿色量, bb 指定蓝色量。 此外,可以将颜色指定为“#aarrggbb”,其中 aa 指定颜色的 alpha 值或透明度。 使用此方法可以创建部分透明的颜色。 在以下示例中,将Button的Background设置为完全不透明的红色,方法是使用十六进制表示法。
<!-- This button's background is painted with a red SolidColorBrush,
     described using hexadecimal notation. -->
<Button Background="#FFFF0000">A Button</Button>
使用属性标记语法描述 SolidColorBrush. 此语法更详细,但允许您指定其他设置,例如画笔的不透明度。 在以下示例中,两个 Button 元素的 Background 属性被设置为完全不透明的红色。 第一个画笔的颜色是使用预定义的颜色名称描述的。 第二个画笔的颜色是使用十六进制表示法描述的。
<!-- Both of these buttons' backgrounds are painted with red
     SolidColorBrush objects, described using object element
     syntax. -->
<Button>A Button

  <Button.Background>
    <SolidColorBrush Color="Red" />
  </Button.Background>
</Button>

<Button>A Button

  <Button.Background>
    <SolidColorBrush Color="#FFFF0000" />
  </Button.Background>
</Button>
在代码中使用 SolidColorBrush 进行绘制
若要在代码中使用纯色绘制区域,请使用以下选项之一。
使用类提供的 Brushes 预定义画笔之一。 在下面的示例中, Background 将 a Button 设置为 Red.
Button myButton = new Button(); myButton.Content = "A Button"; myButton.Background = Brushes.Red;SolidColorBrush使用Color结构创建并设置其Color属性。 可以使用类中的Colors预定义颜色,也可以使用静态FromArgb方法创建Color颜色。
以下示例演示如何使用预定义颜色设置 Color 属性 SolidColorBrush 。
Button myButton = new Button();
myButton.Content = "A Button";

SolidColorBrush mySolidColorBrush = new SolidColorBrush();
mySolidColorBrush.Color = Colors.Red;
myButton.Background = mySolidColorBrush;
使用静态 FromArgb 可以指定颜色的 alpha、红色、绿色和蓝色值。 其中每个值的典型范围为 0-255。 例如,alpha 值为 0 表示颜色完全透明,而值为 255 表示颜色完全不透明。 同样,红色值为 0 表示颜色中没有红色,而值为 255 表示颜色可能的最大红色量。 在以下示例中,通过指定 alpha、红色、绿色和蓝色值来描述画笔的颜色。
Button myButton = new Button();
myButton.Content = "A Button";

SolidColorBrush mySolidColorBrush = new SolidColorBrush();
mySolidColorBrush.Color =
    Color.FromArgb(
        255, // Specifies the transparency of the color.
        255, // Specifies the amount of red.
        0, // specifies the amount of green.
        0); // Specifies the amount of blue.

myButton.Background = mySolidColorBrush;
有关指定颜色的其他方法,请参阅 Color 参考主题。
绘制具有渐变的区域
渐变画笔绘制具有多个颜色的区域,这些颜色沿轴相互混合。 你可以使用它们来创建光和阴影的印象,使控件具有三维的感觉。 还可以使用它们来模拟玻璃、镀铬、水和其他平滑表面。 WPF 提供两种类型的渐变画笔: LinearGradientBrush 和 RadialGradientBrush。
线性渐变
绘制 LinearGradientBrush 沿线条( 渐变轴)定义的渐变区域。 您可以使用 GradientStop 对象指定渐变的颜色及其在渐变轴上的位置。 还可以修改渐变轴,使你能够创建水平渐变和垂直渐变,并反转渐变方向。 下一部分将介绍渐变轴。 默认情况下,将创建对角渐变。
以下示例演示了创建具有四种颜色的线性渐变的代码。
<!-- This rectangle is painted with a diagonal linear gradient. -->
<Rectangle Width="200" Height="100">
  <Rectangle.Fill>
    <LinearGradientBrush StartPoint="0,0" EndPoint="1,1">
      <GradientStop Color="Yellow" Offset="0.0" />
      <GradientStop Color="Red" Offset="0.25" />
      <GradientStop Color="Blue" Offset="0.75" />
      <GradientStop Color="LimeGreen" Offset="1.0" />
    </LinearGradientBrush>
  </Rectangle.Fill>
</Rectangle>
Rectangle diagonalFillRectangle = new Rectangle();
diagonalFillRectangle.Width = 200;
diagonalFillRectangle.Height = 100;

// Create a diagonal linear gradient with four stops.
LinearGradientBrush myLinearGradientBrush =
    new LinearGradientBrush();
myLinearGradientBrush.StartPoint = new Point(0,0);
myLinearGradientBrush.EndPoint = new Point(1,1);
myLinearGradientBrush.GradientStops.Add(
    new GradientStop(Colors.Yellow, 0.0));
myLinearGradientBrush.GradientStops.Add(
    new GradientStop(Colors.Red, 0.25));
myLinearGradientBrush.GradientStops.Add(
    new GradientStop(Colors.Blue, 0.75));
myLinearGradientBrush.GradientStops.Add(
    new GradientStop(Colors.LimeGreen, 1.0));

// Use the brush to paint the rectangle.
diagonalFillRectangle.Fill = myLinearGradientBrush;
此代码生成以下渐变:

注释
本主题中的渐变示例使用默认坐标系来设置起点和终点。 默认坐标系相对于边界框:0 表示边界框的 0%,1 表示边界框的 100%。 可以通过将 MappingMode 属性设置为值 Absolute来更改此坐标系。 绝对坐标系与范围框无关。 值直接在本地空间中解释。
渐变画笔的基本构建基块是GradientStop。 渐变停止点在渐变轴上指定了Color和Offset。
渐变停止点 Color 的属性指定渐变停止点的颜色。 可以使用预定义的颜色(由 Colors 类提供)或指定 ScRGB 或 ARGB 值来设置颜色。 在 XAML 中,还可以使用十六进制表示法来描述颜色。 有关详细信息,请参阅 Color 结构。
渐变停止点的Offset属性指定颜色在渐变轴上的位置。 偏移量范围为 Double 0 到 1。 渐变停止点的偏移值越接近 0,颜色越接近渐变的起点。 渐变偏移值越接近 1,颜色越接近渐变的末尾。
渐变停止点之间每个点的颜色通过线性插值形成,由两个边界渐变停止点指定的颜色组合而成。 下图突出显示了上一示例中的渐变停止点。 圆圈标记渐变停止点的位置,虚线显示渐变轴。

第一个渐变色停点指定偏移量0.0处的颜色为黄色。 第二个渐变停止点指定偏移量 0.25处的颜色红色。 这两个停止之间的点在渐变轴上从左向右移动时逐渐从黄色变为红色。 第三个渐变色标指定颜色为蓝色,偏移量为0.75。 第二和第三个渐变点之间的颜色逐渐从红色变为蓝色。 第四个渐变停止点指定偏移量 1.0处的颜色石灰绿色。 第三和第四个渐变停止点之间的点逐渐从蓝色变为石灰绿色。
渐变轴
如前所述,线性渐变画笔的渐变停止点沿线条(渐变轴)定位。 可以使用画笔的StartPoint和EndPoint属性更改线条的方向和大小。 通过操纵画笔的StartPoint和EndPoint属性,可以创建水平和垂直渐变、反转渐变方向、缩小渐变分布等效果。
默认情况下,线性渐变画笔的StartPoint和EndPoint是相对于要绘制的区域。 点(0,0)表示正在绘制的区域左上角,(1,1)表示正在绘制的区域的右下角。 默认StartPoint和LinearGradientBrush的坐标为(0,0),而其默认EndPoint的坐标为(1,1)。这就创建了一个从左上角开始并延伸到所绘制区域右下角的对角渐变。 下图显示了具有默认值 StartPoint 和 EndPoint的线性渐变画笔的渐变轴。

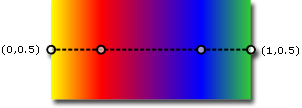
以下示例展示了如何通过指定画笔的StartPoint和EndPoint来创建水平渐变。 请注意,渐变停止点与前面的示例相同;只需更改 StartPoint 渐变, EndPoint渐变已从对角线更改为水平。
<!-- This rectangle is painted with a horizontal linear gradient. -->
<Rectangle Width="200" Height="100">
  <Rectangle.Fill>
    <LinearGradientBrush StartPoint="0,0.5" EndPoint="1,0.5">
      <GradientStop Color="Yellow" Offset="0.0" />
      <GradientStop Color="Red" Offset="0.25" />
      <GradientStop Color="Blue" Offset="0.75" />
      <GradientStop Color="LimeGreen" Offset="1.0" />
    </LinearGradientBrush>
  </Rectangle.Fill>
</Rectangle>
Rectangle horizontalFillRectangle = new Rectangle();
horizontalFillRectangle.Width = 200;
horizontalFillRectangle.Height = 100;

// Create a horizontal linear gradient with four stops.
LinearGradientBrush myHorizontalGradient =
    new LinearGradientBrush();
myHorizontalGradient.StartPoint = new Point(0,0.5);
myHorizontalGradient.EndPoint = new Point(1,0.5);
myHorizontalGradient.GradientStops.Add(
    new GradientStop(Colors.Yellow, 0.0));
myHorizontalGradient.GradientStops.Add(
    new GradientStop(Colors.Red, 0.25));
myHorizontalGradient.GradientStops.Add(
    new GradientStop(Colors.Blue, 0.75));
myHorizontalGradient.GradientStops.Add(
    new GradientStop(Colors.LimeGreen, 1.0));

// Use the brush to paint the rectangle.
horizontalFillRectangle.Fill = myHorizontalGradient;
下图显示了创建的渐变。 渐变轴用虚线标记,渐变停止点用圆圈标记。
下一个示例演示如何创建垂直渐变。
<!-- This rectangle is painted with a vertical gradient. -->
<Rectangle Width="200" Height="100">
  <Rectangle.Fill>
    <LinearGradientBrush StartPoint="0.5,0" EndPoint="0.5,1">
      <GradientStop Color="Yellow" Offset="0.0" />
      <GradientStop Color="Red" Offset="0.25" />
      <GradientStop Color="Blue" Offset="0.75" />
      <GradientStop Color="LimeGreen" Offset="1.0" />
    </LinearGradientBrush>
  </Rectangle.Fill>
</Rectangle>
Rectangle verticalFillRectangle = new Rectangle();
verticalFillRectangle.Width = 200;
verticalFillRectangle.Height = 100;

// Create a vertical linear gradient with four stops.
LinearGradientBrush myVerticalGradient =
    new LinearGradientBrush();
myVerticalGradient.StartPoint = new Point(0.5,0);
myVerticalGradient.EndPoint = new Point(0.5,1);
myVerticalGradient.GradientStops.Add(
    new GradientStop(Colors.Yellow, 0.0));
myVerticalGradient.GradientStops.Add(
    new GradientStop(Colors.Red, 0.25));
myVerticalGradient.GradientStops.Add(
    new GradientStop(Colors.Blue, 0.75));
myVerticalGradient.GradientStops.Add(
    new GradientStop(Colors.LimeGreen, 1.0));

// Use the brush to paint the rectangle.
verticalFillRectangle.Fill = myVerticalGradient;
下图显示了创建的渐变。 渐变轴用虚线标记,渐变停止点用圆圈标记。

径向渐变
像LinearGradientBrush一样,RadialGradientBrush为一个区域着色,颜色在一个轴线上混合在一起。 前面的示例演示了线性渐变画笔的轴如何是直线。 径向渐变画笔的轴由圆定义;其颜色从原点向外“辐射”。
在以下示例中,径向渐变画笔用于绘制矩形的内部。
<!-- This rectangle is painted with a diagonal linear gradient. -->
<Rectangle Width="200" Height="100">
  <Rectangle.Fill>
    <RadialGradientBrush
      GradientOrigin="0.5,0.5" Center="0.5,0.5"
      RadiusX="0.5" RadiusY="0.5">
      <GradientStop Color="Yellow" Offset="0" />
      <GradientStop Color="Red" Offset="0.25" />
      <GradientStop Color="Blue" Offset="0.75" />
      <GradientStop Color="LimeGreen" Offset="1" />
    </RadialGradientBrush>
  </Rectangle.Fill>
</Rectangle>
RadialGradientBrush myRadialGradientBrush = new RadialGradientBrush();
myRadialGradientBrush.GradientOrigin = new Point(0.5,0.5);
myRadialGradientBrush.Center = new Point(0.5,0.5);
myRadialGradientBrush.RadiusX = 0.5;
myRadialGradientBrush.RadiusY = 0.5;
myRadialGradientBrush.GradientStops.Add(
    new GradientStop(Colors.Yellow, 0.0));
myRadialGradientBrush.GradientStops.Add(
    new GradientStop(Colors.Red, 0.25));
myRadialGradientBrush.GradientStops.Add(
    new GradientStop(Colors.Blue, 0.75));
myRadialGradientBrush.GradientStops.Add(
    new GradientStop(Colors.LimeGreen, 1.0));

Rectangle myRectangle = new Rectangle();
myRectangle.Width = 200;
myRectangle.Height = 100;
myRectangle.Fill = myRadialGradientBrush;
下图显示了在上一示例中创建的渐变。 画笔的渐变停止点已突出显示。 请注意,即使结果不同,此示例中的渐变停止点与前面的线性渐变画笔示例中的渐变停止点相同。
径向渐变 
指定 GradientOrigin 径向渐变画笔渐变轴的起点。 渐变轴从渐变原点辐射到渐变圆。 画笔的渐变圆由其Center、RadiusX和RadiusY属性定义。
下图显示了具有不同GradientOrigin、Center、RadiusX和RadiusY设置的多个径向渐变。
 具有不同的 GradientOrigin、Center、RadiusX 和 RadiusY 参数的径向渐变画笔。
指定透明或 Partially-Transparent 渐变停止点
由于渐变停止点不提供不透明度属性,因此必须在标记中使用 ARGB 十六进制表示法指定颜色的 alpha 通道,或使用 Color.FromScRgb 该方法创建透明或部分透明的渐变停止点。 以下部分介绍如何在 XAML 和代码中创建部分透明的渐变停止点。
在“XAML”中指定颜色不透明度
在 XAML 中,使用 ARGB 十六进制表示法指定各个颜色的不透明度。 ARGB 十六进制表示法使用以下语法:
#
aarrggbb
上一行中的 aa 表示用于指定颜色不透明度的两位数十六进制值。 rr、gg 和 bb 分别表示两位数的十六进制值,用于指定颜色中的红色、绿色和蓝色量。 每个十六进制数字可能具有 0-9 或 A-F 的值。 0 是最小值,F 是最大值。 alpha 值为 00 指定完全透明的颜色,而 FF 的 alpha 值则创建完全不透明的颜色。 在以下示例中,十六进制 ARGB 表示法用于指定两种颜色。 第一个部分透明(其 alpha 值为 x20),而第二个值完全不透明。
<Rectangle Width="100" Height="100">
  <Rectangle.Fill>
    <LinearGradientBrush StartPoint="0,0">

      <!-- This gradient stop is partially transparent. -->
      <GradientStop Color="#200000FF" Offset="0.0" />

      <!-- This gradient stop is fully opaque. -->
      <GradientStop Color="#FF0000FF" Offset="1.0" />
    </LinearGradientBrush>
  </Rectangle.Fill>
</Rectangle>
在代码中指定颜色不透明度
使用代码时,静态 FromArgb 方法使你可以在创建颜色时指定 alpha 值。 该方法采用类型 Byte为四个参数。 第一个参数指定颜色的 alpha 通道;其他三个参数指定颜色的红色、绿色和蓝色值。 每个值应介于 0 到 255 之间(含)。 alpha 值为 0 指定颜色完全透明,而 alpha 值为 255 则指定颜色完全不透明。 在下面的示例中, FromArgb 该方法用于生成两种颜色。 第一种颜色部分透明(其 alpha 值为 32),而第二种颜色完全不透明。
LinearGradientBrush myLinearGradientBrush = new LinearGradientBrush();

// This gradient stop is partially transparent.
myLinearGradientBrush.GradientStops.Add(
    new GradientStop(Color.FromArgb(32, 0, 0, 255), 0.0));

// This gradient stop is fully opaque.
myLinearGradientBrush.GradientStops.Add(
    new GradientStop(Color.FromArgb(255, 0, 0, 255), 1.0));

Rectangle myRectangle = new Rectangle();
myRectangle.Width = 100;
myRectangle.Height = 100;
myRectangle.Fill = myLinearGradientBrush;
或者,可以使用 FromScRgb 该方法,使用 ScRGB 值创建颜色。
使用图像、绘图、视觉对象和图案进行绘制
ImageBrush、DrawingBrush和VisualBrush类使你能够使用图像、绘图或视觉对象绘制区域。 有关使用图像、绘图和图案进行绘制的信息,请参阅 “使用图像、绘图和视觉对象进行绘制”。