Panel 元素是控制元素呈现的组件,其大小和维度、其位置和子内容的排列方式。 Windows Presentation Foundation (WPF) 提供了许多预定义 Panel 元素以及构造自定义 Panel 元素的功能。
本主题包含以下各节:
Panel 类
Panel 是 Windows Presentation Foundation(WPF)中提供布局支持的所有元素的基类。 Panel派生元素用于在可扩展应用程序标记语言(XAML)和代码中定位和排列元素。
WPF 包含一套全面的派生面板实现,可实现许多复杂布局。 这些派生类公开了启用大多数标准用户界面(UI)方案的属性和方法。 无法找到满足其需求的子排列行为的开发人员可以通过重写 ArrangeOverride 和 MeasureOverride 方法创建新的布局。 有关自定义布局行为的详细信息,请参阅 自定义面板元素。
面板通用成员
所有Panel元素都支持由FrameworkElement定义的基本大小调整和定位属性,包括Height、Width、HorizontalAlignment、VerticalAlignment和MarginLayoutTransform。 有关定位属性 FrameworkElement的其他信息,请参阅 对齐、边距和填充概述。
Panel 公开了在理解和使用布局时极为重要的附加属性。 该Background属性用于用一个Brush填充派生面板元素的边界之间的区域。 Children 表示由其 Panel 构成的元素的子集合。 InternalChildren 表示集合的内容 Children 以及数据绑定生成的成员。 两者都由父级Panel托管的子元素组成UIElementCollection。
面板还公开了一个 Panel.ZIndex 附加属性,该属性可用于在派生 Panel中实现分层顺序。 具有较高Panel.ZIndex值的面板Children集合的成员显示在值较低的Panel.ZIndex集合前面。 这对于面板特别有用,例如CanvasGrid,允许子元素共享相同的坐标空间。
Panel 还定义了 OnRender 方法,该方法可用于替代默认 Panel呈现行为。
附加属性
派生面板元素广泛使用附加属性。 附加属性是依赖属性的专用形式,它没有传统的公共语言运行时(CLR)属性“包装器”。 附加属性在可扩展应用程序标记语言(XAML)中具有专用语法,可在后面的几个示例中查看。
附加属性的一个用途是允许子元素存储由父元素实际定义的属性的唯一值。 此功能的一个应用是子元素告诉父元素他们想在用户界面(UI)中如何呈现,这对应用布局非常有用。 有关详细信息,请参阅 附加属性概述。
派生面板元素
许多对象派生自 Panel,但并非所有对象都用作根布局提供程序。 有六个定义的面板类(Canvas、、DockPanelGrid、StackPanel和VirtualizingStackPanelWrapPanel)专为创建应用程序 UI 而设计。
每个面板元素封装其自己的特殊功能,如下表所示。
| 元素名称 | UI 面板? | DESCRIPTION |
|---|---|---|
| Canvas | 是的 | 定义一个区域,可在其中通过相对于 Canvas 区域的坐标显式定位子元素。 |
| DockPanel | 是的 | 定义一个区域,可在其中使子元素相互水平或垂直排列。 |
| Grid | 是的 | 定义由列和行组成的灵活网格区域。 子元素 Grid 可以使用该 Margin 属性精确定位。 |
| StackPanel | 是的 | 将子元素排列成水平或垂直的一行。 |
| TabPanel | 否 | 处理 TabControl 内选项卡按钮的布局。 |
| ToolBarOverflowPanel | 否 | 在ToolBar 控件内排列内容。 |
| UniformGrid | 否 | UniformGrid 用于将子级排列在单元格大小均等的网格中。 |
| VirtualizingPanel | 否 | 为可以“虚拟化”其子集合的面板提供基类。 |
| VirtualizingStackPanel | 是的 | 将内容排列和虚拟化在一条水平或垂直的直线上。 |
| WrapPanel | 是的 | WrapPanel 将子元素放置在从左到右的顺序位置,将内容中断到包含框边缘的下一行。 后续排序按顺序从上到下或从右到左的顺序进行,具体取决于属性的值 Orientation 。 |
用户界面面板
WPF 中提供了六个面板类,这些类经过优化以支持 UI 方案:Canvas、、DockPanel、GridStackPanel、和VirtualizingStackPanelWrapPanel。 对于大多数应用程序,这些面板元素易于使用、通用且可扩展。
每个派生 Panel 元素以不同的方式处理大小约束。 理解Panel如何在水平方向或垂直方向处理约束可能会使布局更具可预测性。
| 面板名称 | x-Dimension | y-Dimension |
|---|---|---|
| Canvas | 受内容约束 | 受内容约束 |
| DockPanel | 约束 | 约束 |
| StackPanel (垂直方向) | 约束 | 受内容约束 |
| StackPanel (水平方向) | 受内容约束 | 约束 |
| Grid | 约束 | 受约束,除非 Auto 应用于行和列的情况 |
| WrapPanel | 受内容约束 | 受内容约束 |
下面提供了其中每个元素的更详细说明和用法示例。
帆布
该 Canvas 元素允许根据绝对 x 坐标 和 y 坐标 定位内容。 元素可以在唯一的位置绘制;或者,如果元素占据相同的坐标,则它们在标记中显示的顺序决定了元素的绘制顺序。
Canvas 提供任何 Panel最灵活的布局支持。 高度和宽度属性用于定义画布的区域,画布内的元素会相对于父 Canvas 的区域被分配绝对坐标。 四个附加属性、Canvas.Left、Canvas.Top、Canvas.Right和Canvas.Bottom允许在Canvas内对对象放置进行精细控制,使开发人员能够精确定位和排列屏幕上的元素。
Canvas 中的 ClipToBounds
Canvas 可以在屏幕上的任何位置放置子元素,即使在自己定义的 Height 坐标之外, Width也可以定位子元素。 此外, Canvas 不受其子级大小的影响。 因此,子元素有可能在父 Canvas对象的边界矩形外过度绘制其他元素。
Canvas的默认行为是允许子级被绘制到超出父Canvas的边界之外。 如果此行为不可取,则可以将 ClipToBounds 属性设置为 true。 这会导致 Canvas 裁剪至自身大小。
Canvas 是唯一允许子元素在其边界之外绘制的布局元素。
此行为在 宽度属性比较示例中以图形方式演示。
定义和使用画布
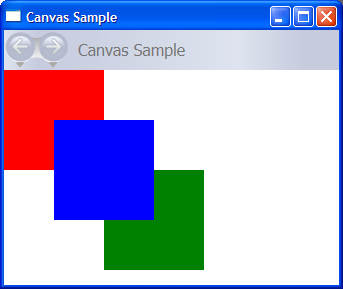
只需使用可扩展应用程序标记语言(XAML)或代码即可实例化 A Canvas 。 以下示例演示如何使用 Canvas 进行绝对定位内容。 此代码生成三个 100 像素的正方形。 第一个正方形为红色,其左上角(x,y)位置指定为 (0, 0)。 第二个正方形为绿色,其左上角位置为(100,100),就在第一个正方形的正下方和右侧。 第三个正方形为蓝色,其左上角位置为(50,50),从而包含第一个正方形的右下象限和第二个左上角象限。 由于第三个正方形最后布局,因此它似乎位于其他两个正方形的顶部,即重叠部分假定第三个框的颜色。
// Create the application's main window
mainWindow = new Window ();
mainWindow.Title = "Canvas Sample";

// Create the Canvas
myParentCanvas = new Canvas();
myParentCanvas.Width = 400;
myParentCanvas.Height = 400;

// Define child Canvas elements
myCanvas1 = new Canvas();
myCanvas1.Background = Brushes.Red;
myCanvas1.Height = 100;
myCanvas1.Width = 100;
Canvas.SetTop(myCanvas1, 0);
Canvas.SetLeft(myCanvas1, 0);

myCanvas2 = new Canvas();
myCanvas2.Background = Brushes.Green;
myCanvas2.Height = 100;
myCanvas2.Width = 100;
Canvas.SetTop(myCanvas2, 100);
Canvas.SetLeft(myCanvas2, 100);

myCanvas3 = new Canvas();
myCanvas3.Background = Brushes.Blue;
myCanvas3.Height = 100;
myCanvas3.Width = 100;
Canvas.SetTop(myCanvas3, 50);
Canvas.SetLeft(myCanvas3, 50);

// Add child elements to the Canvas' Children collection
myParentCanvas.Children.Add(myCanvas1);
myParentCanvas.Children.Add(myCanvas2);
myParentCanvas.Children.Add(myCanvas3);

// Add the parent Canvas as the Content of the Window Object
mainWindow.Content = myParentCanvas;
mainWindow.Show ();
WindowTitle = "Canvas Sample"
'Create a Canvas as the root Panel
Dim myParentCanvas As New Canvas()
myParentCanvas.Width = 400
myParentCanvas.Height = 400

' Define child Canvas elements
Dim myCanvas1 As New Canvas()
myCanvas1.Background = Brushes.Red
myCanvas1.Height = 100
myCanvas1.Width = 100
Canvas.SetTop(myCanvas1, 0)
Canvas.SetLeft(myCanvas1, 0)

Dim myCanvas2 As New Canvas()
myCanvas2.Background = Brushes.Green
myCanvas2.Height = 100
myCanvas2.Width = 100
Canvas.SetTop(myCanvas2, 100)
Canvas.SetLeft(myCanvas2, 100)

Dim myCanvas3 As New Canvas()
myCanvas3.Background = Brushes.Blue
myCanvas3.Height = 100
myCanvas3.Width = 100
Canvas.SetTop(myCanvas3, 50)
Canvas.SetLeft(myCanvas3, 50)

' Add child elements to the Canvas' Children collection
myParentCanvas.Children.Add(myCanvas1)
myParentCanvas.Children.Add(myCanvas2)
myParentCanvas.Children.Add(myCanvas3)

' Add the parent Canvas as the Content of the Window Object
Me.Content = myParentCanvas
<Page WindowTitle="Canvas Sample" xmlns="http://schemas.microsoft.com/winfx/2006/xaml/presentation">
  <Canvas Height="400" Width="400">
    <Canvas Height="100" Width="100" Top="0" Left="0" Background="Red"/>
    <Canvas Height="100" Width="100" Top="100" Left="100" Background="Green"/>
    <Canvas Height="100" Width="100" Top="50" Left="50" Background="Blue"/>
  </Canvas>
</Page>
编译的应用程序生成如下所示的新 UI。
DockPanel
该 DockPanel 元素使用 DockPanel.Dock 子内容元素中设置的附加属性将内容定位到容器边缘。 当DockPanel.Dock被设置为Top或Bottom时,它将子元素放置在彼此上方或下方。 DockPanel.Dock设置为Left或Right时,将子元素彼此左侧或右侧放置。 LastChildFill 属性用于确定作为子元素添加到 DockPanel 的最终元素的位置。
可用于 DockPanel 定位一组相关控件,例如一组按钮。 或者,可以使用它创建“分栏”UI,类似于在 Microsoft Outlook 中找到的 UI。
按内容调整大小
如果未指定其 Height 和 Width 属性,则 DockPanel 会根据内容自行调整大小。 大小可以增加或减少以适应其子元素的大小。 但是,如果指定了这些属性,并且下一个指定的子元素不再具有空间, DockPanel 则不显示子元素或后续子元素,并且不度量后续子元素。
LastChildFill
默认情况下,元素的最后一个 DockPanel 子元素将“填充”剩余的未分配空间。 如果不需要此行为,请将 LastChildFill 属性设置为 false。
定义和使用 DockPanel
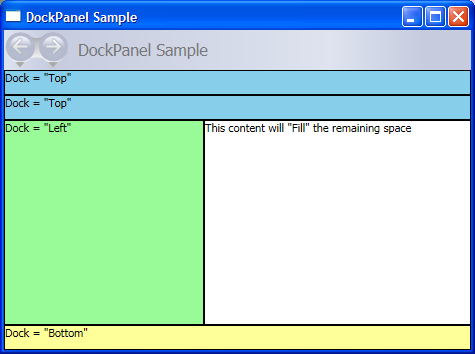
以下示例演示如何使用 DockPanel 来划分空间。 将五个 Border 元素添加为父 DockPanel 的子元素。 每个使用 DockPanel 的不同定位属性来分隔空间。 最后一个元素“填充”剩余的未分配空间。
// Create the application's main window
mainWindow = gcnew Window();
mainWindow->Title = "DockPanel Sample";

// Create the DockPanel
DockPanel^ myDockPanel = gcnew DockPanel();
myDockPanel->LastChildFill = true;

// Define the child content
Border^ myBorder1 = gcnew Border();
myBorder1->Height = 25;
myBorder1->Background = Brushes::SkyBlue;
myBorder1->BorderBrush = Brushes::Black;
myBorder1->BorderThickness = Thickness(1);
DockPanel::SetDock(myBorder1, Dock::Top);
TextBlock^ myTextBlock1 = gcnew TextBlock();
myTextBlock1->Foreground = Brushes::Black;
myTextBlock1->Text = "Dock = Top";
myBorder1->Child = myTextBlock1;

Border^ myBorder2 = gcnew Border();
myBorder2->Height = 25;
myBorder2->Background = Brushes::SkyBlue;
myBorder2->BorderBrush = Brushes::Black;
myBorder2->BorderThickness = Thickness(1);
DockPanel::SetDock(myBorder2, Dock::Top);
TextBlock^ myTextBlock2 = gcnew TextBlock();
myTextBlock2->Foreground = Brushes::Black;
myTextBlock2->Text = "Dock = Top";
myBorder2->Child = myTextBlock2;

Border^ myBorder3 = gcnew Border();
myBorder3->Height = 25;
myBorder3->Background = Brushes::LemonChiffon;
myBorder3->BorderBrush = Brushes::Black;
myBorder3->BorderThickness = Thickness(1);
DockPanel::SetDock(myBorder3, Dock::Bottom);
TextBlock^ myTextBlock3 = gcnew TextBlock();
myTextBlock3->Foreground = Brushes::Black;
myTextBlock3->Text = "Dock = Bottom";
myBorder3->Child = myTextBlock3;

Border^ myBorder4 = gcnew Border();
myBorder4->Width = 200;
myBorder4->Background = Brushes::PaleGreen;
myBorder4->BorderBrush = Brushes::Black;
myBorder4->BorderThickness = Thickness(1);
DockPanel::SetDock(myBorder4, Dock::Left);
TextBlock^ myTextBlock4 = gcnew TextBlock();
myTextBlock4->Foreground = Brushes::Black;
myTextBlock4->Text = "Dock = Left";
myBorder4->Child = myTextBlock4;

Border^ myBorder5 = gcnew Border();
myBorder5->Background = Brushes::White;
myBorder5->BorderBrush = Brushes::Black;
myBorder5->BorderThickness = Thickness(1);
TextBlock^ myTextBlock5 = gcnew TextBlock();
myTextBlock5->Foreground = Brushes::Black;
myTextBlock5->Text = "This content will Fill the remaining space";
myBorder5->Child = myTextBlock5;

// Add child elements to the DockPanel Children collection
myDockPanel->Children->Add(myBorder1);
myDockPanel->Children->Add(myBorder2);
myDockPanel->Children->Add(myBorder3);
myDockPanel->Children->Add(myBorder4);
myDockPanel->Children->Add(myBorder5);

// Add the parent Canvas as the Content of the Window Object
mainWindow->Content = myDockPanel;
mainWindow->Show();
// Create the application's main window
mainWindow = new Window ();
mainWindow.Title = "DockPanel Sample";

// Create the DockPanel
DockPanel myDockPanel = new DockPanel();
myDockPanel.LastChildFill = true;

// Define the child content
Border myBorder1 = new Border();
myBorder1.Height = 25;
myBorder1.Background = Brushes.SkyBlue;
myBorder1.BorderBrush = Brushes.Black;
myBorder1.BorderThickness = new Thickness(1);
DockPanel.SetDock(myBorder1, Dock.Top);
TextBlock myTextBlock1 = new TextBlock();
myTextBlock1.Foreground = Brushes.Black;
myTextBlock1.Text = "Dock = Top";
myBorder1.Child = myTextBlock1;

Border myBorder2 = new Border();
myBorder2.Height = 25;
myBorder2.Background = Brushes.SkyBlue;
myBorder2.BorderBrush = Brushes.Black;
myBorder2.BorderThickness = new Thickness(1);
DockPanel.SetDock(myBorder2, Dock.Top);
TextBlock myTextBlock2 = new TextBlock();
myTextBlock2.Foreground = Brushes.Black;
myTextBlock2.Text = "Dock = Top";
myBorder2.Child = myTextBlock2;

Border myBorder3 = new Border();
myBorder3.Height = 25;
myBorder3.Background = Brushes.LemonChiffon;
myBorder3.BorderBrush = Brushes.Black;
myBorder3.BorderThickness = new Thickness(1);
DockPanel.SetDock(myBorder3, Dock.Bottom);
TextBlock myTextBlock3 = new TextBlock();
myTextBlock3.Foreground = Brushes.Black;
myTextBlock3.Text = "Dock = Bottom";
myBorder3.Child = myTextBlock3;

Border myBorder4 = new Border();
myBorder4.Width = 200;
myBorder4.Background = Brushes.PaleGreen;
myBorder4.BorderBrush = Brushes.Black;
myBorder4.BorderThickness = new Thickness(1);
DockPanel.SetDock(myBorder4, Dock.Left);
TextBlock myTextBlock4 = new TextBlock();
myTextBlock4.Foreground = Brushes.Black;
myTextBlock4.Text = "Dock = Left";
myBorder4.Child = myTextBlock4;

Border myBorder5 = new Border();
myBorder5.Background = Brushes.White;
myBorder5.BorderBrush = Brushes.Black;
myBorder5.BorderThickness = new Thickness(1);
TextBlock myTextBlock5 = new TextBlock();
myTextBlock5.Foreground = Brushes.Black;
myTextBlock5.Text = "This content will Fill the remaining space";
myBorder5.Child = myTextBlock5;

// Add child elements to the DockPanel Children collection
myDockPanel.Children.Add(myBorder1);
myDockPanel.Children.Add(myBorder2);
myDockPanel.Children.Add(myBorder3);
myDockPanel.Children.Add(myBorder4);
myDockPanel.Children.Add(myBorder5);

// Add the parent Canvas as the Content of the Window Object
mainWindow.Content = myDockPanel;
mainWindow.Show ();
WindowTitle = "DockPanel Sample"
'Create a DockPanel as the root Panel
Dim myDockPanel As New DockPanel()
myDockPanel.LastChildFill = True

' Define the child content
Dim myBorder1 As New Border()
myBorder1.Height = 25
myBorder1.Background = Brushes.SkyBlue
myBorder1.BorderBrush = Brushes.Black
myBorder1.BorderThickness = New Thickness(1)
DockPanel.SetDock(myBorder1, Dock.Top)
Dim myTextBlock1 As New TextBlock()
myTextBlock1.Foreground = Brushes.Black
myTextBlock1.Text = "Dock = Top"
myBorder1.Child = myTextBlock1

Dim myBorder2 As New Border()
myBorder2.Height = 25
myBorder2.Background = Brushes.SkyBlue
myBorder2.BorderBrush = Brushes.Black
myBorder2.BorderThickness = New Thickness(1)
DockPanel.SetDock(myBorder2, Dock.Top)
Dim myTextBlock2 As New TextBlock()
myTextBlock2.Foreground = Brushes.Black
myTextBlock2.Text = "Dock = Top"
myBorder2.Child = myTextBlock2

Dim myBorder3 As New Border()
myBorder3.Height = 25
myBorder3.Background = Brushes.LemonChiffon
myBorder3.BorderBrush = Brushes.Black
myBorder3.BorderThickness = New Thickness(1)
DockPanel.SetDock(myBorder3, Dock.Bottom)
Dim myTextBlock3 As New TextBlock()
myTextBlock3.Foreground = Brushes.Black
myTextBlock3.Text = "Dock = Bottom"
myBorder3.Child = myTextBlock3

Dim myBorder4 As New Border()
myBorder4.Width = 200
myBorder4.Background = Brushes.PaleGreen
myBorder4.BorderBrush = Brushes.Black
myBorder4.BorderThickness = New Thickness(1)
DockPanel.SetDock(myBorder4, Dock.Left)
Dim myTextBlock4 As New TextBlock()
myTextBlock4.Foreground = Brushes.Black
myTextBlock4.Text = "Dock = Left"
myBorder4.Child = myTextBlock4

Dim myBorder5 As New Border()
myBorder5.Background = Brushes.White
myBorder5.BorderBrush = Brushes.Black
myBorder5.BorderThickness = New Thickness(1)
Dim myTextBlock5 As New TextBlock()
myTextBlock5.Foreground = Brushes.Black
myTextBlock5.Text = "This content will Fill the remaining space"
myBorder5.Child = myTextBlock5

' Add child elements to the DockPanel Children collection
myDockPanel.Children.Add(myBorder1)
myDockPanel.Children.Add(myBorder2)
myDockPanel.Children.Add(myBorder3)
myDockPanel.Children.Add(myBorder4)
myDockPanel.Children.Add(myBorder5)
Me.Content = myDockPanel
<Page xmlns="http://schemas.microsoft.com/winfx/2006/xaml/presentation" WindowTitle="DockPanel Sample">
  <DockPanel LastChildFill="True">
    <Border Height="25" Background="SkyBlue" BorderBrush="Black" BorderThickness="1" DockPanel.Dock="Top">
      <TextBlock Foreground="Black">Dock = "Top"</TextBlock>
    </Border>
    <Border Height="25" Background="SkyBlue" BorderBrush="Black" BorderThickness="1" DockPanel.Dock="Top">
      <TextBlock Foreground="Black">Dock = "Top"</TextBlock>
    </Border>
    <Border Height="25" Background="LemonChiffon" BorderBrush="Black" BorderThickness="1" DockPanel.Dock="Bottom">
      <TextBlock Foreground="Black">Dock = "Bottom"</TextBlock>
    </Border>
    <Border Width="200" Background="PaleGreen" BorderBrush="Black" BorderThickness="1" DockPanel.Dock="Left">
      <TextBlock Foreground="Black">Dock = "Left"</TextBlock>
    </Border>
    <Border Background="White" BorderBrush="Black" BorderThickness="1">
      <TextBlock Foreground="Black">This content will "Fill" the remaining space</TextBlock>
    </Border>
  </DockPanel>
</Page>
编译的应用程序生成如下所示的新 UI。
网格
该 Grid 元素合并绝对定位和表格数据控件的功能。 使用 A Grid ,可以轻松定位和设置元素样式。 Grid 允许你定义灵活的行和列分组,甚至提供一种机制来共享多个 Grid 元素之间的大小调整信息。
网格与表有何不同?
Table 并 Grid 共享一些常见功能,但每种功能最适合不同的方案。 Table 被设计用于流内容(有关流内容的更多信息,请参阅 流文档概述)。 网格最适合用于表单内部(基本上在流式内容之外的任何位置)。 在FlowDocument中,Table支持流内容行为,例如分页、列重排和内容选择,而Grid则不支持。 Grid另一方面,最好在FlowDocument之外使用,原因有很多,包括Grid会根据行索引和列索引添加元素,而Table则不会。 Grid 元素允许对子内容进行分层,使得单个“单元格”中能够存在多个元素。而 Table 元素则不支持分层。 Grid 的子元素可以相对于其“单元格”边界的区域进行绝对定位。 Table 不支持此功能。 最后,一个 Grid 比一个 Table更轻的重量。
列和行的尺寸调整行为
在一个 Grid 范围内定义的列和行可以利用 Star 大小调整来按比例分布剩余的空间。 当 Star 被选择为行或列的高度或宽度时,该列或行将获得剩余可用空间的加权比例。 这与相反 Auto,它将根据列或行中内容的大小均匀分布空间。 此值在使用可扩展应用程序标记语言(XAML)时,表示为 * 或 2*。 在第一种情况下,行或列将接收一倍的可用空间,在第二种情况下,接收两倍的可用空间,依此类推。 通过将此方法与一个 HorizontalAlignment 和 VerticalAlignment 值 Stretch 成比例地分布空间相结合,可以按屏幕空间百分比对布局空间进行分区。
Grid 是唯一能够以这种方式分配空间的布局面板。
定义和使用网格
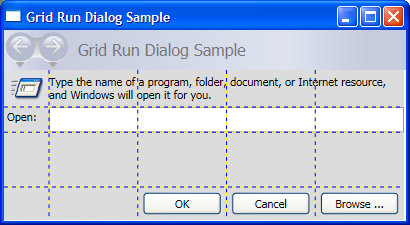
以下示例演示如何生成类似于在 Windows“开始”菜单上可用的“运行”对话框中找到的 UI。
// Create the Grid.
grid1 = new Grid ();
grid1.Background = Brushes.Gainsboro;
grid1.HorizontalAlignment = HorizontalAlignment.Left;
grid1.VerticalAlignment = VerticalAlignment.Top;
grid1.ShowGridLines = true;
grid1.Width = 425;
grid1.Height = 165;

// Define the Columns.
colDef1 = new ColumnDefinition();
colDef1.Width = new GridLength(1, GridUnitType.Auto);
colDef2 = new ColumnDefinition();
colDef2.Width = new GridLength(1, GridUnitType.Star);
colDef3 = new ColumnDefinition();
colDef3.Width = new GridLength(1, GridUnitType.Star);
colDef4 = new ColumnDefinition();
colDef4.Width = new GridLength(1, GridUnitType.Star);
colDef5 = new ColumnDefinition();
colDef5.Width = new GridLength(1, GridUnitType.Star);
grid1.ColumnDefinitions.Add(colDef1);
grid1.ColumnDefinitions.Add(colDef2);
grid1.ColumnDefinitions.Add(colDef3);
grid1.ColumnDefinitions.Add(colDef4);
grid1.ColumnDefinitions.Add(colDef5);

// Define the Rows.
rowDef1 = new RowDefinition();
rowDef1.Height = new GridLength(1, GridUnitType.Auto);
rowDef2 = new RowDefinition();
rowDef2.Height = new GridLength(1, GridUnitType.Auto);
rowDef3 = new RowDefinition();
rowDef3.Height = new GridLength(1, GridUnitType.Star);
rowDef4 = new RowDefinition();
rowDef4.Height = new GridLength(1, GridUnitType.Auto);
grid1.RowDefinitions.Add(rowDef1);
grid1.RowDefinitions.Add(rowDef2);
grid1.RowDefinitions.Add(rowDef3);
grid1.RowDefinitions.Add(rowDef4);

// Add the Image.
img1 = new Image();
img1.Source = new System.Windows.Media.Imaging.BitmapImage(new Uri("runicon.png", UriKind.Relative));
Grid.SetRow(img1, 0);
Grid.SetColumn(img1, 0);

// Add the main application dialog.
txt1 = new TextBlock();
txt1.Text = "Type the name of a program, folder, document, or Internet resource, and Windows will open it for you.";
txt1.TextWrapping = TextWrapping.Wrap;
Grid.SetColumnSpan(txt1, 4);
Grid.SetRow(txt1, 0);
Grid.SetColumn(txt1, 1);

// Add the second text cell to the Grid.
txt2 = new TextBlock();
txt2.Text = "Open:";
Grid.SetRow(txt2, 1);
Grid.SetColumn(txt2, 0);

// Add the TextBox control.
tb1 = new TextBox();
Grid.SetRow(tb1, 1);
Grid.SetColumn(tb1, 1);
Grid.SetColumnSpan(tb1, 5);

// Add the buttons.
button1 = new Button();
button2 = new Button();
button3 = new Button();
button1.Content = "OK";
button2.Content = "Cancel";
button3.Content = "Browse ...";
Grid.SetRow(button1, 3);
Grid.SetColumn(button1, 2);
button1.Margin = new Thickness(10, 0, 10, 15);
button2.Margin = new Thickness(10, 0, 10, 15);
button3.Margin = new Thickness(10, 0, 10, 15);
Grid.SetRow(button2, 3);
Grid.SetColumn(button2, 3);
Grid.SetRow(button3, 3);
Grid.SetColumn(button3, 4);

grid1.Children.Add(img1);
grid1.Children.Add(txt1);
grid1.Children.Add(txt2);
grid1.Children.Add(tb1);
grid1.Children.Add(button1);
grid1.Children.Add(button2);
grid1.Children.Add(button3);

mainWindow.Content = grid1;
'Create a Grid as the root Panel element.
Dim myGrid As New Grid()
myGrid.Height = 165
myGrid.Width = 425
myGrid.Background = Brushes.Gainsboro
myGrid.ShowGridLines = True
myGrid.HorizontalAlignment = Windows.HorizontalAlignment.Left
myGrid.VerticalAlignment = Windows.VerticalAlignment.Top

' Define and Add the Rows and Columns.
Dim colDef1 As New ColumnDefinition
colDef1.Width = New GridLength(1, GridUnitType.Auto)
Dim colDef2 As New ColumnDefinition
colDef2.Width = New GridLength(1, GridUnitType.Star)
Dim colDef3 As New ColumnDefinition
colDef3.Width = New GridLength(1, GridUnitType.Star)
Dim colDef4 As New ColumnDefinition
colDef4.Width = New GridLength(1, GridUnitType.Star)
Dim colDef5 As New ColumnDefinition
colDef5.Width = New GridLength(1, GridUnitType.Star)
myGrid.ColumnDefinitions.Add(colDef1)
myGrid.ColumnDefinitions.Add(colDef2)
myGrid.ColumnDefinitions.Add(colDef3)
myGrid.ColumnDefinitions.Add(colDef4)
myGrid.ColumnDefinitions.Add(colDef5)

Dim rowDef1 As New RowDefinition
rowDef1.Height = New GridLength(1, GridUnitType.Auto)
Dim rowDef2 As New RowDefinition
rowDef2.Height = New GridLength(1, GridUnitType.Auto)
Dim rowDef3 As New Controls.RowDefinition
rowDef3.Height = New GridLength(1, GridUnitType.Star)
Dim rowDef4 As New RowDefinition
rowDef4.Height = New GridLength(1, GridUnitType.Auto)
myGrid.RowDefinitions.Add(rowDef1)
myGrid.RowDefinitions.Add(rowDef2)
myGrid.RowDefinitions.Add(rowDef3)
myGrid.RowDefinitions.Add(rowDef4)

' Add the Image.
Dim img1 As New Image
img1.Source = New System.Windows.Media.Imaging.BitmapImage(New Uri("runicon.png", UriKind.Relative))
Grid.SetRow(img1, 0)
Grid.SetColumn(img1, 0)
myGrid.Children.Add(img1)

' Add the main application dialog.
Dim txt1 As New TextBlock
txt1.Text = "Type the name of a program, document, or Internet resource, and Windows will open it for you."
txt1.TextWrapping = TextWrapping.Wrap
Grid.SetColumnSpan(txt1, 4)
Grid.SetRow(txt1, 0)
Grid.SetColumn(txt1, 1)
myGrid.Children.Add(txt1)

' Add the second TextBlock Cell to the Grid.
Dim txt2 As New TextBlock
txt2.Text = "Open:"
Grid.SetRow(txt2, 1)
Grid.SetColumn(txt2, 0)
myGrid.Children.Add(txt2)

' Add the TextBox control.
Dim tb1 As New TextBox
Grid.SetRow(tb1, 1)
Grid.SetColumn(tb1, 1)
Grid.SetColumnSpan(tb1, 5)
myGrid.Children.Add(tb1)

' Add the Button controls.
Dim button1 As New Button
Dim button2 As New Button
Dim button3 As New Button
button1.Content = "OK"
button1.Margin = New Thickness(10, 0, 10, 15)
button2.Content = "Cancel"
button2.Margin = New Thickness(10, 0, 10, 15)
button3.Content = "Browse ..."
button3.Margin = New Thickness(10, 0, 10, 15)

Grid.SetRow(button1, 3)
Grid.SetColumn(button1, 2)
Grid.SetRow(button2, 3)
Grid.SetColumn(button2, 3)
Grid.SetRow(button3, 3)
Grid.SetColumn(button3, 4)
myGrid.Children.Add(button1)
myGrid.Children.Add(button2)
myGrid.Children.Add(button3)

Me.Content = myGrid
编译的应用程序生成如下所示的新 UI。
StackPanel
使用 A StackPanel ,可以按分配的方向“堆叠”元素。 默认堆栈方向为垂直。 该 Orientation 属性可用于控制内容流。
StackPanel 与 DockPanel
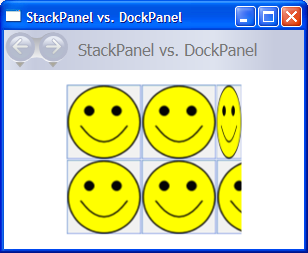
虽然 DockPanel 也可以嵌套子元素,但在某些使用场景中, DockPanel 和 StackPanel 没有产生类似的结果。 例如,在DockPanel中,子元素的顺序可能会影响其大小,而在StackPanel中则不会。 这是因为 StackPanel 在 PositiveInfinity 处按照堆叠方向测量,而 DockPanel 仅测量可用大小。
以下示例演示了此关键差异。
// Create the application's main window
mainWindow = gcnew Window();
mainWindow->Title = "StackPanel vs. DockPanel";

// Add root Grid
myGrid = gcnew Grid();
myGrid->Width = 175;
myGrid->Height = 150;
RowDefinition^ myRowDef1 = gcnew RowDefinition();
RowDefinition^ myRowDef2 = gcnew RowDefinition();
myGrid->RowDefinitions->Add(myRowDef1);
myGrid->RowDefinitions->Add(myRowDef2);

// Define the DockPanel
myDockPanel = gcnew DockPanel();
Grid::SetRow(myDockPanel, 0);

//Define an Image and Source
Image^ myImage = gcnew Image();
BitmapImage^ bi = gcnew BitmapImage();
bi->BeginInit();
bi->UriSource = gcnew System::Uri("smiley_stackpanel.png", UriKind::Relative);
bi->EndInit();
myImage->Source = bi;

Image^ myImage2 = gcnew Image();
BitmapImage^ bi2 = gcnew BitmapImage();
bi2->BeginInit();
bi2->UriSource = gcnew System::Uri("smiley_stackpanel.png", UriKind::Relative);
bi2->EndInit();
myImage2->Source = bi2;

Image^ myImage3 = gcnew Image();
BitmapImage^ bi3 = gcnew BitmapImage();
bi3->BeginInit();
bi3->UriSource = gcnew System::Uri("smiley_stackpanel.PNG", UriKind::Relative);
bi3->EndInit();
myImage3->Stretch = Stretch::Fill;
myImage3->Source = bi3;

// Add the images to the parent DockPanel
myDockPanel->Children->Add(myImage);
myDockPanel->Children->Add(myImage2);
myDockPanel->Children->Add(myImage3);

//Define a StackPanel
myStackPanel = gcnew StackPanel();
myStackPanel->Orientation = Orientation::Horizontal;
Grid::SetRow(myStackPanel, 1);

Image^ myImage4 = gcnew Image();
BitmapImage^ bi4 = gcnew BitmapImage();
bi4->BeginInit();
bi4->UriSource = gcnew System::Uri("smiley_stackpanel.png", UriKind::Relative);
bi4->EndInit();
myImage4->Source = bi4;

Image^ myImage5 = gcnew Image();
BitmapImage^ bi5 = gcnew BitmapImage();
bi5->BeginInit();
bi5->UriSource = gcnew System::Uri("smiley_stackpanel.png", UriKind::Relative);
bi5->EndInit();
myImage5->Source = bi5;

Image^ myImage6 = gcnew Image();
BitmapImage^ bi6 = gcnew BitmapImage();
bi6->BeginInit();
bi6->UriSource = gcnew System::Uri("smiley_stackpanel.PNG", UriKind::Relative);
bi6->EndInit();
myImage6->Stretch = Stretch::Fill;
myImage6->Source = bi6;

// Add the images to the parent StackPanel
myStackPanel->Children->Add(myImage4);
myStackPanel->Children->Add(myImage5);
myStackPanel->Children->Add(myImage6);

// Add the layout panels as children of the Grid
myGrid->Children->Add(myDockPanel);
myGrid->Children->Add(myStackPanel);

// Add the Grid as the Content of the Parent Window Object
mainWindow->Content = myGrid;
mainWindow->Show();
// Create the application's main window
mainWindow = new Window ();
mainWindow.Title = "StackPanel vs. DockPanel";

// Add root Grid
myGrid = new Grid();
myGrid.Width = 175;
myGrid.Height = 150;
RowDefinition myRowDef1 = new RowDefinition();
RowDefinition myRowDef2 = new RowDefinition();
myGrid.RowDefinitions.Add(myRowDef1);
myGrid.RowDefinitions.Add(myRowDef2);

// Define the DockPanel
myDockPanel = new DockPanel();
Grid.SetRow(myDockPanel, 0);

//Define an Image and Source
Image myImage = new Image();
BitmapImage bi = new BitmapImage();
bi.BeginInit();
bi.UriSource = new Uri("smiley_stackpanel.png", UriKind.Relative);
bi.EndInit();
myImage.Source = bi;

Image myImage2 = new Image();
BitmapImage bi2 = new BitmapImage();
bi2.BeginInit();
bi2.UriSource = new Uri("smiley_stackpanel.png", UriKind.Relative);
bi2.EndInit();
myImage2.Source = bi2;

Image myImage3 = new Image();
BitmapImage bi3 = new BitmapImage();
bi3.BeginInit();
bi3.UriSource = new Uri("smiley_stackpanel.PNG", UriKind.Relative);
bi3.EndInit();
myImage3.Stretch = Stretch.Fill;
myImage3.Source = bi3;

// Add the images to the parent DockPanel
myDockPanel.Children.Add(myImage);
myDockPanel.Children.Add(myImage2);
myDockPanel.Children.Add(myImage3);

//Define a StackPanel
myStackPanel = new StackPanel();
myStackPanel.Orientation = Orientation.Horizontal;
Grid.SetRow(myStackPanel, 1);

Image myImage4 = new Image();
BitmapImage bi4 = new BitmapImage();
bi4.BeginInit();
bi4.UriSource = new Uri("smiley_stackpanel.png", UriKind.Relative);
bi4.EndInit();
myImage4.Source = bi4;

Image myImage5 = new Image();
BitmapImage bi5 = new BitmapImage();
bi5.BeginInit();
bi5.UriSource = new Uri("smiley_stackpanel.png", UriKind.Relative);
bi5.EndInit();
myImage5.Source = bi5;

Image myImage6 = new Image();
BitmapImage bi6 = new BitmapImage();
bi6.BeginInit();
bi6.UriSource = new Uri("smiley_stackpanel.PNG", UriKind.Relative);
bi6.EndInit();
myImage6.Stretch = Stretch.Fill;
myImage6.Source = bi6;

// Add the images to the parent StackPanel
myStackPanel.Children.Add(myImage4);
myStackPanel.Children.Add(myImage5);
myStackPanel.Children.Add(myImage6);

// Add the layout panels as children of the Grid
myGrid.Children.Add(myDockPanel);
myGrid.Children.Add(myStackPanel);

// Add the Grid as the Content of the Parent Window Object
mainWindow.Content = myGrid;
mainWindow.Show ();
'Add root Grid
Dim myGrid As New Grid
myGrid.Width = 175
myGrid.Height = 150
Dim myRowDef1 As New RowDefinition
Dim myRowDef2 As New RowDefinition
myGrid.RowDefinitions.Add(myRowDef1)
myGrid.RowDefinitions.Add(myRowDef2)

'Define the DockPanel
Dim myDockPanel As New DockPanel
Grid.SetRow(myDockPanel, 0)

'Define an Image and Source.
Dim myImage As New Image
Dim bi As New BitmapImage
bi.BeginInit()
bi.UriSource = New Uri("smiley_stackpanel.png", UriKind.Relative)
bi.EndInit()
myImage.Source = bi

Dim myImage2 As New Image
Dim bi2 As New BitmapImage
bi2.BeginInit()
bi2.UriSource = New Uri("smiley_stackpanel.png", UriKind.Relative)
bi2.EndInit()
myImage2.Source = bi2

Dim myImage3 As New Image
Dim bi3 As New BitmapImage
bi3.BeginInit()
bi3.UriSource = New Uri("smiley_stackpanel.PNG", UriKind.Relative)
bi3.EndInit()
myImage3.Stretch = Stretch.Fill
myImage3.Source = bi3

'Add the images to the parent DockPanel.
myDockPanel.Children.Add(myImage)
myDockPanel.Children.Add(myImage2)
myDockPanel.Children.Add(myImage3)

'Define a StackPanel.
Dim myStackPanel As New StackPanel
myStackPanel.Orientation = Orientation.Horizontal
Grid.SetRow(myStackPanel, 1)

Dim myImage4 As New Image
Dim bi4 As New BitmapImage
bi4.BeginInit()
bi4.UriSource = New Uri("smiley_stackpanel.png", UriKind.Relative)
bi4.EndInit()
myImage4.Source = bi4

Dim myImage5 As New Image
Dim bi5 As New BitmapImage
bi5.BeginInit()
bi5.UriSource = New Uri("smiley_stackpanel.png", UriKind.Relative)
bi5.EndInit()
myImage5.Source = bi5

Dim myImage6 As New Image
Dim bi6 As New BitmapImage
bi6.BeginInit()
bi6.UriSource = New Uri("smiley_stackpanel.PNG", UriKind.Relative)
bi6.EndInit()
myImage6.Stretch = Stretch.Fill
myImage6.Source = bi6

'Add the images to the parent StackPanel.
myStackPanel.Children.Add(myImage4)
myStackPanel.Children.Add(myImage5)
myStackPanel.Children.Add(myImage6)

'Add the layout panels as children of the Grid
myGrid.Children.Add(myDockPanel)
myGrid.Children.Add(myStackPanel)
<Page xmlns="http://schemas.microsoft.com/winfx/2006/xaml/presentation"
      WindowTitle="StackPanel vs. DockPanel">
  <Grid Width="175" Height="150">
    <Grid.ColumnDefinitions>
      <ColumnDefinition />
    </Grid.ColumnDefinitions>
    <Grid.RowDefinitions>
      <RowDefinition />
      <RowDefinition />
    </Grid.RowDefinitions>

    <DockPanel Grid.Column="0" Grid.Row="0">
      <Image Source="smiley_stackpanel.png" />
      <Image Source="smiley_stackpanel.png" />
      <Image Source="smiley_stackpanel.png" Stretch="Fill"/>
    </DockPanel>

    <StackPanel Grid.Column="0" Grid.Row="1"  Orientation="Horizontal">
      <Image Source="smiley_stackpanel.png" />
      <Image Source="smiley_stackpanel.png" />
      <Image Source="smiley_stackpanel.png" Stretch="Fill"/>
    </StackPanel>
    </Grid>
</Page>
在此图像中可以看到呈现行为的差异。
定义和使用 StackPanel
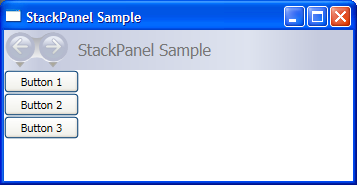
下面的示例演示如何使用 a StackPanel 创建一组垂直定位的按钮。 对于水平定位,请将 Orientation 属性设置为 Horizontal。
// Create the application's main window
mainWindow = new Window ();
mainWindow.Title = "StackPanel Sample";

// Define the StackPanel
myStackPanel = new StackPanel();
myStackPanel.HorizontalAlignment = HorizontalAlignment.Left;
myStackPanel.VerticalAlignment = VerticalAlignment.Top;

// Define child content
Button myButton1 = new Button();
myButton1.Content = "Button 1";
Button myButton2 = new Button();
myButton2.Content = "Button 2";
Button myButton3 = new Button();
myButton3.Content = "Button 3";

// Add child elements to the parent StackPanel
myStackPanel.Children.Add(myButton1);
myStackPanel.Children.Add(myButton2);
myStackPanel.Children.Add(myButton3);

// Add the StackPanel as the Content of the Parent Window Object
mainWindow.Content = myStackPanel;
mainWindow.Show ();
WindowTitle = "StackPanel Sample"
' Define the StackPanel
Dim myStackPanel As New StackPanel()
myStackPanel.HorizontalAlignment = Windows.HorizontalAlignment.Left
myStackPanel.VerticalAlignment = Windows.VerticalAlignment.Top

' Define child content
Dim myButton1 As New Button()
myButton1.Content = "Button 1"
Dim myButton2 As New Button()
myButton2.Content = "Button 2"
Dim myButton3 As New Button()
myButton3.Content = "Button 3"

' Add child elements to the parent StackPanel
myStackPanel.Children.Add(myButton1)
myStackPanel.Children.Add(myButton2)
myStackPanel.Children.Add(myButton3)

Me.Content = myStackPanel
编译的应用程序生成如下所示的新 UI。
VirtualizingStackPanel
WPF 还提供一种 StackPanel 元素的变体,可以自动“虚拟化”数据绑定的子内容。 在此上下文中,虚拟化一词是指一种技术,该技术根据屏幕上可见的项,从大量数据中生成元素的子集。 如果在指定时刻只有少量 UI 元素位于屏幕上,则此时生成大量 UI 元素需要占用大量内存和处理器。 VirtualizingStackPanel(通过 VirtualizingPanel提供的功能)计算可见项,并与 ItemContainerGenerator(如 ItemsControl 或 ListBox)中的 ListView 一起使用,以仅为可见项创建元素。
元素 VirtualizingStackPanel 被自动设置为控件项宿主,例如 ListBox。 承载数据绑定集合时,只要内容位于某个 ScrollViewer边界内,内容就会自动虚拟化。 这极大地提高了托管多个子项时的性能。
以下标记演示如何使用 VirtualizingStackPanel 作为项目托管器。
VirtualizingStackPanel.IsVirtualizingProperty附加属性必须设置为true(默认值),才能进行虚拟化。
<StackPanel DataContext="{Binding Source={StaticResource Leagues}}">
    <TextBlock Text="{Binding XPath=@name}" FontFamily="Arial" FontSize="18" Foreground="Black"/>
        <ListBox VirtualizingStackPanel.IsVirtualizing="True"
                 ItemsSource="{Binding XPath=Team}"
                 ItemTemplate="{DynamicResource NameDataStyle}"/>
</StackPanel>
WrapPanel
WrapPanel 用于将子元素放置在从左到右的顺序位置,当内容到达其父容器的边缘时,会将内容中断到下一行。 内容可以设置为水平或者垂直方向。 WrapPanel 对于简单的流动用户界面(UI)方案非常有用。 它还可用于对其所有子元素应用统一大小调整。
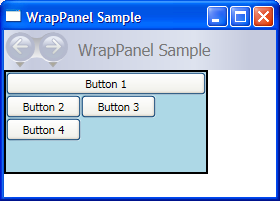
以下示例演示了如何创建一个 WrapPanel 来显示 Button 控件,当这些控件到达容器边缘时自动换行。
// Create the application's main window
mainWindow = gcnew System::Windows::Window();
mainWindow->Title = "WrapPanel Sample";


// Instantiate a new WrapPanel and set properties
myWrapPanel = gcnew WrapPanel();
myWrapPanel->Background = Brushes::Azure;
myWrapPanel->Orientation = Orientation::Horizontal;
myWrapPanel->ItemHeight = 25;

myWrapPanel->ItemWidth = 75;
myWrapPanel->Width = 150;
myWrapPanel->HorizontalAlignment = HorizontalAlignment::Left;
myWrapPanel->VerticalAlignment = VerticalAlignment::Top;

// Define 3 button elements. Each button is sized at width of 75, so the third button wraps to the next line.
btn1 = gcnew Button();
btn1->Content = "Button 1";
btn2 = gcnew Button();
btn2->Content = "Button 2";
btn3 = gcnew Button();
btn3->Content = "Button 3";

// Add the buttons to the parent WrapPanel using the Children.Add method.
myWrapPanel->Children->Add(btn1);
myWrapPanel->Children->Add(btn2);
myWrapPanel->Children->Add(btn3);

// Add the WrapPanel to the MainWindow as Content
mainWindow->Content = myWrapPanel;
mainWindow->Show();
// Create the application's main window
mainWindow = new System.Windows.Window();
mainWindow.Title = "WrapPanel Sample";


// Instantiate a new WrapPanel and set properties
myWrapPanel = new WrapPanel();
myWrapPanel.Background = System.Windows.Media.Brushes.Azure;
myWrapPanel.Orientation = Orientation.Horizontal;
myWrapPanel.Width = 200;
myWrapPanel.HorizontalAlignment = HorizontalAlignment.Left;
myWrapPanel.VerticalAlignment = VerticalAlignment.Top;

// Define 3 button elements. The last three buttons are sized at width
// of 75, so the forth button wraps to the next line.
btn1 = new Button();
btn1.Content = "Button 1";
btn1.Width = 200;
btn2 = new Button();
btn2.Content = "Button 2";
btn2.Width = 75;
btn3 = new Button();
btn3.Content = "Button 3";
btn3.Width = 75;
btn4 = new Button();
btn4.Content = "Button 4";
btn4.Width = 75;

// Add the buttons to the parent WrapPanel using the Children.Add method.
myWrapPanel.Children.Add(btn1);
myWrapPanel.Children.Add(btn2);
myWrapPanel.Children.Add(btn3);
myWrapPanel.Children.Add(btn4);

// Add the WrapPanel to the MainWindow as Content
mainWindow.Content = myWrapPanel;
mainWindow.Show();
WindowTitle = "WrapPanel Sample"

' Instantiate a new WrapPanel and set properties
Dim myWrapPanel As New WrapPanel()
myWrapPanel.Background = Brushes.Azure
myWrapPanel.Orientation = Orientation.Horizontal

myWrapPanel.Width = 200
myWrapPanel.HorizontalAlignment = Windows.HorizontalAlignment.Left
myWrapPanel.VerticalAlignment = Windows.VerticalAlignment.Top

' Define 3 button elements. The last three buttons are sized at width
' of 75, so the forth button wraps to the next line.
Dim btn1 As New Button()
btn1.Content = "Button 1"
btn1.Width = 200
Dim btn2 As New Button()
btn2.Content = "Button 2"
btn2.Width = 75
Dim btn3 As New Button()
btn3.Content = "Button 3"
btn3.Width = 75
Dim btn4 As New Button()
btn4.Content = "Button 4"
btn4.Width = 75

' Add the buttons to the parent WrapPanel using the Children.Add method.
myWrapPanel.Children.Add(btn1)
myWrapPanel.Children.Add(btn2)
myWrapPanel.Children.Add(btn3)
myWrapPanel.Children.Add(btn4)

' Add the WrapPanel to the Page as Content
Me.Content = myWrapPanel
<Page xmlns="http://schemas.microsoft.com/winfx/2006/xaml/presentation" WindowTitle="WrapPanel Sample">
  <Border HorizontalAlignment="Left" VerticalAlignment="Top" BorderBrush="Black" BorderThickness="2">
        <WrapPanel Background="LightBlue" Width="200" Height="100">
            <Button Width="200">Button 1</Button>
            <Button>Button 2</Button>
            <Button>Button 3</Button>
            <Button>Button 4</Button>
        </WrapPanel>
  </Border>
</Page>
编译的应用程序生成如下所示的新 UI。
嵌套面板元素
Panel 元素可以相互嵌套,以便生成复杂的布局。 这在一 Panel 部分 UI 是理想情况下非常有用的,但可能无法满足 UI 不同部分的需求。
应用程序可以支持的嵌套量没有实际限制,但通常最好将应用程序限制为仅使用实际需要用于所需布局的面板。 在许多情况下,可以使用 Grid 元素作为布局容器的灵活替代,这样就不需要嵌套面板了。 这可以通过将不必要的元素保留在树外来提高应用程序中的性能。
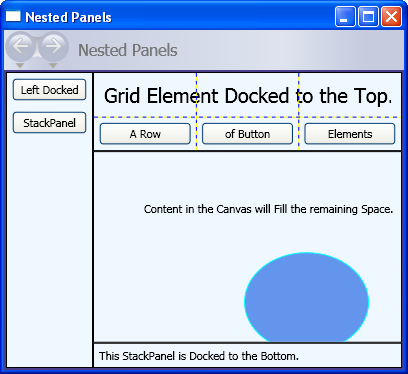
以下示例演示如何创建利用嵌套 Panel 元素实现特定布局的 UI。 在此特定情况下,DockPanel元素用于提供 UI 结构,嵌套的StackPanel元素、Grid和Canvas元素用于在父DockPanel中精确定位子元素。
// Define the DockPanel.
myDockPanel = new DockPanel();

// Add the Left Docked StackPanel
Border myBorder2 = new Border();
myBorder2.BorderThickness = new Thickness(1);
myBorder2.BorderBrush = Brushes.Black;
DockPanel.SetDock(myBorder2, Dock.Left);
StackPanel myStackPanel = new StackPanel();
Button myButton1 = new Button();
myButton1.Content = "Left Docked";
myButton1.Margin = new Thickness(5);
Button myButton2 = new Button();
myButton2.Content = "StackPanel";
myButton2.Margin = new Thickness(5);
myStackPanel.Children.Add(myButton1);
myStackPanel.Children.Add(myButton2);
myBorder2.Child = myStackPanel;

// Add the Top Docked Grid.
Border myBorder3 = new Border();
myBorder3.BorderThickness = new Thickness(1);
myBorder3.BorderBrush = Brushes.Black;
DockPanel.SetDock(myBorder3, Dock.Top);
Grid myGrid = new Grid();
myGrid.ShowGridLines = true;
RowDefinition myRowDef1 = new RowDefinition();
RowDefinition myRowDef2 = new RowDefinition();
ColumnDefinition myColDef1 = new ColumnDefinition();
ColumnDefinition myColDef2 = new ColumnDefinition();
ColumnDefinition myColDef3 = new ColumnDefinition();
myGrid.ColumnDefinitions.Add(myColDef1);
myGrid.ColumnDefinitions.Add(myColDef2);
myGrid.ColumnDefinitions.Add(myColDef3);
myGrid.RowDefinitions.Add(myRowDef1);
myGrid.RowDefinitions.Add(myRowDef2);
TextBlock myTextBlock1 = new TextBlock();
myTextBlock1.FontSize = 20;
myTextBlock1.Margin = new Thickness(10);
myTextBlock1.Text = "Grid Element Docked at the Top";
Grid.SetRow(myTextBlock1, 0);
Grid.SetColumnSpan(myTextBlock1, 3);
Button myButton3 = new Button();
myButton3.Margin = new Thickness(5);
myButton3.Content = "A Row";
Grid.SetColumn(myButton3, 0);
Grid.SetRow(myButton3, 1);
Button myButton4 = new Button();
myButton4.Margin = new Thickness(5);
myButton4.Content = "of Button";
Grid.SetColumn(myButton4, 1);
Grid.SetRow(myButton4, 1);
Button myButton5 = new Button();
myButton5.Margin = new Thickness(5);
myButton5.Content = "Elements";
Grid.SetColumn(myButton5, 2);
Grid.SetRow(myButton5, 1);
myGrid.Children.Add(myTextBlock1);
myGrid.Children.Add(myButton3);
myGrid.Children.Add(myButton4);
myGrid.Children.Add(myButton5);
myBorder3.Child = myGrid;

// Add the Bottom Docked StackPanel.
Border myBorder4 = new Border();
myBorder4.BorderBrush = Brushes.Black;
myBorder4.BorderThickness = new Thickness(1);
DockPanel.SetDock(myBorder4, Dock.Bottom);
StackPanel myStackPanel2 = new StackPanel();
myStackPanel2.Orientation = Orientation.Horizontal;
TextBlock myTextBlock2 = new TextBlock();
myTextBlock2.Text = "This StackPanel is Docked to the Bottom";
myTextBlock2.Margin = new Thickness(5);
myStackPanel2.Children.Add(myTextBlock2);
myBorder4.Child = myStackPanel2;

// Add the Canvas, that fills remaining space.
Border myBorder5 = new Border();
myBorder4.BorderBrush = Brushes.Black;
myBorder5.BorderThickness = new Thickness(1);
Canvas myCanvas = new Canvas();
myCanvas.ClipToBounds = true;
TextBlock myTextBlock3 = new TextBlock();
myTextBlock3.Text = "Content in the Canvas will Fill the remaining space.";
Canvas.SetTop(myTextBlock3, 50);
Canvas.SetLeft(myTextBlock3, 50);
Ellipse myEllipse = new Ellipse();
myEllipse.Height = 100;
myEllipse.Width = 125;
myEllipse.Fill = Brushes.CornflowerBlue;
myEllipse.Stroke = Brushes.Aqua;
Canvas.SetTop(myEllipse, 100);
Canvas.SetLeft(myEllipse, 150);
myCanvas.Children.Add(myTextBlock3);
myCanvas.Children.Add(myEllipse);
myBorder5.Child = myCanvas;

// Add child elements to the parent DockPanel.
myDockPanel.Children.Add(myBorder2);
myDockPanel.Children.Add(myBorder3);
myDockPanel.Children.Add(myBorder4);
myDockPanel.Children.Add(myBorder5);
Dim myDockPanel As New DockPanel()

Dim myBorder2 As New Border()
myBorder2.BorderThickness = New Thickness(1)
myBorder2.BorderBrush = Brushes.Black
DockPanel.SetDock(myBorder2, Dock.Left)
Dim myStackPanel As New StackPanel()
Dim myButton1 As New Button()
myButton1.Content = "Left Docked"
myButton1.Margin = New Thickness(5)
Dim myButton2 As New Button()
myButton2.Content = "StackPanel"
myButton2.Margin = New Thickness(5)
myStackPanel.Children.Add(myButton1)
myStackPanel.Children.Add(myButton2)
myBorder2.Child = myStackPanel

Dim myBorder3 As New Border()
myBorder3.BorderThickness = New Thickness(1)
myBorder3.BorderBrush = Brushes.Black
DockPanel.SetDock(myBorder3, Dock.Top)
Dim myGrid As New Grid()
myGrid.ShowGridLines = True
Dim myRowDef1 As New RowDefinition()
Dim myRowDef2 As New RowDefinition()
Dim myColDef1 As New ColumnDefinition()
Dim myColDef2 As New ColumnDefinition()
Dim myColDef3 As New ColumnDefinition()
myGrid.ColumnDefinitions.Add(myColDef1)
myGrid.ColumnDefinitions.Add(myColDef2)
myGrid.ColumnDefinitions.Add(myColDef3)
myGrid.RowDefinitions.Add(myRowDef1)
myGrid.RowDefinitions.Add(myRowDef2)
Dim myTextBlock1 As New TextBlock()
myTextBlock1.FontSize = 20
myTextBlock1.Margin = New Thickness(10)
myTextBlock1.Text = "Grid Element Docked at the Top"
Grid.SetRow(myTextBlock1, 0)
Grid.SetColumnSpan(myTextBlock1, 3)
Dim myButton3 As New Button()
myButton3.Margin = New Thickness(5)
myButton3.Content = "A Row"
Grid.SetColumn(myButton3, 0)
Grid.SetRow(myButton3, 1)
Dim myButton4 As New Button()
myButton4.Margin = New Thickness(5)
myButton4.Content = "of Button"
Grid.SetColumn(myButton4, 1)
Grid.SetRow(myButton4, 1)
Dim myButton5 As New Button()
myButton5.Margin = New Thickness(5)
myButton5.Content = "Elements"
Grid.SetColumn(myButton5, 2)
Grid.SetRow(myButton5, 1)
myGrid.Children.Add(myTextBlock1)
myGrid.Children.Add(myButton3)
myGrid.Children.Add(myButton4)
myGrid.Children.Add(myButton5)
myBorder3.Child = myGrid

Dim myBorder4 As New Border()
myBorder4.BorderBrush = Brushes.Black
myBorder4.BorderThickness = New Thickness(1)
DockPanel.SetDock(myBorder4, Dock.Bottom)
Dim myStackPanel2 As New StackPanel()
myStackPanel2.Orientation = Orientation.Horizontal
Dim myTextBlock2 As New TextBlock()
myTextBlock2.Text = "This StackPanel is Docked to the Bottom"
myTextBlock2.Margin = New Thickness(5)
myStackPanel2.Children.Add(myTextBlock2)
myBorder4.Child = myStackPanel2

Dim myBorder5 As New Border()
myBorder5.BorderBrush = Brushes.Black
myBorder5.BorderThickness = New Thickness(1)
Dim myCanvas As New Canvas()
myCanvas.ClipToBounds = True
Dim myTextBlock3 As New TextBlock()
myTextBlock3.Text = "Content in the Canvas will Fill the remaining space."
Canvas.SetTop(myTextBlock3, 50)
Canvas.SetLeft(myTextBlock3, 50)
Dim myEllipse As New Ellipse()
myEllipse.Height = 100
myEllipse.Width = 125
myEllipse.Fill = Brushes.CornflowerBlue
myEllipse.Stroke = Brushes.Aqua
Canvas.SetTop(myEllipse, 100)
Canvas.SetLeft(myEllipse, 150)
myCanvas.Children.Add(myTextBlock3)
myCanvas.Children.Add(myEllipse)
myBorder5.Child = myCanvas

myDockPanel.Children.Add(myBorder2)
myDockPanel.Children.Add(myBorder3)
myDockPanel.Children.Add(myBorder4)
myDockPanel.Children.Add(myBorder5)
编译的应用程序生成如下所示的新 UI。
自定义面板元素
虽然 WPF 提供了灵活的布局控件数组,但也可以通过重写 ArrangeOverride 和 MeasureOverride 方法来实现自定义布局行为。 可以通过在这些替代方法中定义新的定位行为来实现自定义大小调整和定位。
同样,可以通过在派生类(如Canvas或Grid)中重写其ArrangeOverride和MeasureOverride方法来定义自定义布局行为。
以下标记演示如何创建自定义 Panel 元素。 此新的 Panel,定义为 PlotPanel,支持通过硬编码的 x 和 y 坐标来定位子元素。 在此示例中,元素 Rectangle (未显示)定位在绘图点 50(x)和 50 (y)。
public:
   ref class PlotPanel : Panel {

   public:
      PlotPanel () {};

   protected:
      // Override the default Measure method of Panel
      virtual Size MeasureOverride(Size availableSize) override
      {
          Size^ panelDesiredSize = gcnew Size();

          // In our example, we just have one child.
          // Report that our panel requires just the size of its only child.
          for each (UIElement^ child in InternalChildren)
          {
              child->Measure(availableSize);
              panelDesiredSize = child->DesiredSize;
          }
          return *panelDesiredSize ;
      }

   protected:
      virtual System::Windows::Size ArrangeOverride (Size finalSize) override
      {
         for each (UIElement^ child in InternalChildren)
         {
            double x = 50;
            double y = 50;
            child->Arrange(Rect(Point(x, y), child->DesiredSize));
         }
         return finalSize;
      };
   };
public class PlotPanel : Panel
{
    // Default public constructor
    public PlotPanel()
        : base()
    {
    }

    // Override the default Measure method of Panel
    protected override Size MeasureOverride(Size availableSize)
    {
        Size panelDesiredSize = new Size();

        // In our example, we just have one child.
        // Report that our panel requires just the size of its only child.
        foreach (UIElement child in InternalChildren)
        {
            child.Measure(availableSize);
            panelDesiredSize = child.DesiredSize;
        }

        return panelDesiredSize ;
    }
    protected override Size ArrangeOverride(Size finalSize)
    {
        foreach (UIElement child in InternalChildren)
        {
            double x = 50;
            double y = 50;

            child.Arrange(new Rect(new Point(x, y), child.DesiredSize));
        }
        return finalSize; // Returns the final Arranged size
    }
}
Public Class PlotPanel
    Inherits Panel
    'Override the default Measure method of Panel.

    Protected Overrides Function MeasureOverride(ByVal availableSize As System.Windows.Size) As System.Windows.Size
        Dim panelDesiredSize As Size = New Size()
        ' In our example, we just have one child.
        ' Report that our panel requires just the size of its only child.
        For Each child As UIElement In InternalChildren
            child.Measure(availableSize)
            panelDesiredSize = child.DesiredSize
        Next
        Return panelDesiredSize
    End Function
    Protected Overrides Function ArrangeOverride(ByVal finalSize As System.Windows.Size) As System.Windows.Size
        For Each child As UIElement In InternalChildren
            Dim x As Double = 50
            Dim y As Double = 50
            child.Arrange(New Rect(New System.Windows.Point(x, y), child.DesiredSize))
        Next
        Return finalSize
    End Function
End Class
若要查看更复杂的自定义面板实现,请参阅 “创建自定义内容包装面板示例”。
本地化/全球化支持
WPF 支持许多有助于创建可本地化 UI 的功能。
所有面板元素原生都支持该 FlowDirection 属性,该属性可用于根据用户的区域设置或语言设置动态重新流内容。 有关详细信息,请参阅 FlowDirection。
该 SizeToContent 属性提供了一种机制,使应用程序开发人员能够预测本地化 UI 的需求。 借助此属性的WidthAndHeight值,父级Window始终动态调整大小以适应内容,并且不受人为的高度或宽度限制。
DockPanel, Grid并且 StackPanel 都是可本地化 UI 的好选择。 Canvas 但是,这不是一个不错的选择,因为它绝对定位内容,使得难以本地化。
有关使用可本地化用户界面(UI)创建 WPF 应用程序的其他信息,请参阅 “使用自动布局概述”。
