Azure 基于角色的访问控制 (Azure RBAC) 是用于管理 Azure 资源访问权限的授权系统。 若要授予访问权限,请将角色分配给特定范围内的用户、组、服务主体或托管标识。 除了使用 Azure PowerShell 或 Azure CLI 之外,还可以使用 Azure 资源管理器模板分配角色。 如果需要一致且重复地部署资源,模板会很有用。 本文介绍如何使用模板分配角色。
注释
Bicep 是一种用于定义 Azure 资源的新语言。 它具有比 JSON 更简单的创作体验,以及有助于提高代码基础设施质量的其他功能。 我们建议刚接触 Azure 基础结构即代码的用户使用 Bicep 而不是 JSON。
若要了解如何使用 Bicep 定义角色分配,请参阅使用 Bicep 创建 Azure RBAC 资源。 有关快速入门示例,请参阅 快速入门:使用 Bicep 分配 Azure 角色。
先决条件
若要分配 Azure 角色,必须具有:
Microsoft.Authorization/roleAssignments/write权限,例如基于角色的访问控制管理员或用户访问管理员
必须使用以下版本:
2018-09-01-preview或更高版本,用于将 Azure 角色分配给新的服务主体2020-04-01-preview或更高版本,用于在资源范围内分配 Azure 角色2022-04-01是第一个稳定版本
有关详细信息,请参阅 Azure RBAC REST API 的 API 版本。
获取对象 ID
若要分配角色,需要指定要为其分配角色的用户、组或应用程序的 ID。 ID 的格式为:11111111-1111-1111-1111-111111111111。 可以使用 Azure 门户、Azure PowerShell 或 Azure CLI 来获取 ID。
用户
若要获取用户的 ID,可以使用 Get-AzADUser 或 az ad user show 命令。
$objectid = (Get-AzADUser -DisplayName "{name}").id
objectid=$(az ad user show --id "{email}" --query id --output tsv)
组
若要获取组的 ID,可以使用 Get-AzADGroup 或 az ad group show 命令。
$objectid = (Get-AzADGroup -DisplayName "{name}").id
objectid=$(az ad group show --group "{name}" --query id --output tsv)
托管标识
若要获取托管标识的 ID,可以使用 Get-AzAdServiceprincipal 或 az ad sp 命令。
$objectid = (Get-AzADServicePrincipal -DisplayName <Azure resource name>).id
objectid=$(az ad sp list --display-name <Azure resource name> --query [].id --output tsv)
应用程序
若要获取服务主体(应用程序使用的标识)的 ID,可以使用 Get-AzADServicePrincipal 或 az ad sp list 命令。 对于服务主体,使用对象 ID,而不是应用程序 ID。
$objectid = (Get-AzADServicePrincipal -DisplayName "{name}").id
objectid=$(az ad sp list --display-name "{name}" --query [].id --output tsv)
分配 Azure 角色
在 Azure RBAC 中,若要授予访问权限,需分配一个角色。
资源组范围(不包含参数)
以下模板演示了用于分配角色的基本方法。 某些值在模板中指定。 以下模板演示:
- 如何将读者角色分配给资源组范围内的用户、组或应用程序
若要使用模板,必须执行以下操作:
- 创建新的 JSON 文件并复制模板
- 将
<your-principal-id>替换为要为其分配角色的用户、组、托管标识或应用程序的 ID
{
    "$schema": "https://schema.management.azure.com/schemas/2015-01-01/deploymentTemplate.json#",
    "contentVersion": "1.0.0.0",
    "resources": [
        {
            "type": "Microsoft.Authorization/roleAssignments",
            "apiVersion": "2022-04-01",
            "name": "[guid(resourceGroup().id)]",
            "properties": {
                "roleDefinitionId": "[concat('/subscriptions/', subscription().subscriptionId, '/providers/Microsoft.Authorization/roleDefinitions/', 'acdd72a7-3385-48ef-bd42-f606fba81ae7')]",
                "principalId": "<your-principal-id>"
            }
        }
    ]
}
下面是 New-AzResourceGroupDeployment 和 az deployment group create 命令示例,演示如何在名为 ExampleGroup 的资源组中启动部署。
New-AzResourceGroupDeployment -ResourceGroupName ExampleGroup -TemplateFile rbac-test.json
az deployment group create --resource-group ExampleGroup --template-file rbac-test.json
下面显示了在部署模板后向资源组的用户分配“读者”角色的示例。

资源组或订阅范围
上一个模板不太灵活。 以下模板使用参数,并且可以在不同的范围内使用。 以下模板演示:
- 如何将角色分配给资源组范围或订阅范围内的用户、组或应用程序
- 如何将“所有者”、“参与者”和“读者”角色指定为参数
若要使用模板,必须指定以下输入:
- 要为其分配角色的用户、组、托管标识或应用程序的 ID
- 将用于角色分配的唯一 ID,或者可以使用默认 ID
{
    "$schema": "https://schema.management.azure.com/schemas/2015-01-01/deploymentTemplate.json#",
    "contentVersion": "1.0.0.0",
    "parameters": {
        "principalId": {
            "type": "string",
            "metadata": {
                "description": "The principal to assign the role to"
            }
        },
        "builtInRoleType": {
            "type": "string",
            "allowedValues": [
                "Owner",
                "Contributor",
                "Reader"
            ],
            "metadata": {
                "description": "Built-in role to assign"
            }
        },
        "roleNameGuid": {
            "type": "string",
            "defaultValue": "[newGuid()]",
            "metadata": {
                "description": "A new GUID used to identify the role assignment"
            }
        }
    },
    "variables": {
        "Owner": "[concat('/subscriptions/', subscription().subscriptionId, '/providers/Microsoft.Authorization/roleDefinitions/', '8e3af657-a8ff-443c-a75c-2fe8c4bcb635')]",
        "Contributor": "[concat('/subscriptions/', subscription().subscriptionId, '/providers/Microsoft.Authorization/roleDefinitions/', 'b24988ac-6180-42a0-ab88-20f7382dd24c')]",
        "Reader": "[concat('/subscriptions/', subscription().subscriptionId, '/providers/Microsoft.Authorization/roleDefinitions/', 'acdd72a7-3385-48ef-bd42-f606fba81ae7')]"
    },
    "resources": [
        {
            "type": "Microsoft.Authorization/roleAssignments",
            "apiVersion": "2022-04-01",
            "name": "[parameters('roleNameGuid')]",
            "properties": {
                "roleDefinitionId": "[variables(parameters('builtInRoleType'))]",
                "principalId": "[parameters('principalId')]"
            }
        }
    ]
}
注释
此模板不是幂等的,除非将同一 roleNameGuid 值作为模板的每个部署的参数提供。 如果未提供 roleNameGuid,则默认情况下将在每个部署上生成新的 GUID,并且后续部署将失败并出现 Conflict: RoleAssignmentExists 错误。
角色分配的范围是根据部署级别确定的。 下面是 New-AzResourceGroupDeployment 和 az deployment group create 命令示例,演示如何在资源组范围启动部署。
New-AzResourceGroupDeployment -ResourceGroupName ExampleGroup -TemplateFile rbac-test.json -principalId $objectid -builtInRoleType Reader
az deployment group create --resource-group ExampleGroup --template-file rbac-test.json --parameters principalId=$objectid builtInRoleType=Reader
下面是 New-AzDeployment 和 az deployment sub create 命令示例,演示如何在订阅范围启动部署并指定位置。
New-AzDeployment -Location centralus -TemplateFile rbac-test.json -principalId $objectid -builtInRoleType Reader
az deployment sub create --___location centralus --template-file rbac-test.json --parameters principalId=$objectid builtInRoleType=Reader
资源范围
如果需要在资源级别分配角色,请将角色分配的 scope 属性设置为资源的名称。
以下模板演示:
- 如何新建存储帐户
- 如何将角色分配给存储帐户范围内的用户、组或应用程序
- 如何将“所有者”、“参与者”和“读者”角色指定为参数
若要使用模板,必须指定以下输入:
- 要为其分配角色的用户、组、托管标识或应用程序的 ID
{
    "$schema": "https://schema.management.azure.com/schemas/2019-04-01/deploymentTemplate.json#",
    "contentVersion": "1.0.0.0",
    "parameters": {
        "principalId": {
            "type": "string",
            "metadata": {
                "description": "The principal to assign the role to"
            }
        },
        "builtInRoleType": {
            "type": "string",
            "allowedValues": [
                "Owner",
                "Contributor",
                "Reader"
            ],
            "metadata": {
                "description": "Built-in role to assign"
            }
        },
        "roleNameGuid": {
            "type": "string",
            "defaultValue": "[newGuid()]",
            "metadata": {
                "description": "A new GUID used to identify the role assignment"
            }
        },
        "___location": {
            "type": "string",
            "defaultValue": "[resourceGroup().___location]"
        }
    },
    "variables": {
        "Owner": "[concat('/subscriptions/', subscription().subscriptionId, '/providers/Microsoft.Authorization/roleDefinitions/', '8e3af657-a8ff-443c-a75c-2fe8c4bcb635')]",
        "Contributor": "[concat('/subscriptions/', subscription().subscriptionId, '/providers/Microsoft.Authorization/roleDefinitions/', 'b24988ac-6180-42a0-ab88-20f7382dd24c')]",
        "Reader": "[concat('/subscriptions/', subscription().subscriptionId, '/providers/Microsoft.Authorization/roleDefinitions/', 'acdd72a7-3385-48ef-bd42-f606fba81ae7')]",
        "storageName": "[concat('storage', uniqueString(resourceGroup().id))]"
    },
    "resources": [
        {
            "apiVersion": "2019-04-01",
            "type": "Microsoft.Storage/storageAccounts",
            "name": "[variables('storageName')]",
            "___location": "[parameters('___location')]",
            "sku": {
                "name": "Standard_LRS"
            },
            "kind": "Storage",
            "properties": {}
        },
        {
            "type": "Microsoft.Authorization/roleAssignments",
            "apiVersion": "2022-04-01",
            "name": "[parameters('roleNameGuid')]",
            "scope": "[concat('Microsoft.Storage/storageAccounts', '/', variables('storageName'))]",
            "dependsOn": [
                "[variables('storageName')]"
            ],
            "properties": {
                "roleDefinitionId": "[variables(parameters('builtInRoleType'))]",
                "principalId": "[parameters('principalId')]"
            }
        }
    ]
}
若要部署上一个模板,请使用资源组命令。 下面是 New-AzResourceGroupDeployment 和 az deployment group create 命令示例,演示如何在资源范围启动部署。
New-AzResourceGroupDeployment -ResourceGroupName ExampleGroup -TemplateFile rbac-test.json -principalId $objectid -builtInRoleType Contributor
az deployment group create --resource-group ExampleGroup --template-file rbac-test.json --parameters principalId=$objectid builtInRoleType=Contributor
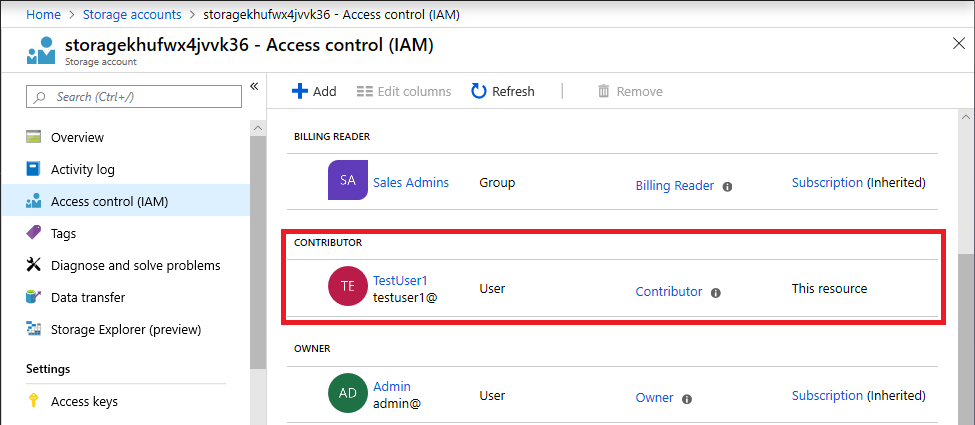
下面显示了在部署模板后向存储帐户的用户分配“参与者”角色的示例。
新服务主体
如果创建新服务主体并立即尝试将角色分配给该服务主体,则在某些情况下该角色分配可能会失败。 例如,如果创建新托管标识,然后尝试将角色分配给同一 Azure 资源管理器模板中的服务主体,则角色分配可能会失败。 失败原因可能是复制延迟。 服务主体是在一个区域中创建的;但是,角色分配可能发生在尚未复制服务主体的其他区域中。
若要解决这种情况,应在创建角色分配时将 principalType 属性设置为 ServicePrincipal。 还必须将角色分配的 apiVersion 设置为 2018-09-01-preview 或更高版本。 2022-04-01 是第一个稳定版本。
以下模板演示:
- 如何创建新的托管标识服务主体
- 如何指定
principalType - 如何将“参与者”角色分配给资源组范围内的服务主体
若要使用模板,必须指定以下输入:
- 托管标识的基名称,或者可以使用默认字符串
{
    "$schema": "http://schema.management.azure.com/schemas/2015-01-01/deploymentTemplate.json#",
    "contentVersion": "1.0.0.0",
    "parameters": {
        "baseName": {
            "type": "string",
            "defaultValue": "msi-test"
        }
    },
    "variables": {
        "identityName": "[concat(parameters('baseName'), '-bootstrap')]",
        "bootstrapRoleAssignmentId": "[guid(concat(resourceGroup().id, 'contributor'))]",
        "contributorRoleDefinitionId": "[concat('/subscriptions/', subscription().subscriptionId, '/providers/Microsoft.Authorization/roleDefinitions/', 'b24988ac-6180-42a0-ab88-20f7382dd24c')]"
    },
    "resources": [
        {
            "type": "Microsoft.ManagedIdentity/userAssignedIdentities",
            "name": "[variables('identityName')]",
            "apiVersion": "2018-11-30",
            "___location": "[resourceGroup().___location]"
        },
        {
            "type": "Microsoft.Authorization/roleAssignments",
            "apiVersion": "2022-04-01",
            "name": "[variables('bootstrapRoleAssignmentId')]",
            "dependsOn": [
                "[resourceId('Microsoft.ManagedIdentity/userAssignedIdentities', variables('identityName'))]"
            ],
            "properties": {
                "roleDefinitionId": "[variables('contributorRoleDefinitionId')]",
                "principalId": "[reference(resourceId('Microsoft.ManagedIdentity/userAssignedIdentities', variables('identityName')), '2018-11-30').principalId]",
                "principalType": "ServicePrincipal"
            }
        }
    ]
}
下面是 New-AzResourceGroupDeployment 和 az deployment group create 命令示例,演示如何在资源组范围启动部署。
New-AzResourceGroupDeployment -ResourceGroupName ExampleGroup2 -TemplateFile rbac-test.json
az deployment group create --resource-group ExampleGroup2 --template-file rbac-test.json
下面显示了在部署模板后向新的托管标识服务主体分配“参与者”角色的示例。
