在本文中,你将了解如何通过三种不同的方法在 Azure 虚拟机 (VM) 或 Azure 虚拟机规模集上运行适用于 .NET 的 Application Insights Profiler:
- Visual Studio 和 Azure 资源管理器
- PowerShell
- Azure 资源浏览器
选择首选方法选项卡以:
本指南介绍如何:
- 配置 Azure 诊断扩展以运行 .NET Profiler。
- 将 Application Insights SDK 安装到 VM 上。
- 部署应用程序。
- 通过 Azure 门户中的 Application Insights 实例查看 Profiler 跟踪。
注意
目前,本地服务器不支持适用于 .NET 的 Application Insights Profiler。
先决条件
将 Application Insights SDK 添加到应用程序
在 Visual Studio 中打开 ASP.NET Core 项目。
选择项目>添加 Application Insights 遥测功能。
选择“Azure Application Insights”“下一步”。
选择 Application Insights 资源所在的订阅,然后选择“下一步”。
选择要将连接字符串保存到的位置,然后选择“下一步”。
选择“完成”。
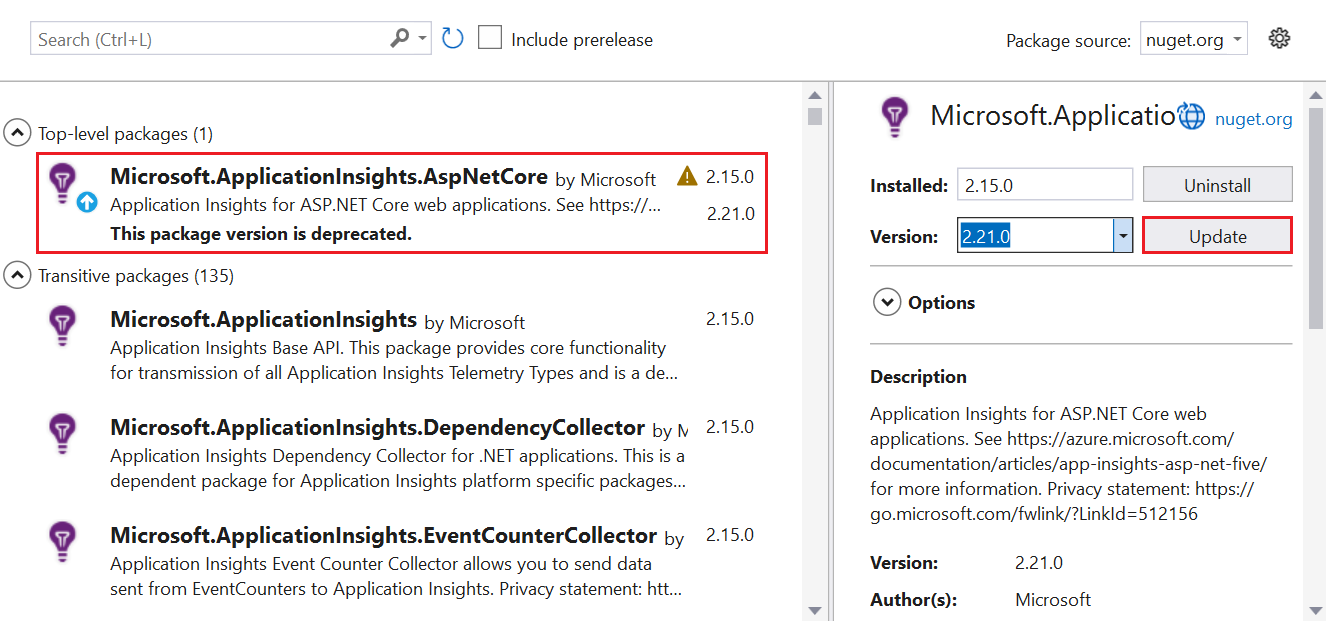
确认 Application Insights SDK 的最新稳定版本
转到项目>管理 NuGet 包。
选择“Microsoft.ApplicationInsights.AspNetCore”。
在侧窗格中,从下拉列表中选择最新版本的 SDK。
选择“更新”。
启用 .NET Profiler
可以通过以下三种方式之一启用 Profiler:
- 在 ASP.NET Core 应用程序中使用 Azure 资源管理器模板和 Visual Studio。 建议
- 通过 Azure CLI 使用 PowerShell 命令。
- 使用 Azure 资源浏览器。
安装 Azure 诊断扩展
选择要使用的 ARM 模板:
在模板中,找到 extension 类型的资源。
在 Visual Studio 中,转到安装 Application Insights SDK 时添加的 ASP.NET Core 应用程序中的 arm.json 文件。
将模板中的资源类型 extension 添加到 arm.json 文件,以使用 Azure 诊断设置 VM 或虚拟机规模集。
在 WadCfg 标记中,将 Application Insights 连接字符串添加到 MyApplicationInsightsProfilerSink。
"WadCfg": {
  "SinksConfig": {
    "Sink": [
      {
        "name": "MyApplicationInsightsProfilerSink",
        "ApplicationInsightsProfiler": "YOUR_APPLICATION_INSIGHTS_INSTRUMENTATION_KEY"
      }
    ]
  }
}
部署应用程序。
以下 PowerShell 命令是针对仅涉及 Azure 诊断扩展的现有 VM 的一种方法。
注意
如果再次部署 VM,接收器将丢失。 部署 VM 时,你需要更新所使用的配置以保留此设置。
通过 Azure 诊断配置安装 Application Insights
将当前部署的 Azure 诊断配置导出到文件:
$ConfigFilePath = [IO.Path]::GetTempFileName()
将 Application Insights Profiler 接收器添加到以下命令返回的配置中:
(Get-AzVMDiagnosticsExtension -ResourceGroupName "YOUR_RESOURCE_GROUP" -VMName "YOUR_VM").PublicSettings | Out-File -Verbose $ConfigFilePath
Application Insights Profiler WadCfg:
"WadCfg": {
  "SinksConfig": {
    "Sink": [
      {
        "name": "MyApplicationInsightsProfilerSink",
        "ApplicationInsightsProfiler": "YOUR_APPLICATION_INSIGHTS_INSTRUMENTATION_KEY"
      }
    ]
  }
}
运行以下命令将更新的配置传递给 Set-AzVMDiagnosticsExtension 命令。
Set-AzVMDiagnosticsExtension -ResourceGroupName "YOUR_RESOURCE_GROUP" -VMName "YOUR_VM" -DiagnosticsConfigurationPath $ConfigFilePath
注意
Set-AzVMDiagnosticsExtension 可能需要 -StorageAccountName 参数。 如果你的原始诊断配置在 storageAccountName 节中包含 protectedSettings 属性(不可下载),请确保传递你在此 cmdlet 调用中具有的相同原始值。
IIS Http 跟踪功能
如果目标应用程序通过 IIS 运行,请启用 IIS Http Tracing Windows 功能:
建立到环境的远程访问。
使用添加 Windows 功能窗口,或以管理员身份在 PowerShell 中运行以下命令:
Enable-WindowsOptionalFeature -FeatureName IIS-HttpTracing -Online -All
如果无法建立远程访问连接,可以使用 Azure CLI 运行以下命令:
az vm run-command invoke -g MyResourceGroupName -n MyVirtualMachineName --command-id RunPowerShellScript --scripts "Enable-WindowsOptionalFeature -FeatureName IIS-HttpTracing -Online -All"
部署应用程序。
使用 Azure 资源浏览器设置 Profiler 接收器
由于 Azure 门户不提供设置适用于 .NET 的 Application Insights Profiler 接收器的方法,因此可以使用 Azure 资源浏览器来设置接收器。
注意
如果再次部署 VM,接收器将丢失。 部署 VM 时,你需要更新所使用的配置以保留此设置。
通过查看为你的虚拟机安装的扩展,验证是否安装了 Microsoft Azure 诊断扩展。

查找你的 VM 的 VM 诊断扩展:
转到 Azure 资源浏览器。
展开订阅并找到包含 VM 的资源组的订阅。
通过选择资源组向下钻取到 VM 扩展。 然后选择“Microsoft.Compute”>“virtualMachines”>“[你的虚拟机]”>“扩展”。

将适用于 .NET 的 Application Insights Profiler 接收器添加到 SinksConfig 下的 WadCfg 节点。 如果还没有 SinksConfig 部分,可能需要添加一个。 添加接收器:
在设置中指定正确的 Application Insights iKey。
在右上角将资源管理器模式切换为“读/写”。
选择“编辑”。

"WadCfg": {
  "SinksConfig": {
    "Sink": [
      {
        "name": "MyApplicationInsightsProfilerSink",
        "ApplicationInsightsProfiler": "YOUR_APPLICATION_INSIGHTS_INSTRUMENTATION_KEY"
      }
    ]
  }
}
完成配置编辑后,选择“PUT”。
如果 put 操作成功,则屏幕中间会显示一个绿色的对勾。

后续步骤