在本快速入门中,你将 Azure 托管 Redis 或 Azure Cache for Redis 合并到 Node.js 应用中。 该应用可访问安全专用缓存,该缓存可从 Azure 内的任何应用程序进行访问。
先决条件
- Azure 订阅 - 创建免费帐户
- Node.js 安装 - 若要安装 Node.js,请参阅在 Windows 上安装 Node.js,了解如何在 Windows 计算机上安装 Node 和 npm。
创建 Azure 托管 Redis 实例
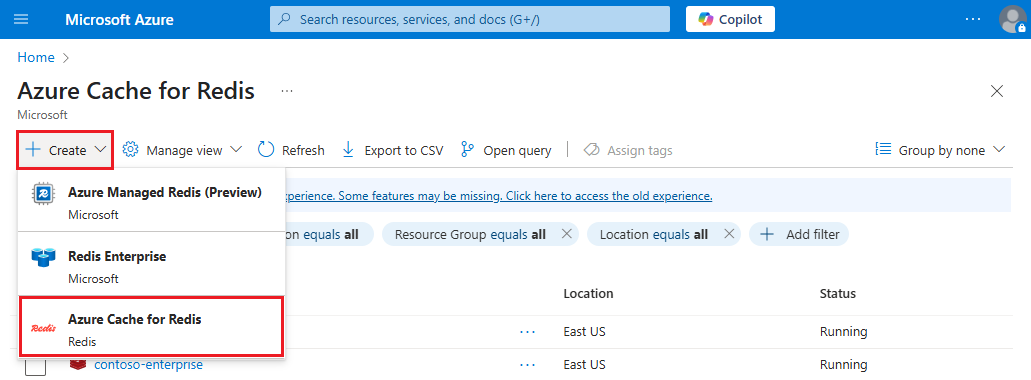
若要创建 Azure 托管 Redis 实例,请登录到 Azure 门户并选择“ 创建资源”。
在“新建”页面上的搜索框中键入“Azure Cache for Redis”。
在 “新建 Redis 缓存 ”选项卡上,在“基本信息”上配置新缓存的设置。
设置 选择值 DESCRIPTION 订阅 单击下拉箭头并选择你的订阅。 创建新的 Azure 托管 Redis 实例所需的订阅。 资源组 单击下拉箭头并选择一个资源组,或者选择新建并输入新的资源组名称。 要在其中创建缓存和其他资源的资源组的名称。 将所有应用资源放入一个资源组可以轻松地统一管理或删除这些资源。 名称 输入在区域中唯一的名称。 如果与缓存的区域名称组合,缓存名称必须为介于 1 到 63 个字符的字符串,且只能包含数字、字母或连字符。 (如果缓存名称长度少于 45 个字符,则它应该可以在所有当前可用的区域中正常工作。)该名称必须以数字或字母开头和结尾,且不能包含连续的连字符。 缓存实例的主机名为 \<DNS name\>.\<Azure region\>.redis.azure.net。区域 下拉并选择一个位置。 Azure 托管 Redis 在选定的 Azure 区域中可用。 数据层 选择 内存中 以实现高性能,或 选择“闪存 ”以降低性能缓存 内存中层包括 平衡层、 内存优化层和 计算优化层。 使用 闪存 级别来利用内存(RAM)和磁盘(SSD)数据存储。 缓存大小 下拉并选择大小。 缓存大小取决于层。 最小大小为均衡层。 最大的内存中层为内存优化层。 性能 下拉并选择性能首选项。 性能取决于 vCPU 的数量。 vCPU 的数量因层而异。 计算优化具有最多的 vCPU。 有关选择正确的性能层的指导,请参阅 “选择适当的层”。
重要
使用超过 120 GB 存储的所有内存中层都处于公共预览状态,包括内存优化 M150 及更高版本;平衡 B150 及更高版本;和计算优化 X150 及更高版本。 所有这些层及更高版本均以公共预览版提供。
所有闪存优化层均以公共预览版提供。
选择 “下一步:网络 ”,然后选择 “公共终结点 ”或 “专用终结点”。
选择 “下一步:活动异地复制”。 若要使用活动异地复制,必须在预配期间启用它。 以后无法将不具有活动异地复制的缓存添加到或加入活动异地复制组。 有关详细信息,请参阅为 Azure 托管 Redis 实例配置活动异地复制。
选择“ 下一步:高级 ”选项卡。
配置要添加到实例的任何 Redis 模块 。
默认情况下,对于新的托管缓存:
- 已启用 Microsoft Entra ID。
- 出于安全原因,“访问密钥身份验证”处于禁用状态。
重要
为了获得最佳安全性,我们建议你在可能的情况下使用 Microsoft Entra ID 和托管标识来授权针对缓存的请求。 与共享访问密钥授权相比,使用 Microsoft Entra ID 和托管标识进行授权提供了更高的安全性和易用性。 若要详细了解如何将托管标识与缓存配合使用,请参阅使用 Microsoft Entra ID 进行缓存身份验证。
设置 群集策略:
- 使用 Enterprise 以使用 RedisSearch 或其他模块
- 将 OSS 用于群集缓存。
- 对于非聚集缓存,请使用非聚集索引(预览版)。
重要
创建 Azure 托管 Redis 实例后,无法更改群集策略。 如果使用 RediSearch,则需要企业群集策略,
NoEviction是唯一支持的逐出策略。重要
如果在异地复制组中使用此缓存实例,则创建实例后无法更改逐出策略。 在创建缓存之前,请务必了解主节点的逐出策略。 有关活动异地复制的详细信息,请参阅活动异地复制先决条件。
重要
创建缓存实例后,无法更改模块。 必须在创建 Azure Cache for Redis 实例时启用模块。 没有在创建缓存后启用模块配置的选项。
选择下一步:标记并跳过。
选择 “下一步:查看 + 创建”。
检查设置,然后选择“创建”。
创建 Redis 实例需要几分钟时间。 可以在 Azure 托管 Redis 的“概述”页面上监视进度。 如果状态显示为正在运行,则表示该缓存可供使用。
创建用于 Redis 的 Azure 缓存实例
在 Azure 门户中,搜索并选择 Azure Redis 缓存。
在 Azure Redis 缓存 页上,选择“ 创建>Azure Redis 缓存”。
在“新建 Redis 缓存”页的“基本信息”选项卡上,配置以下设置:
- 订阅:选择要使用的订阅。
- 资源组:选择资源组,或选择 “新建 ”并输入新的资源组名称。 将所有应用资源放在同一资源组中即可轻松管理或删除它们。
- 名称:输入区域中唯一的缓存名称。 名称必须:
- 字符串长度应为1到63个字符。
- 仅包含数字、字母和连字符。
- 以数字或字母开头和结尾。
- 不包含连续的连字符。
- 区域:选择使用缓存的其他服务附近的 Azure 区域 。
- 缓存 SKU:选择 SKU 来确定缓存的可用大小、性能和功能。
- 缓存大小:选择缓存大小。 有关详细信息,请参阅 Azure Cache for Redis 概述。

选择“ 网络 ”选项卡,或选择“ 下一步:网络”。
在“网络”选项卡上,选择用于缓存的连接方法。 建议使用专用终结点实现安全性。 如果选择 “专用终结点”,请选择“ 添加专用终结点 ”并创建专用终结点。
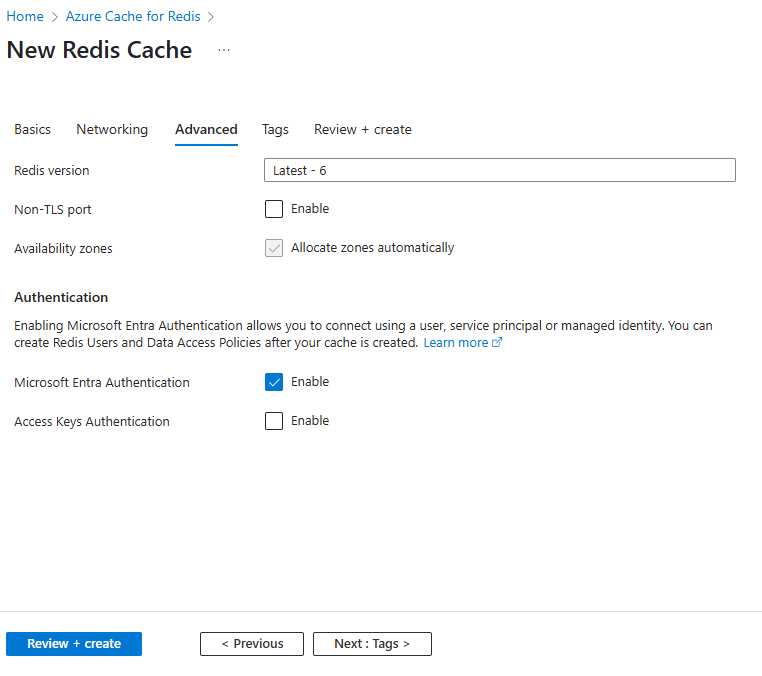
选择“ 高级 ”选项卡,或选择“ 下一步:高级”。
在 “高级 ”窗格中,配置以下选项:
- 选择 Microsoft Entra 身份验证 或 访问密钥认证。 默认情况下,Microsoft Entra Authentication 处于启用状态。
- 选择是否 启用 非 TLS 端口。
- 对于高级缓存,可以配置或禁用 可用性区域。 创建缓存后,无法禁用可用性区域。 对于标准缓存,会自动分配可用性区域。 可用性区域不适用于基本 SKU。
- 对于高级缓存,请配置 副本计数、 群集 和 分片计数、 系统分配的托管标识和数据 持久性的设置。
下图显示了标准 SKU 的 “高级 ”选项卡。
重要
将 Microsoft Entra ID 与托管标识一起使用,以授权针对缓存的请求(如果可能)。 使用 Microsoft Entra ID 和托管标识的授权可提供更好的安全性,并且比共享访问密钥授权更容易使用。 若要详细了解如何将托管标识与缓存配合使用,请参阅使用 Microsoft Entra ID 进行缓存身份验证。
(可选)选择“ 标记 ”选项卡或选择“ 下一步:标记”,然后输入标记名称和值以对缓存资源进行分类。
选择 “查看 + 创建”,验证通过后,选择“ 创建”。
新的缓存部署需要几分钟时间。 可以在门户 Azure Redis 缓存页上监视部署进度。 当缓存 状态 显示 “正在运行”时,缓存可供使用。
安装 node-redis 客户端库
node-redis 库是 Redis 的主要 Node.js 客户端。 你可以使用以下命令安装客户端及 npm:
npm install redis
创建 Node.js 应用以访问缓存
创建 Node.js 应用,该应用使用 Microsoft Entra ID 或访问密钥连接到 Azure 托管 Redis 实例。 建议使用 Microsoft Entra ID。
对缓存使用 Microsoft Entra ID 身份验证
Azure Redis 缓存(Enterprise 和 Enterprise Flash 层除外)将默认启用 Microsoft Entra 身份验证。 访问密钥将默认禁用。
重要
Microsoft 建议使用 Microsoft Entra ID 身份验证来获得最安全的身份验证体验,而不要使用密码或访问密钥。 本文本节中描述的身份验证使用访问密钥,该方式需要对应用程序具有高度信任,并且相较于使用 Microsoft Entra ID 存在额外的风险。 仅当Microsoft Entra ID 身份验证不可行时,才使用本文档中的方法。
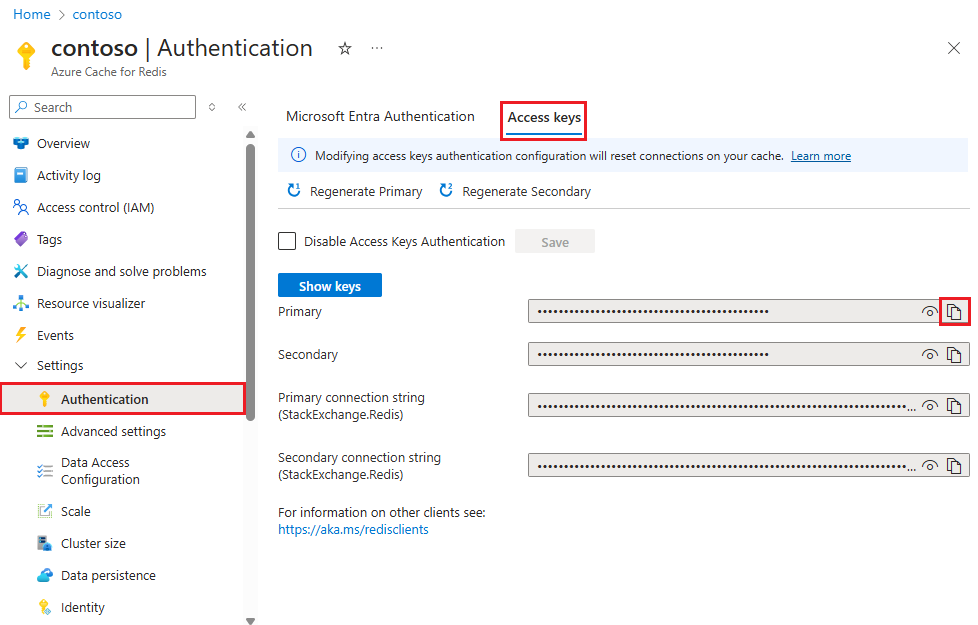
在 Azure 门户中,选择要使用基于 Microsoft Entra 令牌的身份验证的缓存。
从“资源”菜单中选择“身份验证”。
选择“选择成员”并输入有效用户的名称。 选择“保存”时,系统会自动向你输入的用户默认分配数据所有者访问策略。 还可输入托管标识或服务主体以连接到缓存实例。

有关如何将 Microsoft Entra ID 与 Azure CLI 配合使用的信息,请参阅标识参考页面。
安装 JavaScript Azure 标识客户端库
Microsoft 身份验证库 (MSAL) 允许从 Microsoft 标识获取安全令牌,以对用户进行身份验证。 我们提供了一个 JavaScript Azure 标识客户端库,以通过 MSAL 支持令牌身份验证。 使用 npm 安装此库:
npm install @azure/identity
创建使用 Microsoft Entra ID 的新 Node.js 应用
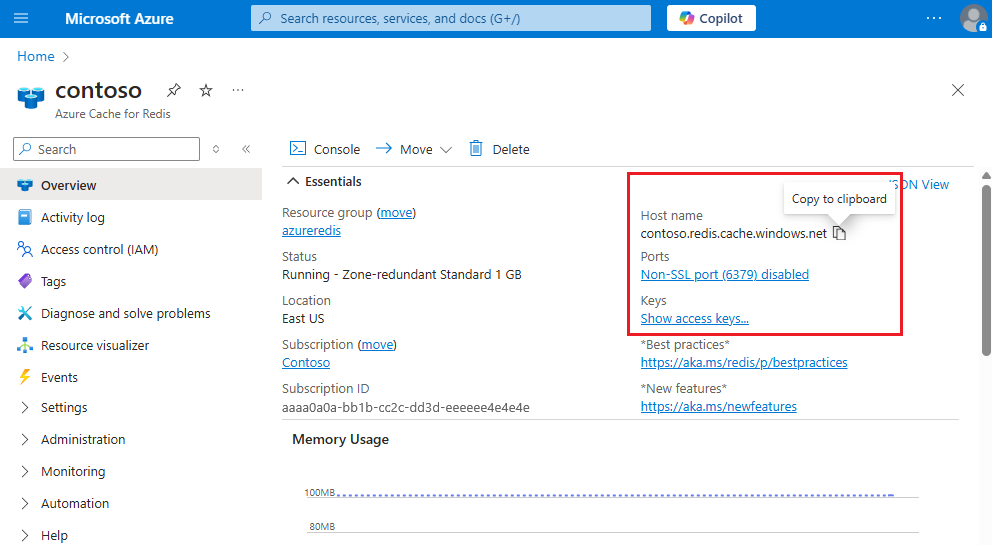
添加对应主机名和服务主体 ID(这是 Microsoft Entra ID 服务主体或用户的对象 ID)的环境变量。 在 Azure 门户中,查找用户名。
set AZURE_MANAGED_REDIS_HOST_NAME=contosoCache
set REDIS_SERVICE_PRINCIPAL_ID=XXXXXXXXXXXXXXXXXXXXXXXXXXXXXXXXXXXXXXXXXXXX
创建名为 redistest.js 的新脚本文件。
将下面的示例 JavaScript 添加到文件。 此代码演示如何使用缓存主机名和密钥环境变量连接到 Azure 托管 Redis 实例。 此代码还在缓存中存储和检索字符串值。 还执行了
PING和CLIENT LIST命令。 有关将 Redis 与 node-redis 客户端一起使用的更多示例,请参阅 https://redis.js.org/。const { createClient } = require("redis"); const { DefaultAzureCredential } = require("@azure/identity"); async function main() { // Construct a Token Credential from Identity library, e.g. ClientSecretCredential / ClientCertificateCredential / ManagedIdentityCredential, etc. const credential = new DefaultAzureCredential(); const redisScope = "https://redis.azure.com/.default"; // Fetch a Microsoft Entra token to be used for authentication. This token will be used as the password. let accessToken = await credential.getToken(redisScope); console.log("access Token", accessToken); // Create redis client and connect to the Azure Cache for Redis over the TLS port using the access token as password. const cacheConnection = createClient({ username: process.env.REDIS_SERVICE_PRINCIPAL_ID, password: accessToken.token, url: `redis://${process.env.AZURE_MANAGED_REDIS_HOST_NAME}:10000`, pingInterval: 100000, socket: { tls: true, keepAlive: 0 }, }); cacheConnection.on("error", (err) => console.log("Redis Client Error", err)); await cacheConnection.connect(); // PING command console.log("\nCache command: PING"); console.log("Cache response : " + await cacheConnection.ping()); // SET console.log("\nCache command: SET Message"); console.log("Cache response : " + await cacheConnection.set("Message", "Hello! The cache is working from Node.js!")); // GET console.log("\nCache command: GET Message"); console.log("Cache response : " + await cacheConnection.get("Message")); // Client list, useful to see if connection list is growing... console.log("\nCache command: CLIENT LIST"); console.log("Cache response : " + await cacheConnection.sendCommand(["CLIENT", "LIST"])); cacheConnection.disconnect(); return "Done" } main().then((result) => console.log(result)).catch(ex => console.log(ex));使用 Node.js 运行该脚本。
node redistest.js代码的输出如下所示。
Cache command: PING
Cache response : PONG

Cache command: GET Message
Cache response : Hello! The cache is working from Node.js!

Cache command: SET Message
Cache response : OK

Cache command: GET Message
Cache response : Hello! The cache is working from Node.js!

Cache command: CLIENT LIST
Cache response : id=10017364 addr=76.22.73.183:59380 fd=221 name= age=1 idle=0 flags=N db=0 sub=0 psub=0 multi=-1 qbuf=26 qbuf-free=32742 argv-mem=10 obl=0 oll=0 omem=0 tot-mem=61466 ow=0 owmem=0 events=r cmd=client user=default numops=6

Done
创建使用重新身份验证的示例 JavaScript 应用
Microsoft Entra ID 访问令牌的有效期有限,平均为 75 分钟。 为了保持与缓存的连接,需要刷新令牌。 此示例演示如何使用 JavaScript 执行此操作。
创建名为 redistestreauth.js 的新脚本文件。
将下面的示例 JavaScript 添加到文件。
 const { createClient } = require("redis");
 const { DefaultAzureCredential } = require("@azure/identity");

 async function returnPassword(credential) {
     const redisScope = "https://redis.azure.com/.default";

     // Fetch a Microsoft Entra token to be used for authentication. This token will be used as the password.
     return credential.getToken(redisScope);
 }

 async function main() {
   // Construct a Token Credential from Identity library, e.g. ClientSecretCredential / ClientCertificateCredential / ManagedIdentityCredential, etc.
   const credential = new DefaultAzureCredential();
   let accessToken = await returnPassword(credential);

   // Create redis client and connect to the Azure Cache for Redis over the TLS port using the access token as password.
   let cacheConnection = createClient({
     username: process.env.REDIS_SERVICE_PRINCIPAL_ID,
     password: accessToken.token,
     url: `redis://${process.env.AZURE_MANAGED_REDIS_HOST_NAME}:10000`,
     pingInterval: 100000,
     socket: {
       tls: true,
       keepAlive: 0
     },
   });

   cacheConnection.on("error", (err) => console.log("Redis Client Error", err));
   await cacheConnection.connect();

   for (let i = 0; i < 3; i++) {
     try {
         // PING command
         console.log("\nCache command: PING");
         console.log("Cache response : " + await cacheConnection.ping());

         // SET
         console.log("\nCache command: SET Message");
         console.log("Cache response : " + await cacheConnection.set("Message",
             "Hello! The cache is working from Node.js!"));

         // GET
         console.log("\nCache command: GET Message");
         console.log("Cache response : " + await cacheConnection.get("Message"));

         // Client list, useful to see if connection list is growing...
         console.log("\nCache command: CLIENT LIST");
         console.log("Cache response : " + await cacheConnection.sendCommand(["CLIENT", "LIST"]));
       break;
     } catch (e) {
       console.log("error during redis get", e.toString());
       if ((accessToken.expiresOnTimestamp <= Date.now())|| (redis.status === "end" || "close") ) {
         await redis.disconnect();
         accessToken = await returnPassword(credential);
         cacheConnection = createClient({
           username: process.env.REDIS_SERVICE_PRINCIPAL_ID,
           password: accessToken.token,
           url: `redis://${process.env.AZURE_MANAGED_REDIS_HOST_NAME}:10000`,
           pingInterval: 100000,
           socket: {
             tls: true,
             keepAlive: 0
           },
         });
       }
     }
   }
 }

 main().then((result) => console.log(result)).catch(ex => console.log(ex));
使用 Node.js 运行该脚本。
node redistestreauth.js代码的输出如下所示。
 Cache command: PING
 Cache response : PONG

 Cache command: GET Message
 Cache response : Hello! The cache is working from Node.js!

 Cache command: SET Message
 Cache response : OK

 Cache command: GET Message
 Cache response : Hello! The cache is working from Node.js!

 Cache command: CLIENT LIST
 Cache response : id=10017364 addr=76.22.73.183:59380 fd=221 name= age=1 idle=0 flags=N db=0 sub=0 psub=0 multi=-1 qbuf=26 qbuf-free=32742 argv-mem=10 obl=0 oll=0 omem=0 tot-mem=61466 ow=0 owmem=0 events=r cmd=client user=default numops=6
注释
有关使用 Microsoft Entra ID 通过 node-redis 库向 Redis 进行身份验证的其他示例,请参阅此 GitHub 存储库
创建 Node.js 应用以访问缓存
创建 Node.js 应用,该应用使用 Microsoft Entra ID 或访问密钥连接到 Azure Redis 缓存。 建议使用 Microsoft Entra ID。
对缓存使用 Microsoft Entra ID 身份验证
Azure Redis 缓存(Enterprise 和 Enterprise Flash 层除外)将默认启用 Microsoft Entra 身份验证。 访问密钥将默认禁用。
重要
Microsoft 建议使用 Microsoft Entra ID 身份验证来获得最安全的身份验证体验,而不要使用密码或访问密钥。 本文本节中描述的身份验证使用访问密钥,该方式需要对应用程序具有高度信任,并且相较于使用 Microsoft Entra ID 存在额外的风险。 仅当Microsoft Entra ID 身份验证不可行时,才使用本文档中的方法。
在 Azure 门户中,选择要使用基于 Microsoft Entra 令牌的身份验证的缓存。
从“资源”菜单中选择“身份验证”。
选择“选择成员”并输入有效用户的名称。 选择“保存”时,系统会自动向你输入的用户默认分配数据所有者访问策略。 还可输入托管标识或服务主体以连接到缓存实例。
有关如何将 Microsoft Entra ID 与 Azure CLI 配合使用的信息,请参阅标识参考页面。
安装 JavaScript Azure 标识客户端库
Microsoft 身份验证库 (MSAL) 允许从 Microsoft 标识获取安全令牌,以对用户进行身份验证。 我们提供了一个 JavaScript Azure 标识客户端库,以通过 MSAL 支持令牌身份验证。 使用 npm 安装此库:
npm install @azure/identity
创建使用 Microsoft Entra ID 的新 Node.js 应用
添加对应主机名和服务主体 ID(这是 Microsoft Entra ID 服务主体或用户的对象 ID)的环境变量。 在 Azure 门户中,查找用户名。
set AZURE_CACHE_FOR_REDIS_HOST_NAME=contosoCache set REDIS_SERVICE_PRINCIPAL_ID=XXXXXXXXXXXXXXXXXXXXXXXXXXXXXXXXXXXXXXXXXXXX创建名为 redistest.js 的新脚本文件。
将下面的示例 JavaScript 添加到文件。 此代码演示如何使用缓存主机名和密钥环境变量连接到 Azure Redis 缓存实例。 此代码还在缓存中存储和检索字符串值。 还执行了
PING和CLIENT LIST命令。 有关将 Redis 与 node-redis 客户端一起使用的更多示例,请参阅 https://redis.js.org/。const { createClient } = require("redis"); const { DefaultAzureCredential } = require("@azure/identity"); async function main() { // Construct a Token Credential from Identity library, e.g. ClientSecretCredential / ClientCertificateCredential / ManagedIdentityCredential, etc. const credential = new DefaultAzureCredential(); const redisScope = "https://redis.azure.com/.default"; // Fetch a Microsoft Entra token to be used for authentication. This token will be used as the password. let accessToken = await credential.getToken(redisScope); console.log("access Token", accessToken); // Create redis client and connect to the Azure Cache for Redis over the TLS port using the access token as password. const cacheConnection = createClient({ username: process.env.REDIS_SERVICE_PRINCIPAL_ID, password: accessToken.token, url: `redis://${process.env.AZURE_CACHE_FOR_REDIS_HOST_NAME}:6380`, pingInterval: 100000, socket: { tls: true, keepAlive: 0 }, }); cacheConnection.on("error", (err) => console.log("Redis Client Error", err)); await cacheConnection.connect(); // PING command console.log("\nCache command: PING"); console.log("Cache response : " + await cacheConnection.ping()); // SET console.log("\nCache command: SET Message"); console.log("Cache response : " + await cacheConnection.set("Message", "Hello! The cache is working from Node.js!")); // GET console.log("\nCache command: GET Message"); console.log("Cache response : " + await cacheConnection.get("Message")); // Client list, useful to see if connection list is growing... console.log("\nCache command: CLIENT LIST"); console.log("Cache response : " + await cacheConnection.sendCommand(["CLIENT", "LIST"])); cacheConnection.disconnect(); return "Done" } main().then((result) => console.log(result)).catch(ex => console.log(ex));使用 Node.js 运行该脚本。
node redistest.js代码的输出如下所示。
Cache command: PING
Cache response : PONG

Cache command: GET Message
Cache response : Hello! The cache is working from Node.js!

Cache command: SET Message
Cache response : OK

Cache command: GET Message
Cache response : Hello! The cache is working from Node.js!

Cache command: CLIENT LIST
Cache response : id=10017364 addr=76.22.73.183:59380 fd=221 name= age=1 idle=0 flags=N db=0 sub=0 psub=0 multi=-1 qbuf=26 qbuf-free=32742 argv-mem=10 obl=0 oll=0 omem=0 tot-mem=61466 ow=0 owmem=0 events=r cmd=client user=default numops=6

Done
创建使用重新身份验证的示例 JavaScript 应用
Microsoft Entra ID 访问令牌的有效期有限,平均为 75 分钟。 为了保持与缓存的连接,需要刷新令牌。 此示例演示如何使用 JavaScript 执行此操作。
创建名为 redistestreauth.js 的新脚本文件。
将下面的示例 JavaScript 添加到文件。
 const { createClient } = require("redis");
 const { DefaultAzureCredential } = require("@azure/identity");

 async function returnPassword(credential) {
     const redisScope = "https://redis.azure.com/.default";

     // Fetch a Microsoft Entra token to be used for authentication. This token will be used as the password.
     return credential.getToken(redisScope);
 }

 async function main() {
   // Construct a Token Credential from Identity library, e.g. ClientSecretCredential / ClientCertificateCredential / ManagedIdentityCredential, etc.
   const credential = new DefaultAzureCredential();
   let accessToken = await returnPassword(credential);

   // Create redis client and connect to the Azure Cache for Redis over the TLS port using the access token as password.
   let cacheConnection = createClient({
     username: process.env.REDIS_SERVICE_PRINCIPAL_ID,
     password: accessToken.token,
     url: `redis://${process.env.AZURE_CACHE_FOR_REDIS_HOST_NAME}:6380`,
     pingInterval: 100000,
     socket: {
       tls: true,
       keepAlive: 0
     },
   });

   cacheConnection.on("error", (err) => console.log("Redis Client Error", err));
   await cacheConnection.connect();

   for (let i = 0; i < 3; i++) {
     try {
         // PING command
         console.log("\nCache command: PING");
         console.log("Cache response : " + await cacheConnection.ping());

         // SET
         console.log("\nCache command: SET Message");
         console.log("Cache response : " + await cacheConnection.set("Message",
             "Hello! The cache is working from Node.js!"));

         // GET
         console.log("\nCache command: GET Message");
         console.log("Cache response : " + await cacheConnection.get("Message"));

         // Client list, useful to see if connection list is growing...
         console.log("\nCache command: CLIENT LIST");
         console.log("Cache response : " + await cacheConnection.sendCommand(["CLIENT", "LIST"]));
       break;
     } catch (e) {
       console.log("error during redis get", e.toString());
       if ((accessToken.expiresOnTimestamp <= Date.now())|| (redis.status === "end" || "close") ) {
         await redis.disconnect();
         accessToken = await returnPassword(credential);
         cacheConnection = createClient({
           username: process.env.REDIS_SERVICE_PRINCIPAL_ID,
           password: accessToken.token,
           url: `redis://${process.env.AZURE_CACHE_FOR_REDIS_HOST_NAME}:6380`,
           pingInterval: 100000,
           socket: {
             tls: true,
             keepAlive: 0
           },
         });
       }
     }
   }
 }

 main().then((result) => console.log(result)).catch(ex => console.log(ex));
使用 Node.js 运行该脚本。
node redistestreauth.js代码的输出如下所示。
 Cache command: PING
 Cache response : PONG

 Cache command: GET Message
 Cache response : Hello! The cache is working from Node.js!

 Cache command: SET Message
 Cache response : OK

 Cache command: GET Message
 Cache response : Hello! The cache is working from Node.js!

 Cache command: CLIENT LIST
 Cache response : id=10017364 addr=76.22.73.183:59380 fd=221 name= age=1 idle=0 flags=N db=0 sub=0 psub=0 multi=-1 qbuf=26 qbuf-free=32742 argv-mem=10 obl=0 oll=0 omem=0 tot-mem=61466 ow=0 owmem=0 events=r cmd=client user=default numops=6
注释
有关使用 Microsoft Entra ID 通过 node-redis 库向 Redis 进行身份验证的其他示例,请参阅此 GitHub 存储库
清理资源
要继续使用在本文中创建的资源,请保留资源组。
否则,如果您已不再需要使用这些资源,可以删除您创建的 Azure 资源组以避免产生费用。
重要
删除资源组的操作不可逆。 删除资源组时,包含在其中的所有资源会被永久删除。 请确保不会意外删除错误的资源组或资源。 如果在现有资源组(其中包含要保留的资源)内创建了此资源,可以逐个删除这些资源,而不是删除资源组。
删除资源组的步骤
登录到 Azure 门户,然后选择“资源组”。
选择要删除的资源组。
如果有多个资源组,请使用“筛选任何字段...”框,键入为本文创建的资源组的名称。 在结果列表中选择资源组。

选择“删除资源组”。
系统会要求确认是否删除资源组。 键入资源组的名称进行确认,然后选择“删除”。

片刻之后,将会删除该资源组及其所有资源。
获取示例代码
获取 GitHub 上的 Node.js快速入门。
相关内容
在本快速入门中,您已学习如何从 Node.js 应用程序使用 Azure 托管 Redis 或 Azure Redis 缓存。 详细了解 Azure Redis 产品/服务: