你当前正在访问 Microsoft Azure Global Edition 技术文档网站。 如果需要访问由世纪互联运营的 Microsoft Azure 中国技术文档网站,请访问 https://docs.azure.cn。
Azure OpenAI 现在支持使用 Azure Blob 存储 来处理 Azure OpenAI Batch 的输入和输出文件。 通过使用自己的存储,你不会受到对文件数的批处理限制。
区域支持
- australiaeast
- eastus
- 德国西中部
- northcentralus
- polandcentral
- Swedencentral
- switzerlandnorth
- eastus2
- westus
Azure Blob 存储配置
先决条件
- Azure Blob 存储帐户。
- 已部署 Azure OpenAI 资源,其中包含部署类型为
Global-Batch或DataZoneBatch的模型。 有关此过程的帮助,请参阅 资源创建和模型部署指南 。
托管标识
若要使 Azure OpenAI 资源能够安全地访问 Azure Blob 存储帐户,需要使用 系统分配的托管标识来设置资源。
注释
目前不支持用户分配的托管标识。
找到你的 Azure OpenAI 资源 > 选择“资源管理”>“标识”>“系统分配”> 将状态设置为“开”。


基于角色的访问控制
为系统分配的托管标识配置 Azure OpenAI 资源后,需要向其授予对 Azure Blob 存储帐户的访问权限。
从 https://portal.azure.com 查找并选择 Azure Blob 存储资源。
选择访问控制 (IAM)>添加>添加角色分配。
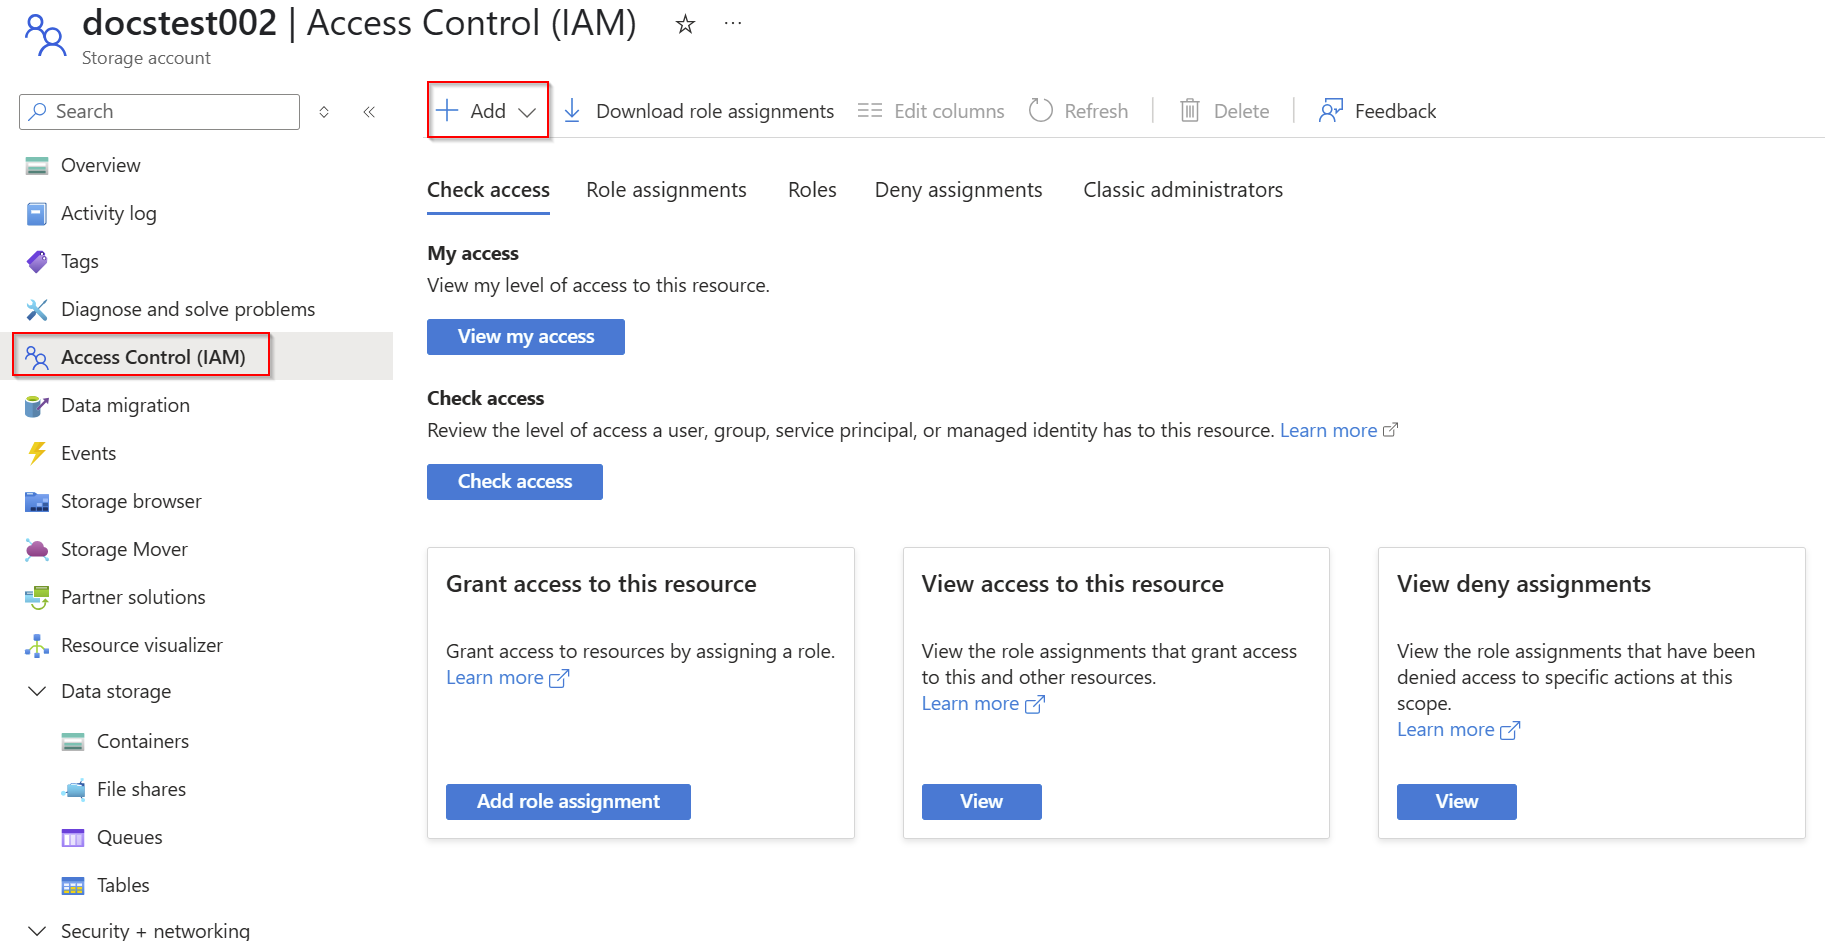
搜索“存储 Blob 数据参与者”>“下一步”。
选择 “托管标识>+选择成员> ”选择 Azure OpenAI 资源的托管标识。


如果希望使用自定义角色进行更精细的访问,则需要以下权限:
输入数据:
Microsoft.Storage/storageAccounts/blobServices/containers/blobs/read
输出数据/文件夹:
Microsoft.Storage/storageAccounts/blobServices/containers/blobs/readMicrosoft.Storage/storageAccounts/blobServices/containers/blobs/write
创建容器
在此示例中,你将创建两个名为batch-input和batch-output的容器。 可以根据需要命名这些名称,但如果使用备用名称,则需要在以下步骤中调整示例。
若要在数据存储>下创建容器,请选择+容器> 并命名您的容器。

创建容器后,通过选择容器 >“设置”>“属性”> 复制 URL 来检索每个容器的 URL。
在本例中,我们有:
https://{AZURE-BLOB-STORAGE-RESOURCE-NAME}.blob.core.windows.net/batch-inputhttps://{AZURE-BLOB-STORAGE-RESOURCE-NAME}.blob.core.windows.net/batch-output
创建输入文件
在本文中,我们将创建一 test.jsonl 个名为的文件,并将以下内容复制到该文件。 你需要修改该文件并将你的全局批处理部署名称添加到该文件的每一行。
{"custom_id": "task-0", "method": "POST", "url": "/chat/completions", "body": {"model": "REPLACE-WITH-MODEL-DEPLOYMENT-NAME", "messages": [{"role": "system", "content": "You are an AI assistant that helps people find information."}, {"role": "user", "content": "When was Microsoft founded?"}]}}
{"custom_id": "task-1", "method": "POST", "url": "/chat/completions", "body": {"model": "REPLACE-WITH-MODEL-DEPLOYMENT-NAME", "messages": [{"role": "system", "content": "You are an AI assistant that helps people find information."}, {"role": "user", "content": "When was the first XBOX released?"}]}}
{"custom_id": "task-2", "method": "POST", "url": "/chat/completions", "body": {"model": "REPLACE-WITH-MODEL-DEPLOYMENT-NAME", "messages": [{"role": "system", "content": "You are an AI assistant that helps people find information."}, {"role": "user", "content": "What is Altair Basic?"}]}}
上传训练文件
在 Azure Blob 存储帐户中,打开之前创建的 批处理输入 容器。
选择“ 上传 ”并选择文件 test.jsonl 。

在批处理作业中处理文件 jsonl 的过程中,无法对文件进行任何更改。 如果在批处理作业运行时文件发生更改,作业将失败。
创建批处理作业
注释
metadata 此功能目前不受支持。
import os
from datetime import datetime
from openai import AzureOpenAI
from azure.identity import DefaultAzureCredential, get_bearer_token_provider

token_provider = get_bearer_token_provider(
    DefaultAzureCredential(), "https://cognitiveservices.azure.com/.default"
)

client = AzureOpenAI(
  azure_endpoint = os.getenv("AZURE_OPENAI_ENDPOINT"),
  azure_ad_token_provider=token_provider,
  api_version="2025-04-01-preview"
)

batch_response = client.batches.create(
    input_file_id=None,
    endpoint="/chat/completions",
    completion_window="24h",
      extra_body={
        "input_blob": "https://{AZURE-BLOB-STORAGE-RESOURCE-NAME}.blob.core.windows.net/batch-input/test.jsonl",
        "output_folder": {
                "url": "https://{AZURE-BLOB-STORAGE-RESOURCE-NAME}.blob.core.windows.net/batch-output",
        }
    }
)

# Save batch ID for later use
batch_id = batch_response.id

print(batch_response.model_dump_json(indent=2))
输出:
{
  "id": "batch_b632a805-797b-49ed-9c9c-86eb4057f2a2",
  "completion_window": "24h",
  "created_at": 1747516485,
  "endpoint": "/chat/completions",
  "input_file_id": null,
  "object": "batch",
  "status": "validating",
  "cancelled_at": null,
  "cancelling_at": null,
  "completed_at": null,
  "error_file_id": null,
  "errors": null,
  "expired_at": null,
  "expires_at": 1747602881,
  "failed_at": null,
  "finalizing_at": null,
  "in_progress_at": null,
  "metadata": null,
  "output_file_id": null,
  "request_counts": {
    "completed": 0,
    "failed": 0,
    "total": 0
  },
  "error_blob": "",
  "input_blob": "https://docstest002.blob.core.windows.net/batch-input/test.jsonl",
  "output_blob": ""
}
可以像之前在 有关使用 Azure OpenAI 批处理的综合指南中所述那样监视状态。
import time
import datetime

status = "validating"
while status not in ("completed", "failed", "canceled"):
    time.sleep(60)
    batch_response = client.batches.retrieve(batch_id)
    status = batch_response.status
    print(f"{datetime.datetime.now()} Batch Id: {batch_id},  Status: {status}")

if batch_response.status == "failed":
    for error in batch_response.errors.data:
        print(f"Error code {error.code} Message {error.message}")
输出:
2025-05-17 17:16:56.950427 Batch Id: batch_b632a805-797b-49ed-9c9c-86eb4057f2a2,  Status: validating
2025-05-17 17:17:57.532054 Batch Id: batch_b632a805-797b-49ed-9c9c-86eb4057f2a2,  Status: validating
2025-05-17 17:18:58.156793 Batch Id: batch_b632a805-797b-49ed-9c9c-86eb4057f2a2,  Status: in_progress
2025-05-17 17:19:58.739708 Batch Id: batch_b632a805-797b-49ed-9c9c-86eb4057f2a2,  Status: in_progress
2025-05-17 17:20:59.398508 Batch Id: batch_b632a805-797b-49ed-9c9c-86eb4057f2a2,  Status: finalizing
2025-05-17 17:22:00.242371 Batch Id: batch_b632a805-797b-49ed-9c9c-86eb4057f2a2,  Status: completed
一旦status是completed,您就可以检索output_blob路径:
print(batch_response.model_dump_json(indent=2))
输出:
{
  "id": "batch_b632a805-797b-49ed-9c9c-86eb4057f2a2",
  "completion_window": "24h",
  "created_at": 1747516485,
  "endpoint": "/chat/completions",
  "input_file_id": null,
  "object": "batch",
  "status": "completed",
  "cancelled_at": null,
  "cancelling_at": null,
  "completed_at": 1747516883,
  "error_file_id": null,
  "errors": null,
  "expired_at": null,
  "expires_at": 1747602881,
  "failed_at": null,
  "finalizing_at": 1747516834,
  "in_progress_at": 1747516722,
  "metadata": null,
  "output_file_id": null,
  "request_counts": {
    "completed": 3,
    "failed": 0,
    "total": 3
  },
  "error_blob": "https://docstest002.blob.core.windows.net/batch-output/{GUID}/errors.jsonl",
  "input_blob": "https://docstest002.blob.core.windows.net/batch-input/test.jsonl",
  "output_blob": "https://docstest002.blob.core.windows.net/batch-output/{GUID}/results.jsonl"
}
批处理作业完成后,可以在 Azure 门户中通过 Azure Blob 存储界面下载 error_blob , output_blob 也可以以编程方式下载:
注释
error_blob并且 output_blob 路径始终在响应中返回,即使在未创建相应的文件时也是如此。 在这种情况下,没有错误,因此 errors.jsonl 未创建,仅 results.jsonl 存在。
pip install azure-identity azure-storage-blob
请记住,虽然你已向 Azure OpenAI 资源授予对 Azure Blob 存储的编程访问权限,但下载结果时,可能还需要为执行以下脚本的用户帐户提供访问权限。 若要下载文件, Storage Blob Data Reader 访问就足够了。
# Import required libraries
from azure.identity import DefaultAzureCredential
from azure.storage.blob import BlobServiceClient

# Define storage account and container information
storage_account_name = "docstest002" # replace with your storage account name
container_name = "batch-output"

# Define the blob paths to download
blob_paths = [
    "{REPLACE-WITH-YOUR-GUID}/results.jsonl",
]

credential = DefaultAzureCredential()
account_url = f"https://{storage_account_name}.blob.core.windows.net"
blob_service_client = BlobServiceClient(account_url=account_url, credential=credential)
container_client = blob_service_client.get_container_client(container_name)

for blob_path in blob_paths:
    blob_client = container_client.get_blob_client(blob_path)

    file_name = blob_path.split("/")[-1]

    print(f"Downloading {file_name}...")
    with open(file_name, "wb") as file:
        download_stream = blob_client.download_blob()
        file.write(download_stream.readall())

    print(f"Downloaded {file_name} successfully!")
另请参阅
有关 Azure OpenAI Batch 的详细信息,请参阅 全面的批处理指南。