Recently we (Rohit Batra) added capability to sign the service bus message in "Publish to azure service bus" task. In this post, we will walk-through how you can use it in your release/build workflows.
1. Get the pfx certificate that you want to use for signing. In case you want to try out, you can create a self-signed certificate using this code.
# create a new certificate New-SelfSignedCertificate -certstorelocation cert:\localmachine\my -dnsname mydomain.fqdn -Provider "Microsoft Enhanced RSA and AES Cryptographic Provider" # export the above as a pfx file $pwd = ConvertTo-SecureString -String "mypassword" -Force -AsPlainText Export-PfxCertificate -cert cert:\localMachine\my\ -FilePath c:\temp\mycert.pfx -Password $pwd
2. If you want to use azure key-vault to manage this, you can import the certificate to key-vault as shown below and then link the key-vault backed variable group to your definition environment as mentioned here.

3. But if you dont want to use key-vault, then convert the above pfx certificate to a string using this code.
$pfxcert = New-Object System.Security.Cryptography.X509certificates.X509certificate2("C:\temp\mycert.pfx", "mypassword", [System.Security.Cryptography.X509Certificates.X509KeyStorageFlags]::Exportable); $certBytes = $pfxcert.Export([System.Security.Cryptography.X509certificates.X509ContentType]::Pkcs12); $certString = [Convert]::ToBase64String($certBytes); Write-Output $certString
4. Define a new secret variable with value as the above string in your definition environment.

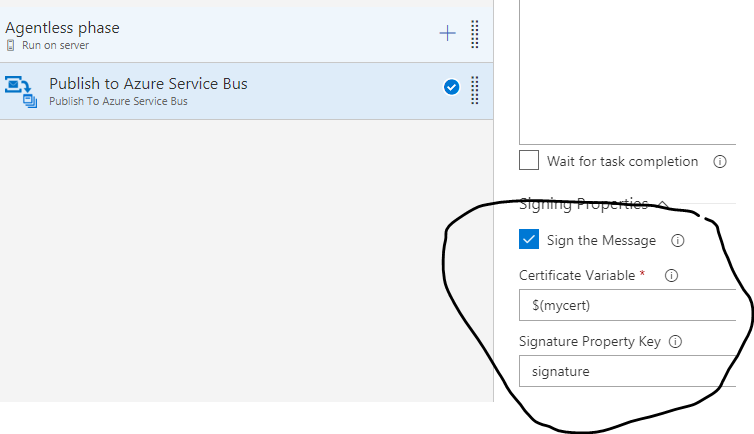
5. Use the above secret variable in the signing properties.
6. Run a release and you will see the payload is signed.

Enjoy !!