클라우드 네이티브 앱을 Azure Kubernetes Service에 수동으로 배포
웹 사이트 배포를 자동화하려면 AKS(Azure Kubernetes Service)에 기존 eShop 앱을 수동으로 배포해야 합니다. Azure CLI 명령 및 bash 스크립트를 사용하여 Azure 리소스를 만들고 AKS에 앱을 배포합니다. 마지막으로 GitHub Actions가 AKS 및 Azure Container Registry에 배포할 수 있도록 Azure AD(Azure Active Directory) 서비스 주체를 만듭니다.
이 명령은 다음 리소스를 만들어 업데이트된 버전의 eShop 앱을 배포합니다.
- ACR(Azure Container Registry)을 프로비전한 다음, 레지스트리에 이미지를 푸시합니다.
- AKS 클러스터를 프로비전한 다음, 컨테이너를 클러스터에 배포합니다.
- 배포를 테스트합니다.
- GitHub Actions가 AKS 및 Azure Container Registry에 배포할 수 있도록 서비스 주체를 만듭니다.
중요합니다
시작하기 전에 필수 구성 요소를 완료했는지 확인합니다.
개발 환경 열기
연습을 호스팅하는 GitHub 코드 공간을 사용하거나 Visual Studio Code에서 로컬로 연습을 완료하도록 선택할 수 있습니다.
GitHub Codespaces 설정
리포지토리를 사용자 고유의 https://github.com/MicrosoftDocs/mslearn-dotnet-cloudnative-devops GitHub 계정에 포크합니다. 그런 다음 새 포크에서 다음을 수행합니다.
- 코드를 선택합니다.
- Codespaces 탭을 선택합니다.
- 아이콘을 선택하여 코드스페이 + 스를 만듭니다.
GitHub는 코드스페이스를 만들고 구성하는 데 몇 분 정도 걸립니다. 프로세스가 완료되면 연습에 대한 코드 파일이 표시됩니다.
선택 사항: Visual Studio Code 설정
Visual Studio Code를 사용하려면 리포지토리를 사용자 고유의 https://github.com/MicrosoftDocs/mslearn-dotnet-cloudnative-devops GitHub 계정에 포크하고 로컬로 복제합니다. 그러면:
- Visual Studio Code에서 Dev Container를 실행하려면 시스템 요구 사항을 설치합니다.
- Docker가 실행 중인지 확인합니다.
- 새 Visual Studio Code 창에서 복제된 리포지토리의 폴더를 엽니다.
- 명령 팔레트를 열려면 Ctrl+Shift+P를 누릅니다.
- 검색: >개발 컨테이너: 다시 빌드 및 컨테이너에서 다시 열기
- Visual Studio Code는 개발 컨테이너를 로컬로 만듭니다.
컨테이너 빌드
터미널 창에서 다음 dotnet CLI 명령을 실행합니다.
dotnet publish /p:PublishProfile=DefaultContainer
Azure 리소스 만들기
터미널 창에서 다음 Azure CLI 명령을 사용하여 Azure에 로그인합니다.
az login --use-device-code선택한 Azure 구독을 봅니다.
az account show -o table잘못된 구독을 선택한 경우 az account set 명령을 사용하여 올바른 구독을 선택합니다.
다음 Azure CLI 명령을 실행하여 Azure 지역 및 연결된 이름 목록을 가져옵니다.
az account list-locations -o table가장 가까운 지역을 찾아 다음 단계에서
[Closest Azure region]를 대체하여 사용하십시오.다음 bash 문을 실행합니다.
export LOCATION=[Closest Azure region]
export RESOURCE_GROUP=rg-eshop
export CLUSTER_NAME=aks-eshop
export ACR_NAME=acseshop$SRANDOM
이전 명령은 다음 Azure CLI 명령에서 사용할 환경 변수를 만듭니다. LOCATION을 가까운 Azure 지역으로 변경해야 합니다. 예를 들어 eastus입니다. 리소스 그룹, AKS 클러스터 또는 ACR에 다른 이름을 지정하려면 해당 값을 변경합니다. Azure Portal에서 새 리포지토리를 보려면 컨테이너 레지스트리의 액세스 제어(IAM)에서 앱 준수 자동화 관리자로 자신을 할당합니다.
다음 Azure CLI 명령을 실행합니다.
az group create --name $RESOURCE_GROUP --___location $LOCATION
az acr create --resource-group $RESOURCE_GROUP --name $ACR_NAME --sku Basic
az acr login --name $ACR_NAME
실행 시 인증 오류가
az acr login --name $ACR_Name표시되는 경우 설정 - 액세스 키 아래 Azure에서 새로 만든 컨테이너 레지스터에서 관리자 사용자를 켜야 합니다. 계속하려면 Azure에서 이러한 자격 증명을 입력하라는 메시지를 표시합니다. 을 사용하여 다시 인증해야 할 수도 있습니다az login --use-device-code.이러한 명령은 Azure 리소스, 이미지에 대한 ACR을 포함하는 리소스 그룹을 만든 다음 ACR에 로그인합니다. 이 출력이 표시될 때까지 몇 분 정도 걸릴 수 있습니다.
  ...
  },
  "status": null,
  "systemData": {
    "createdAt": "2023-10-19T09:11:51.389157+00:00",
    "createdBy": "",
    "createdByType": "User",
    "lastModifiedAt": "2023-10-19T09:11:51.389157+00:00",
    "lastModifiedBy": "",
    "lastModifiedByType": "User"
  },
  "tags": {},
  "type": "Microsoft.ContainerRegistry/registries",
  "zoneRedundancy": "Disabled"
}
Login Succeeded
이미지에 태그를 지정하고 만든 ACR에 푸시하려면 다음 명령을 실행합니다.
docker tag store $ACR_NAME.azurecr.io/storeimage:v1
docker tag products $ACR_NAME.azurecr.io/productservice:v1

docker push $ACR_NAME.azurecr.io/storeimage:v1
docker push $ACR_NAME.azurecr.io/productservice:v1
다음 명령을 사용하여 이미지 푸시가 성공적으로 완료되었는지 확인할 수 있습니다.
az acr repository list --name $ACR_NAME --output tableAKS를 만들고 다음 명령을 사용하여 ACR에 연결합니다.
az aks create --resource-group $RESOURCE_GROUP --name $CLUSTER_NAME --node-count 1 --generate-ssh-keys --node-vm-size Standard_B2s --network-plugin azure --attach-acr $ACR_NAME

az aks get-credentials --name $CLUSTER_NAME --resource-group $RESOURCE_GROUP
위의 명령은 단일 노드 AKS 클러스터를 만들고, ACR에 연결한 다음, 로컬 컴퓨터를 AKS 클러스터에 연결합니다. 위의 명령을 완료하는 데 몇 분 정도 걸릴 수 있습니다.
새 AKS가 다음 명령을 사용하여 ACR에서 이미지를 끌어올 수 있는지 확인합니다.
az aks check-acr --acr $ACR_NAME.azurecr.io --name $CLUSTER_NAME --resource-group $RESOURCE_GROUP다음 메시지와 유사한 출력이 표시됩니다.
[2023-10-19T13:33:09Z] Loading azure.json file from /etc/kubernetes/azure.json
[2023-10-19T13:33:09Z] Checking managed identity...
[2023-10-19T13:33:09Z] Cluster cloud name: AzurePublicCloud
[2023-10-19T13:33:09Z] Kubelet managed identity client ID: 00001111-aaaa-2222-bbbb-3333cccc4444
[2023-10-19T13:33:09Z] Validating managed identity existance: SUCCEEDED
[2023-10-19T13:33:09Z] Validating image pull permission: SUCCEEDED
[2023-10-19T13:33:09Z]
Your cluster can pull images from acseshop1251599299.azurecr.io!
이제 새 AKS 클러스터에 대해 kubectl 명령을 실행할 수 있습니다. 출력에서 전체 ACR URL을 복사합니다. 예를 들어 URL 위에 acseshop1251599299가 있습니다.
AKS 클러스터의 상태를 확인합니다.
kubectl get nodes -A다음 메시지와 유사한 출력이 표시됩니다.
NAME                                STATUS   ROLES   AGE     VERSION
aks-nodepool1-37200563-vmss000000   Ready    agent   3h44m   v1.26.6
Kubernetes 배포 매니페스트 구성
이제 eShop 이미지가 ACR에 있으므로 이러한 새 이미지를 사용하도록 AKS 배포 매니페스트를 업데이트할 수 있습니다.
Visual Studio Code의 탐색기 패널에서 프로젝트의 루트에서 deployment.yml 파일을 선택합니다.
줄 17에서 바꾸기:
- image: [replace with your ACR name].azurecr.io/storeimage:v1이전 단계에서 복사한 ACR 이름을 붙여넣습니다. 줄은 다음 yaml과 유사해야 합니다.
- image: acseshop1251599299.azurecr.io/storeimage:v1줄 65에 대해 다음 단계를 반복합니다.
- image: [replace with your ACR name].azurecr.io/productservice:v1Ctrl+ S를 사용하여 파일을 저장합니다.
터미널 창에서 다음 kubernetes 명령을 사용하여 NGINX 수신 컨트롤러를 배포합니다.
kubectl apply -f https://raw.githubusercontent.com/kubernetes/ingress-nginx/controller-v1.9.3/deploy/static/provider/cloud/deploy.yaml위의
kubectl명령은 AKS 클러스터로의 수신을 허용하는 서비스 및 구성 요소를 추가합니다. 다음 kubernetes 명령을 사용하여 인그레스가 실행할 준비가 되었는지 확인합니다.kubectl get services --namespace ingress-nginx다음 메시지와 유사한 출력이 표시됩니다.
NAME                                 TYPE           CLUSTER-IP     EXTERNAL-IP    PORT(S)                      AGE
ingress-nginx-controller             LoadBalancer   10.0.135.51    20.26.154.64   80:32115/TCP,443:32254/TCP   58s
ingress-nginx-controller-admission   ClusterIP      10.0.137.137   <none>         443/TCP                      58s
다음 명령을 사용하여 eShop 앱을 배포합니다.
kubectl apply -f deployment.ymlkubectl적용 명령은 eShop 앱, 프런트 엔드 Blazor 웹앱, 백 엔드 REST API 제품 서비스, AKS 클러스터의 올바른 서비스로 트래픽을 라우팅하는 수신 규칙을 배포합니다. 배포에 오류가 발생하면 이 명령을 다시 실행합니다.다음 메시지와 유사한 출력이 표시됩니다.
deployment.apps/storeimage created
service/eshop-website created
deployment.apps/productservice created
service/eshop-backend created
ingress.networking.k8s.io/eshop-ingress created
다음 명령을 사용하여 두 개의 마이크로 서비스가 배포되는지 확인합니다.
kubectl get pods -A다음 메시지와 유사한 출력이 표시됩니다.
NAMESPACE       NAME                                        READY   STATUS      RESTARTS   AGE
default         productservice-7569b8c64-vfbfz              1/1     Running     0          3m56s
default         storeimage-6c7c999d7c-zsnxd                 1/1     Running     0          3m56s
ingress-nginx   ingress-nginx-admission-create-szb8l        0/1     Completed   0          4m4s
ingress-nginx   ingress-nginx-admission-patch-czdbv         0/1     Completed   0          4m4s
ingress-nginx   ingress-nginx-controller-58bf5bf7dc-nwtsr   1/1     Running     0          4m4s
다음 명령을 사용하여 배포된 eShop을 봅니다.
echo "http://$(kubectl get services --namespace ingress-nginx ingress-nginx-controller --output jsonpath='{.status.loadBalancer.ingress[0].ip}')"위의 명령은 웹앱에 대한 외부 IP 주소를 반환합니다. Ctrl 키를 누른 채 링크를 클릭하여 새 탭에서 앱을 엽니다.

GitHub에서 배포하기 위한 서비스 주체 만들기
GitHub Actions는 컨테이너 이미지를 Azure Container Registry에 게시할 수 있습니다. 따라서 GitHub Runner에는 Azure에 연결할 수 있는 권한이 있어야 합니다. 다음 단계에서는 Azure 내에서 GitHub Actions ID 역할을 하는 Azure AD 서비스 주체를 만듭니다.
환경 변수에 구독 ID를 저장하려면 터미널에서 다음 명령을 실행합니다.
export SUBS=$(az account show --query 'id' --output tsv)GitHub에서 액세스를 허용하는 Azure AD 서비스 주체를 만들려면 다음 명령을 실행합니다.
az ad sp create-for-rbac --name "eShop" --role contributor --scopes /subscriptions/$SUBS/resourceGroups/$RESOURCE_GROUP --json-auth다음과 유사한 출력이 표시됩니다.
Creating 'Contributor' role assignment under scope '/subscriptions/ffffffff-aaaa-bbbb-6666-777777777777'

The output includes credentials that you must protect. Be sure that you do not include these credentials in your code or check the credentials into your source control. For more information, see https://aka.ms/azadsp-cli
 {
  "clientId": "00001111-aaaa-2222-bbbb-3333cccc4444",
  "clientSecret": "abc1A~abc123ABC123abc123ABC123abc123ABC1",
  "subscriptionId": "00000000-0000-0000-0000-000000000000",
  "tenantId": "00000000-0000-0000-0000-000000000000",
  "activeDirectoryEndpointUrl": "https://login.microsoftonline.com",
  "resourceManagerEndpointUrl": "https://management.azure.com/",
  "activeDirectoryGraphResourceId": "https://graph.windows.net/",
  "sqlManagementEndpointUrl": "https://management.core.windows.net:8443/",
  "galleryEndpointUrl": "https://gallery.azure.com/",
  "managementEndpointUrl": "https://management.core.windows.net/"
}
다음 단계에서 사용할 JSON 출력 및 대괄호를 복사합니다.
GitHub 비밀 만들기
GitHub Actions 실행기는 자격 증명을 사용하여 Container Registry 및 AKS와 상호 작용합니다. 서비스 주체 및 컨테이너 레지스트리의 자격 증명은 중요한 정보입니다. 중요한 정보를 암호화된 비밀 로 안전한 위치에 저장하는 것이 가장 좋습니다. GitHub는 비밀 및 기타 변수를 저장할 수 있는 기본 제공 위치를 제공합니다.
중요한 정보를 리포지토리에 환경 변수로 안전하게 저장하려면 다음 단계를 완료합니다. 리포지토리 관리자는 GitHub Actions 실행기에서 액세스할 수 있는 비밀을 관리해야 합니다.
포크된 GitHub 리포지토리에서 Settings>Secrets and variables>Actions로 이동합니다.
Actions secrets and variables 페이지에서 New repository secret를 선택합니다.
New secret 페이지에서 Name 아래에 AZURE_CREDENTIALS를 입력하고, Secret 아래에 터미널에서 복사한 JSON 출력을 입력합니다.
설정은 다음 스크린샷과 유사합니다.
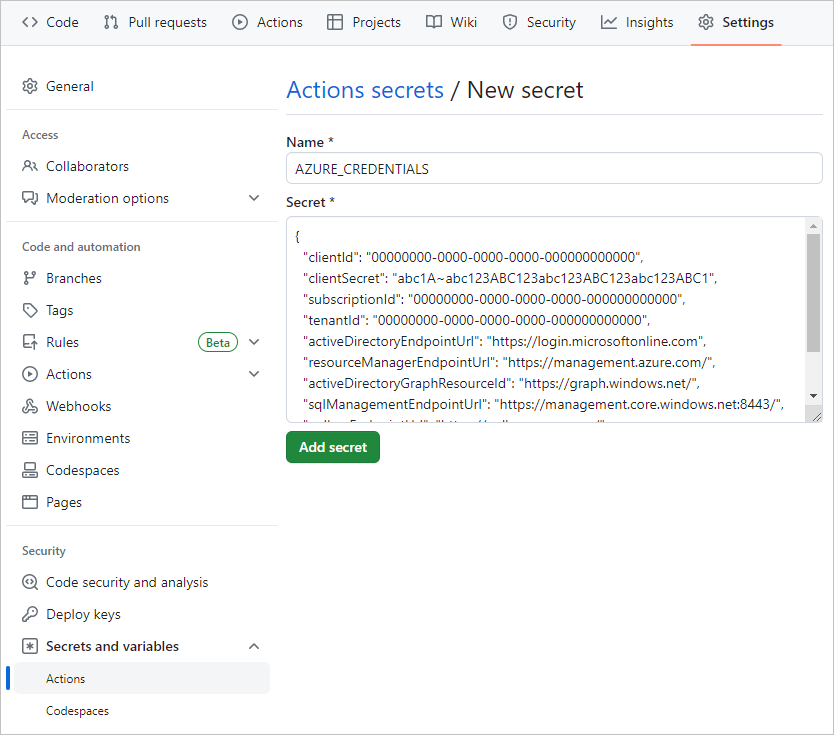
Add secret를 선택합니다.

다음 섹션에서 이 GitHub 비밀을 사용하여 컨테이너 이미지를 빌드하는 GitHub 작업을 만듭니다.