この記事では、Microsoft Entra ID 用 Spring Boot Starter の機能とコア シナリオについて説明します。 この記事には、一般的な問題、回避策、診断手順に関するガイダンスも含まれています。
Web アプリケーションを構築する場合、ID とアクセスの管理は基本的な要素です。 Azure には、Azure エコシステムの残りの部分と深く統合されたクラウドベースの ID サービスが用意されています。
Spring Security を使用すると、Spring ベースのアプリケーションを簡単にセキュリティで保護できますが、特定の ID プロバイダーに合わせて調整されるわけではありません。 Spring Boot Starter for Microsoft Entra ID を使用すると、Web アプリケーションを Microsoft Entra テナントに接続し、Microsoft Entra ID でリソース サーバーを保護できます。 Oauth 2.0 プロトコルを使用して、Web アプリケーションとリソース サーバーを保護します。
次のリンクは、スターター パッケージ、ドキュメント、サンプルへのアクセスを提供します。
[前提条件]
このガイドの手順に従うには、次の前提条件が必要です。
- Azure サブスクリプション。Azure サブスクリプションをまだお持ちでない場合は、MSDN サブスクライバーの特典を有効にするか、または無料の Azure アカウントにサインアップできます。
- サポートされている Java Development Kit (JDK) バージョン 8 以降。 詳細については、 Azure と Azure Stack での Java のサポートに関するページを参照してください。
- Apache Maven、バージョン 3.0 以降。
- Microsoft Entra ID に登録されているアプリケーション。 詳細については、クイックスタート : Microsoft ID プラットフォームにアプリケーションを登録する を参照してください。
重要
この記事の手順を完了するには、Spring Boot 2.5 以降のバージョンが必要です。
コア シナリオ
このガイドでは、次のシナリオで Microsoft Entra スターターを使用する方法について説明します。
- Web アプリケーションにアクセスする
- Web アプリケーションからリソース サーバーにアクセスする
- リソース サーバー/API を保護する
- リソース サーバーから他のリソース サーバーにアクセスする
- 1 つのアプリケーション内の Web アプリケーションとリソース サーバー
Web アプリケーションは、ユーザーがサインインできるようにする任意の Web ベースのアプリケーションです。 リソース サーバーは、アクセス トークンの検証後にアクセスを受け入れるか拒否します。
Web アプリケーションにアクセスする
このシナリオでは、 OAuth 2.0 承認コード付与 フローを使用して、ユーザーが Microsoft アカウントでサインインできるようにします。
このシナリオで Microsoft Entra スターターを使用するには、次の手順に従います。
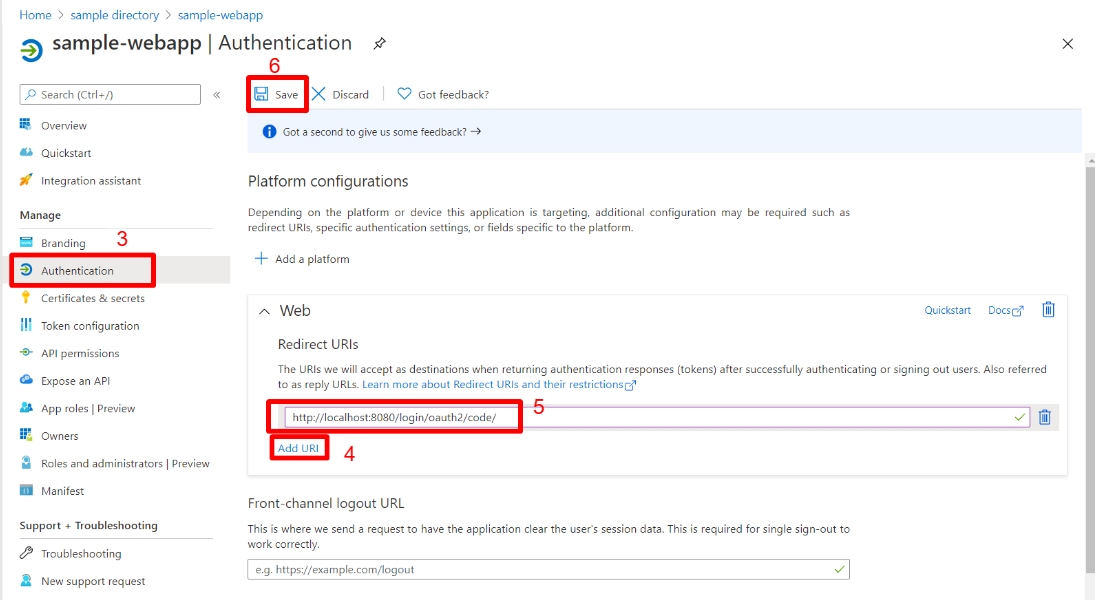
リダイレクト URI を <application-base-uri>/login/oauth2/code/に設定します。 たとえば、 http://localhost:8080/login/oauth2/code/と指定します。 必ず末尾の /を含めます。 リダイレクト URI の詳細については、「クイック スタート: Microsoft ID プラットフォームにアプリケーションを登録する」の「リダイレクト URI を追加する」を参照してください。
pom.xml ファイルに次の依存関係を追加します。
<dependency>
   <groupId>com.azure.spring</groupId>
   <artifactId>spring-cloud-azure-starter-active-directory</artifactId>
</dependency>
<dependency>
   <groupId>org.springframework.boot</groupId>
   <artifactId>spring-boot-starter-oauth2-client</artifactId>
</dependency>
注
部品表 (BOM) を使用して Spring Cloud Azure ライブラリのバージョンを管理する方法の詳細については、Spring Cloud Azure 開発者ガイドの「作業の開始」セクションを参照してください。
application.yml ファイルに次のプロパティを追加します。 これらのプロパティの値は、前提条件の説明に従って、Azure portal で作成したアプリ登録から取得できます。
spring:
 cloud:
   azure:
     active-directory:
       enabled: true
       profile:
         tenant-id: <tenant>
       credential:
         client-id: <your-client-ID>
         client-secret: <your-client-secret>
注
tenant-id に使用できる値は、common、organizations、consumers、またはテナント ID です。 これらの値の詳細については、「エラー AADSTS50020 - ID プロバイダーのユーザー アカウントがテナントに存在しない」の「間違ったエンドポイント (個人用アカウントと organization アカウント) を使用しました」セクションを参照してください。 シングルテナント アプリの変換の詳細については、「Microsoft Entra IDでのシングルテナント アプリをマルチテナントに変換する」を参照してください。
既定のセキュリティ構成を使用するか、独自の構成を指定します。
オプション 1: 既定の構成を使用します。
このオプションでは、何もする必要はありません。
DefaultAadWebSecurityConfiguration クラスは自動的に構成されます。
オプション 2: 自己定義の構成を指定します。
構成を提供するには、次の例に示すように、AadWebApplicationHttpSecurityConfigurer#aadWebApplicationのHttpSecurity メソッドを適用します。
@Configuration(proxyBeanMethods = false)
@EnableWebSecurity
@EnableMethodSecurity
public class AadOAuth2LoginSecurityConfig {

   /**
    * Add configuration logic as needed.
    */
   @Bean
   SecurityFilterChain filterChain(HttpSecurity http) throws Exception {
       http.apply(AadWebApplicationHttpSecurityConfigurer.aadWebApplication())
               .and()
           .authorizeHttpRequests()
               .anyRequest().authenticated();
           // Do some custom configuration.
       return http.build();
   }
}
Web アプリケーションからリソース サーバーにアクセスする
このシナリオで Microsoft Entra スターターを使用するには、次の手順に従います。
前に説明したようにリダイレクト URI を設定します。
pom.xml ファイルに次の依存関係を追加します。
<dependency>
   <groupId>com.azure.spring</groupId>
   <artifactId>spring-cloud-azure-starter-active-directory</artifactId>
</dependency>
<dependency>
   <groupId>org.springframework.boot</groupId>
   <artifactId>spring-boot-starter-oauth2-client</artifactId>
</dependency>
注
部品表 (BOM) を使用して Spring Cloud Azure ライブラリのバージョンを管理する方法の詳細については、Spring Cloud Azure 開発者ガイドの「作業の開始」セクションを参照してください。
前に説明したように、 application.yml ファイルに次のプロパティを追加します。
spring:
 cloud:
   azure:
     active-directory:
       enabled: true
       profile:
         tenant-id: <tenant>
       credential:
         client-id: <your-client-ID>
         client-secret: <your-client-secret>
       authorization-clients:
         graph:
           scopes: https://graph.microsoft.com/Analytics.Read, email
注
tenant-id に使用できる値は、common、organizations、consumers、またはテナント ID です。 これらの値の詳細については、「エラー AADSTS50020 - ID プロバイダーのユーザー アカウントがテナントに存在しない」の「間違ったエンドポイント (個人用アカウントと organization アカウント) を使用しました」セクションを参照してください。 シングルテナント アプリの変換の詳細については、「Microsoft Entra IDでのシングルテナント アプリをマルチテナントに変換する」を参照してください。
ここでは、 graph は OAuth2AuthorizedClientの名前であり、 scopes はログイン時に同意に必要なスコープです。
次の例のようなコードをアプリケーションに追加します。
@GetMapping("/graph")
@ResponseBody
public String graph(
   @RegisteredOAuth2AuthorizedClient("graph") OAuth2AuthorizedClient graphClient
) {
   // toJsonString() is just a demo.
   // oAuth2AuthorizedClient contains access_token. We can use this access_token to access the resource server.
   return toJsonString(graphClient);
}
ここで、 graph は前の手順で構成したクライアント ID です。
OAuth2AuthorizedClient には、リソース サーバーへのアクセスに使用されるアクセス トークンが含まれています。
このシナリオを示す完全なサンプルについては、 spring-cloud-azure-starter-active-directory サンプル aad-web-application を参照してください。
リソース サーバー/API を保護する
このシナリオではサインインはサポートされませんが、アクセス トークンを検証することでサーバーを保護します。 アクセス トークンが有効な場合、サーバーは要求を処理します。
このシナリオで Microsoft Entra スターターを使用するには、次の手順に従います。
pom.xml ファイルに次の依存関係を追加します。
<dependency>
   <groupId>com.azure.spring</groupId>
   <artifactId>spring-cloud-azure-starter-active-directory</artifactId>
</dependency>
<dependency>
   <groupId>org.springframework.boot</groupId>
   <artifactId>spring-boot-starter-oauth2-resource-server</artifactId>
</dependency>
注
部品表 (BOM) を使用して Spring Cloud Azure ライブラリのバージョンを管理する方法の詳細については、Spring Cloud Azure 開発者ガイドの「作業の開始」セクションを参照してください。
前に説明したように、 application.yml ファイルに次のプロパティを追加します。
spring:
 cloud:
   azure:
     active-directory:
       enabled: true
       credential:
         client-id: <your-client-ID>
       app-id-uri: <your-app-ID-URI>
<your-client-ID>と<your-app-ID-URI>の両方の値を使用して、アクセス トークンを確認できます。 次の図に示すように、azure portal から <your-app-ID-URI> 値を取得できます。
![[アプリケーション ID URI] が強調表示された Web アプリの [API の公開] ページを示す Azure portal のスクリーンショット。](media/spring-boot-starter-for-entra-developer-guide/get-app-id-uri-2.png)
既定のセキュリティ構成を使用するか、独自の構成を指定します。
オプション 1: 既定の構成を使用します。
このオプションでは、何もする必要はありません。
DefaultAadResourceServerConfiguration クラスは自動的に構成されます。
オプション 2: 自己定義の構成を指定します。
構成を提供するには、次の例に示すように、AadResourceServerHttpSecurityConfigurer#aadResourceServerのHttpSecurity メソッドを適用します。
@Configuration(proxyBeanMethods = false)
@EnableWebSecurity
@EnableMethodSecurity
public class AadOAuth2ResourceServerSecurityConfig {

   /**
    * Add configuration logic as needed.
    */
   @Bean
   public SecurityFilterChain apiFilterChain(HttpSecurity http) throws Exception {
       http.apply(AadResourceServerHttpSecurityConfigurer.aadResourceServer())
               .and()
           .authorizeHttpRequests()
               .anyRequest().authenticated();
       return http.build();
   }
}
このシナリオを示す完全なサンプルについては、 spring-cloud-azure-starter-active-directory サンプル aad-resource-server を参照してください。
リソース サーバーから他のリソース サーバーにアクセスする
このシナリオでは、他のリソース サーバーにアクセスするリソース サーバーがサポートされています。
このシナリオで Microsoft Entra スターターを使用するには、次の手順に従います。
pom.xml ファイルに次の依存関係を追加します。
<dependency>
   <groupId>com.azure.spring</groupId>
   <artifactId>spring-cloud-azure-starter-active-directory</artifactId>
</dependency>
<dependency>
   <groupId>org.springframework.boot</groupId>
   <artifactId>spring-boot-starter-oauth2-resource-server</artifactId>
</dependency>
<dependency>
   <groupId>org.springframework.boot</groupId>
   <artifactId>spring-boot-starter-oauth2-client</artifactId>
</dependency>
注
部品表 (BOM) を使用して Spring Cloud Azure ライブラリのバージョンを管理する方法の詳細については、Spring Cloud Azure 開発者ガイドの「作業の開始」セクションを参照してください。
application.yml ファイルに次のプロパティを追加します。
spring:
 cloud:
   azure:
     active-directory:
       enabled: true
       profile:
         tenant-id: <tenant>
       credential:
         client-id: <web-API-A-client-ID>
         client-secret: <web-API-A-client-secret>
       app-id-uri: <web-API-A-app-ID-URI>
       authorization-clients:
         graph:
           scopes:
              - https://graph.microsoft.com/User.Read
注
tenant-id に使用できる値は、common、organizations、consumers、またはテナント ID です。 これらの値の詳細については、「エラー AADSTS50020 - ID プロバイダーのユーザー アカウントがテナントに存在しない」の「間違ったエンドポイント (個人用アカウントと organization アカウント) を使用しました」セクションを参照してください。 シングルテナント アプリの変換の詳細については、「Microsoft Entra IDでのシングルテナント アプリをマルチテナントに変換する」を参照してください。
次の例に示すように、コード内の @RegisteredOAuth2AuthorizedClient 属性を使用して、関連するリソース サーバーにアクセスします。
@PreAuthorize("hasAuthority('SCOPE_Obo.Graph.Read')")
@GetMapping("call-graph")
public String callGraph(@RegisteredOAuth2AuthorizedClient("graph") OAuth2AuthorizedClient graph) {
   return callMicrosoftGraphMeEndpoint(graph);
}
このシナリオを示す完全なサンプルについては、 spring-cloud-azure-starter-active-directory サンプル aad-resource-server-obo を参照してください。
1 つのアプリケーション内の Web アプリケーションとリソース サーバー
このシナリオでは、 Web アプリケーションへのアクセス と、1 つのアプリケーションでの リソース サーバー/API の保護 がサポートされます。
このシナリオで aad-starter を使用するには、次の手順に従います。
pom.xml ファイルに次の依存関係を追加します。
<dependency>
   <groupId>com.azure.spring</groupId>
   <artifactId>spring-cloud-azure-starter-active-directory</artifactId>
</dependency>
<dependency>
   <groupId>org.springframework.boot</groupId>
   <artifactId>spring-boot-starter-oauth2-resource-server</artifactId>
</dependency>
<dependency>
   <groupId>org.springframework.boot</groupId>
   <artifactId>spring-boot-starter-oauth2-client</artifactId>
</dependency>
注
部品表 (BOM) を使用して Spring Cloud Azure ライブラリのバージョンを管理する方法の詳細については、Spring Cloud Azure 開発者ガイドの「作業の開始」セクションを参照してください。
application.yml ファイルを更新します。 次の例に示すように、プロパティ spring.cloud.azure.active-directory.application-type を web_application_and_resource_serverに設定し、各承認クライアントの承認の種類を指定します。
spring:
 cloud:
   azure:
     active-directory:
       enabled: true
       profile:
         tenant-id: <tenant>
       credential:
         client-id: <Web-API-C-client-id>
         client-secret: <Web-API-C-client-secret>
       app-id-uri: <Web-API-C-app-id-url>
       application-type: web_application_and_resource_server  # This is required.
       authorization-clients:
         graph:
           authorizationGrantType: authorization_code  # This is required.
           scopes:
             - https://graph.microsoft.com/User.Read
             - https://graph.microsoft.com/Directory.Read.All
注
tenant-id に使用できる値は、common、organizations、consumers、またはテナント ID です。 これらの値の詳細については、「エラー AADSTS50020 - ID プロバイダーのユーザー アカウントがテナントに存在しない」の「間違ったエンドポイント (個人用アカウントと organization アカウント) を使用しました」セクションを参照してください。 シングルテナント アプリの変換の詳細については、「Microsoft Entra IDでのシングルテナント アプリをマルチテナントに変換する」を参照してください。
複数の HttpSecurity インスタンスを構成する Java コードを記述します。
次のコード例では、 AadWebApplicationAndResourceServerConfig には、リソース サーバー用と Web アプリケーション用の 2 つのセキュリティ フィルター チェーン Bean が含まれています。
apiFilterChain Bean には、リソース・サーバー・セキュリティー・ビルダーを構成するための優先順位が高い。
htmlFilterChain Bean には、Web アプリケーション・セキュリティー・ビルダーを構成するための優先順位が低い。
@Configuration(proxyBeanMethods = false)
@EnableWebSecurity
@EnableMethodSecurity
public class AadWebApplicationAndResourceServerConfig {

    @Bean
    @Order(1)
    public SecurityFilterChain apiFilterChain(HttpSecurity http) throws Exception {
        http.apply(AadResourceServerHttpSecurityConfigurer.aadResourceServer())
                .and()
            // All the paths that match `/api/**`(configurable) work as the resource server. Other paths work as the web application.
            .securityMatcher("/api/**")
            .authorizeHttpRequests()
                .anyRequest().authenticated();
        return http.build();
    }

    @Bean
    public SecurityFilterChain htmlFilterChain(HttpSecurity http) throws Exception {
        // @formatter:off
        http.apply(AadWebApplicationHttpSecurityConfigurer.aadWebApplication())
                .and()
            .authorizeHttpRequests()
                .requestMatchers("/login").permitAll()
                .anyRequest().authenticated();
        // @formatter:on
        return http.build();
    }
}
アプリケーションの種類
spring.cloud.azure.active-directory.application-type プロパティの値は依存関係によって推論できるため、省略可能です。
web_application_and_resource_server値を使用する場合にのみ、プロパティを手動で設定する必要があります。
| 依存関係がある: spring-security-oauth2-client | 依存関係がある: spring-security-oauth2-resource-server | アプリケーションの種類の有効な値 | 既定値 |
|---|---|---|---|
| イエス | いいえ | web_application |
web_application |
| いいえ | イエス | resource_server |
resource_server |
| イエス | イエス |
web_application、resource_server、resource_server_with_obo、web_application_and_resource_server |
resource_server_with_obo |
設定可能なプロパティ
Spring Boot Starter for Microsoft Entra ID には、次のプロパティがあります。
| 特性 | 説明 |
|---|---|
| spring.cloud.azure.active-directory.app-id-uri | アクセス トークン内の対象ユーザーを検証するためにリソース サーバーによって使用されます。 アクセス トークンは、対象ユーザーが前に説明した <your-client-ID> または <your-app-ID-URI> 値と等しい場合にのみ有効です。 |
| spring.cloud.azure.active-directory.authorization-clients | アプリケーションがアクセスするリソース API を構成するマップ。 各項目は、アプリケーションがアクセスする 1 つのリソース API に対応します。 Spring コードでは、各項目は 1 つの OAuth2AuthorizedClient オブジェクトに対応します。 |
spring.cloud.azure.active-directory.authorization-clients.<your-client-name>。スコープ |
アプリケーションが取得するリソース サーバーの API アクセス許可。 |
spring.cloud.azure.active-directory.authorization-clients.<your-client-name>。authorization-grant-type |
承認クライアントの種類。 サポートされている型は、 authorization_code (webapp の既定の種類)、 on_behalf_of (resource-server の既定の種類)、 client_credentialsです。 |
| spring.cloud.azure.active-directory.application-type | アプリケーションの 種類を参照してください。 |
| spring.cloud.azure.active-directory.profile.environment.active-directory-endpoint | 承認サーバーのベース URI。 既定値は https://login.microsoftonline.com/ です。 |
| spring.cloud.azure.active-directory.credential.client-id | Microsoft Entra ID の登録済みアプリケーション ID。 |
| spring.cloud.azure.active-directory.credential.client-secret | 登録済みアプリケーションのクライアント シークレット。 |
| spring.cloud.azure.active-directory.user-group.use-transitive-members |
v1.0/me/transitiveMemberOfに設定されている場合は、trueを使用してグループを取得します。 それ以外の場合は、/v1.0/me/memberOf を使用します。 |
| spring.cloud.azure.active-directory.post-logout-redirect-uri | サインアウトを投稿するためのリダイレクト URI。 |
| spring.cloud.azure.active-directory.profile.tenant-id (スプリング クラウド アジュール アクティブ ディレクトリ プロファイル テナントID) | Azure テナント ID。
tenant-id に使用できる値は、common、organizations、consumers、またはテナント ID です。 |
| spring.cloud.azure.active-directory.user-group.allowed-group-names |
MemberOf Graph API 呼び出しからの応答で見つかった場合に、権限が付与される予定のユーザー グループ。 |
| spring.cloud.azure.active-directory.user-name-attribute | どのクレームがプリンシパルの名前になるかを示します。 |
次の例は、これらのプロパティを使用する方法を示しています。
プロパティの例 1: Azure Global の代わりに Azure China 21Vianet を使用するには、次の手順を使用します。
application.yml ファイルに次のプロパティを追加します。
spring:
   cloud:
     azure:
       active-directory:
         enabled: true
         profile:
           environment:
             active-directory-endpoint: https://login.partner.microsoftonline.cn
この方法では、Azure パブリック クラウドではなく 、Azure ソブリン クラウドまたは国内クラウド を使用できます。
プロパティの例 2: グループ名を使用して Web アプリケーション内のメソッドを保護するには、次の手順に従います。
application.yml ファイルに次のプロパティを追加します。
spring:
 cloud:
   azure:
     active-directory:
       enabled: true
       user-group:
         allowed-groups: group1, group2
既定のセキュリティ構成を使用するか、独自の構成を指定します。
オプション 1: 既定の構成を使用します。 このオプションでは、何もする必要はありません。
DefaultAadWebSecurityConfiguration クラスは自動的に構成されます。
オプション 2: 自己定義の構成を指定します。 構成を提供するには、次の例に示すように、AadWebApplicationHttpSecurityConfigurer#aadWebApplicationのHttpSecurity メソッドを適用します。
@Configuration(proxyBeanMethods = false)
@EnableWebSecurity
@EnableMethodSecurity
public class AadOAuth2LoginSecurityConfig {

   /**
    * Add configuration logic as needed.
    */
   @Bean
   public SecurityFilterChain htmlFilterChain(HttpSecurity http) throws Exception {
       // @formatter:off
       http.apply(AadWebApplicationHttpSecurityConfigurer.aadWebApplication())
               .and()
           .authorizeHttpRequests()
               .anyRequest().authenticated();
       // @formatter:on
       // Do some custom configuration.
       return http.build();
   }
}
次の例に示すように、 @PreAuthorize 注釈を使用してメソッドを保護します。
@Controller
public class RoleController {
   @GetMapping("group1")
   @ResponseBody
   @PreAuthorize("hasRole('ROLE_group1')")
   public String group1() {
       return "group1 message";
   }

   @GetMapping("group2")
   @ResponseBody
   @PreAuthorize("hasRole('ROLE_group2')")
   public String group2() {
       return "group2 message";
   }

   @GetMapping("group1Id")
   @ResponseBody
   @PreAuthorize("hasRole('ROLE_<group1-id>')")
   public String group1Id() {
       return "group1Id message";
   }

   @GetMapping("group2Id")
   @ResponseBody
   @PreAuthorize("hasRole('ROLE_<group2-id>')")
   public String group2Id() {
       return "group2Id message";
   }
}
プロパティの例 3: リソース サーバーにアクセスするリソース サーバーでクライアント資格情報フローを有効にするには、次の手順を使用します。
application.yml ファイルに次のプロパティを追加します。
spring:
 cloud:
   azure:
     active-directory:
       enabled: true
       authorization-clients:
         webapiC:   # When authorization-grant-type is null, on behalf of flow is used by default
           authorization-grant-type: client_credentials
           scopes:
             - <Web-API-C-app-id-url>/.default
次の例のようなコードをアプリケーションに追加します。
@PreAuthorize("hasAuthority('SCOPE_Obo.WebApiA.ExampleScope')")
@GetMapping("webapiA/webapiC")
public String callClientCredential() {
   String body = webClient
       .get()
       .uri(CUSTOM_LOCAL_READ_ENDPOINT)
       .attributes(clientRegistrationId("webapiC"))
       .retrieve()
       .bodyToMono(String.class)
       .block();
   LOGGER.info("Response from Client Credential: {}", body);
   return "client Credential response " + (null != body ? "success." : "failed.");
}
高度な機能
Web アプリケーションで ID トークンによるアクセス制御をサポートする
スターターは、ID トークンのGrantedAuthority要求からのrolesの作成をサポートし、Web アプリケーションでの承認に ID トークンの使用を許可します。 Microsoft Entra ID の appRoles 機能を使用して、 roles 要求を作成し、アクセス制御を実装できます。
注
rolesから生成されたappRoles要求は、プレフィックス APPROLE_で修飾されます。
appRolesをroles要求として使用する場合は、グループ属性をrolesとして同時に構成しないでください。 それ以外の場合、グループ属性は、 appRolesではなくグループ情報を含む要求をオーバーライドします。 マニフェストでは、次の構成は避ける必要があります。
"optionalClaims": {
    "idtoken": [{
        "name": "groups",
        "additionalProperties": ["emit_as_roles"]
    }]
}
Web アプリケーションで ID トークンによるアクセス制御をサポートするには、次の手順を使用します。
アプリケーションにアプリ ロールを追加し、ユーザーまたはグループに割り当てます。 詳細については、「 方法: アプリケーションにアプリ ロールを追加し、トークンで受け取る」を参照してください。
アプリケーションのマニフェストに次の appRoles 構成を追加します。
 "appRoles": [
   {
     "allowedMemberTypes": [
       "User"
     ],
     "displayName": "Admin",
     "id": "2fa848d0-8054-4e11-8c73-7af5f1171001",
     "isEnabled": true,
     "description": "Full admin access",
     "value": "Admin"
    }
 ]
次の例のようなコードをアプリケーションに追加します。
@GetMapping("Admin")
@ResponseBody
@PreAuthorize("hasAuthority('APPROLE_Admin')")
public String Admin() {
   return "Admin message";
}
トラブルシューティング
クライアントのログ記録を有効にする
Azure SDK for Java には、アプリケーション エラーのトラブルシューティングと解決に役立つ一貫したログ記録のストーリーが用意されています。 生成されたログは、ターミナルに到達する前にアプリケーションのフローをキャプチャし、ルートの問題を特定するのに役立ちます。 ログ記録の有効化に関するガイダンスについては、ログ Wiki を参照してください。
Spring ログを有効にする
Spring では、がlogging.level.<logger-name>=<level>、<level>、TRACE、DEBUG、INFO、WARN、またはERRORのいずれかであるFATALを使用して、サポートされているすべてのログ システムで Spring 環境 (OFF など) でロガー レベルを設定できます。 ルート ロガーは、 logging.level.rootを使用して構成できます。
次の例は、 application.properties ファイル内の潜在的なログ設定を示しています。
logging.level.root=WARN
logging.level.org.springframework.web=DEBUG
logging.level.org.hibernate=ERROR
Spring でのログ記録の構成の詳細については、Spring ドキュメントの ログ記録 を参照してください。
次のステップ
Spring および Azure の詳細については、Azure ドキュメント センターで引き続き Spring に関するドキュメントをご確認ください。