This article describes how to use the Azure portal to configure listener-specific SSL policies on your Application Gateway. Listener-specific SSL policies allow you to configure specific listeners to use different SSL policies from each other. You'll still be able to set a default SSL policy that all listeners will use unless overwritten by the listener-specific SSL policy.
注
Only Standard_v2 and WAF_v2 SKUs support listener specific policies as listener specific policies are part of SSL profiles, and SSL profiles are only supported on v2 gateways.
Azure サブスクリプションをお持ちでない場合は、開始する前に 無料アカウント を作成してください。
新しい Application Gateway を作成する
First create a new Application Gateway as you would usually through the portal - there are no additional steps needed in the creation to configure listener-specific SSL policies. ポータルで Application Gateway を作成する方法の詳細については、 ポータルのクイックスタート チュートリアルを参照してください。
Set up a listener-specific SSL policy
Before you proceed, here are some important points related to listener-specific SSL policy.
We recommend using TLS 1.2 as this version will be mandated in the future.
You don't have to configure client authentication on an SSL profile to associate it to a listener. You can have only client authentication or listener-specific SSL policy configured, or both configured in your SSL profile.
Using a 2022 Predefined or Customv2 policy enhances SSL security and performance for the entire gateway (SSL Policy and SSL Profile). Therefore, you cannot have different listeners on both old as well as new SSL (predefined or custom) policies.
Consider this example, you're currently using SSL Policy and SSL Profile with "older" policies/ciphers. To use a "new" Predefined or Customv2 policy for any one of them will also require you to upgrade the other configuration. You may use the new predefined policies, or customv2 policy, or combination of these across the gateway.
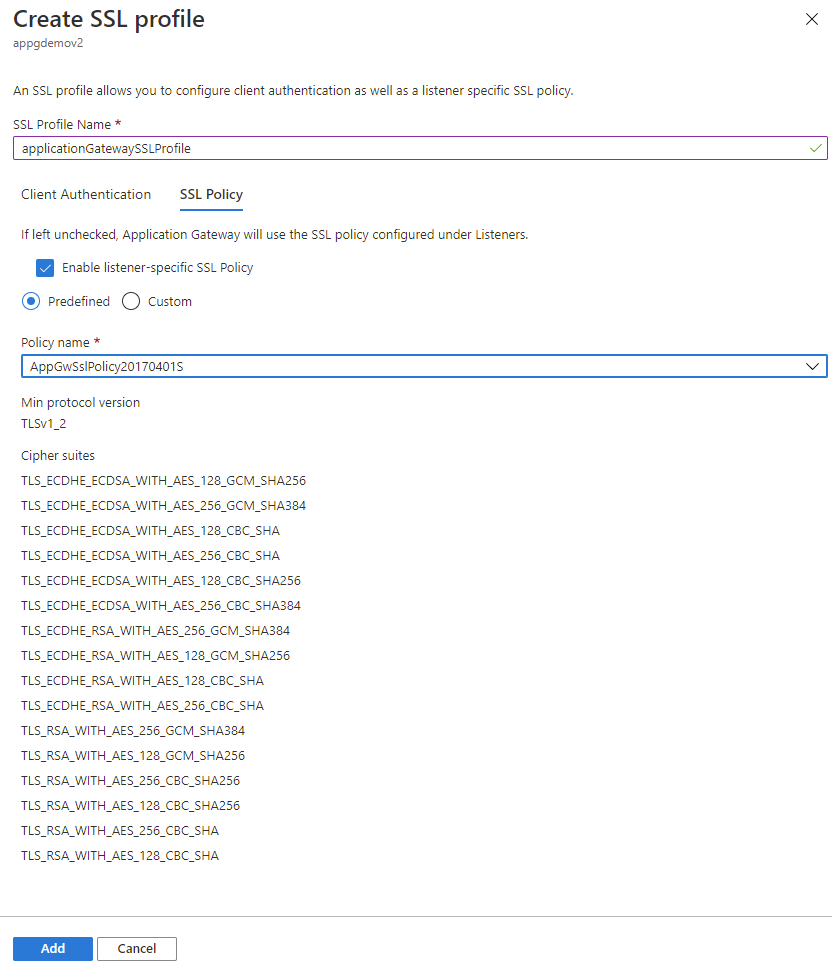
To set up a listener-specific SSL policy, you'll need to first go to the SSL settings tab in the Portal and create a new SSL profile. SSL プロファイルを作成すると、 クライアント認証 と SSL ポリシーの 2 つのタブが表示されます。 The SSL Policy tab is to configure a listener-specific SSL policy. The Client Authentication tab is where to upload a client certificate(s) for mutual authentication - for more information, check out Configuring a mutual authentication.
ポータルで Application Gateway を検索し、[ アプリケーション ゲートウェイ] を選択して、既存の Application Gateway をクリックします。
左側のメニューから [SSL 設定 ] を選択します。
上部にある SSL プロファイル の横にあるプラス記号をクリックして、新しい SSL プロファイルを作成します。
[SSL プロファイル名] に名前を入力します。 この例では、SSL プロファイル applicationGatewaySSLProfile を呼び出します。
Go to the SSL Policy tab and check the Enable listener-specific SSL Policy box.
Set up your listener-specific SSL policy given your requirements. You can choose between predefined SSL policies and customizing your own SSL policy. For more information on SSL policies, visit SSL policy overview. We recommend using TLS 1.2
[ 追加] を選択して保存します。
SSL プロファイルをリスナーに関連付ける
Now that we've created an SSL profile with a listener-specific SSL policy, we need to associate the SSL profile to the listener to put the listener-specific policy in action.
既存の Application Gateway に移動します。 上記の手順を完了した場合は、ここで何もする必要はありません。
左側のメニューから [リスナー ] を選択します。
HTTPS リスナーがまだ設定されていない場合は、[ リスナーの追加] をクリックします。 HTTPS リスナーが既にある場合は、一覧からそれをクリックします。
要件に合わせて 、リスナー名、 フロントエンド IP、 ポート、 プロトコル、その他 の HTTPS 設定 を入力します。
リスナーに関連付ける SSL プロファイルを選択できるように、[ SSL プロファイルを有効にする] チェック ボックスをオンにします。
Select the SSL profile you created from the dropdown list. この例では、前の手順で作成した SSL プロファイル applicationGatewaySSLProfile を選択します。
要件に合わせてリスナーの残りの部分を構成し続けます。
[ 追加] をクリックして、SSL プロファイルが関連付けられた新しいリスナーを保存します。

制限事項
There is a limitation right now on Application Gateway that different listeners using the same port cannot have SSL policies (predefined or custom) with different TLS protocol versions. Choosing the same TLS version for different listeners will work for configuring cipher suite preference for each listener. However, to use different TLS protocol versions for separate listeners, you will need to use distinct ports for each.