Exercise - Add a preview stage to your pipeline
You want to add another stage to your pipeline so you can check what changes will be made to your Azure environment.
During the process, you'll:
- Update the pipeline YAML file to add a new preview stage.
- Add an environment to Azure Pipelines.
- Configure the environment to require an approval.
- Update the pipeline YAML file to use the environment for the deployment stage.
- View the what-if results and approve a pipeline run.
Update the pipeline definition to add a preview stage
First, you'll add a new stage to your pipeline that runs the what-if operation.
In Visual Studio Code, open the azure-pipelines.yml file in the deploy folder.
Between the Validate and Deploy stages, add the following definition for the Preview stage:
jobs:
- job: PreviewAzureChanges
  displayName: Preview Azure changes
  steps:
    - task: AzureCLI@2
      name: RunWhatIf
      displayName: Run what-if
      inputs:
        azureSubscription: $(ServiceConnectionName)
        scriptType: 'bash'
        scriptLocation: 'inlineScript'
        inlineScript: |
          az deployment group what-if \
            --resource-group $(ResourceGroupName) \
            --template-file deploy/main.bicep \
            --parameters environmentType=$(EnvironmentType)
Save your changes to the file.
Add an environment
In Azure DevOps, go to Pipelines > Environments.

Select Create environment.

Enter Website as the environment name.
Leave the description blank. In the Resource section, select None.
Note
In Azure Pipelines, environments are used to enable deployment features. Some of these features apply only when you're deploying to Kubernetes or to virtual machines. In this module, you won't use these features and you can ignore them.
Select Create.

Add an approval check to the environment
Select the Approvals and checks tab in the top-left corner of the page.

Select Approvals.

In the Approvers box, enter your own name and select yourself.
Expand the Advanced section by selecting the down arrow.
Notice that, by default, approvers are allowed to approve the runs that they've triggered. Because you're the only person who will work with this pipeline, leave this checkbox selected.
Select Create.

Update the pipeline definition to require an environment and approval
Next, you'll configure the Deploy stage to run against the Website environment that you created previously. You'll convert the Deploy stage to run a deployment job instead of a standard job and configure it to deploy to the environment.
In the azure-pipelines.yml file in Visual Studio Code, replace the Deploy stage definition with the following code:
 jobs:
 - deployment: DeployWebsite
   displayName: Deploy website
   environment: Website
   strategy:
     runOnce:
       deploy:
         steps:
           - checkout: self

           - task: AzureResourceManagerTemplateDeployment@3
             name: DeployBicepFile
             displayName: Deploy Bicep file
             inputs:
               connectedServiceName: $(ServiceConnectionName)
               deploymentName: $(Build.BuildNumber)
               ___location: $(deploymentDefaultLocation)
               resourceGroupName: $(ResourceGroupName)
               csmFile: deploy/main.bicep
               overrideParameters: >
                 -environmentType $(EnvironmentType)
Notice that you defined a new
checkoutstep. Unlike normal jobs, deployment jobs need to be configured to check out (download) the files from your Git repository. If you don't include this step, the deployment job won't be able to read your Bicep file. You could instead consider using pipeline artifacts to send files between pipeline stages. The module summary includes a link to more information about artifacts.Save the file.
Verify and commit your pipeline definition
Verify that your azure-pipelines.yml file looks like the following code:
trigger:
  batch: true
  branches:
    include:
    - main

pool: Default

variables:
  - name: deploymentDefaultLocation
    value: westus3

stages:

- stage: Lint
  jobs:
  - job: LintCode
    displayName: Lint code
    steps:
      - script: |
          az bicep build --file deploy/main.bicep
        name: LintBicepCode
        displayName: Run Bicep linter

- stage: Validate
  jobs:
  - job: ValidateBicepCode
    displayName: Validate Bicep code
    steps:
      - task: AzureResourceManagerTemplateDeployment@3
        name: RunPreflightValidation
        displayName: Run preflight validation
        inputs:
          connectedServiceName: $(ServiceConnectionName)
          ___location: $(deploymentDefaultLocation)
          deploymentMode: Validation
          resourceGroupName: $(ResourceGroupName)
          csmFile: deploy/main.bicep
          overrideParameters: >
            -environmentType $(EnvironmentType)

- stage: Preview
  jobs:
  - job: PreviewAzureChanges
    displayName: Preview Azure changes
    steps:
      - task: AzureCLI@2
        name: RunWhatIf
        displayName: Run what-if
        inputs:
          azureSubscription: $(ServiceConnectionName)
          scriptType: 'bash'
          scriptLocation: 'inlineScript'
          inlineScript: |
            az deployment group what-if \
              --resource-group $(ResourceGroupName) \
              --template-file deploy/main.bicep \
              --parameters environmentType=$(EnvironmentType)

- stage: Deploy
  jobs:
  - deployment: DeployWebsite
    displayName: Deploy website
    environment: Website
    strategy:
      runOnce:
        deploy:
          steps:
            - checkout: self

            - task: AzureResourceManagerTemplateDeployment@3
              name: DeployBicepFile
              displayName: Deploy Bicep file
              inputs:
                connectedServiceName: $(ServiceConnectionName)
                deploymentName: $(Build.BuildNumber)
                ___location: $(deploymentDefaultLocation)
                resourceGroupName: $(ResourceGroupName)
                csmFile: deploy/main.bicep
                overrideParameters: >
                  -environmentType $(EnvironmentType)
If it doesn't look the same, update it to match this example, and then save it.
Commit and push your changes to your Git repository by running the following commands in the Visual Studio Code terminal:
git add .
git commit -m "Add preview stage"
git push
Run the pipeline and review the what-if outputs
In Azure DevOps, go to your pipeline.
Select the most recent run of your pipeline.
Wait until the pipeline completes the Lint, Validate, and Preview stages. Although Azure Pipelines automatically updates the page with the latest status, it's a good idea to refresh the page occasionally.
If you're prompted to grant permission to access a resource, select View and then select Permit.
Notice that Azure Pipelines prompts you for an approval. You also receive an email informing you that the pipeline needs your approval.

Before you approve the continuation of the pipeline, you'll review the what-if results to ensure that they match your expectations.
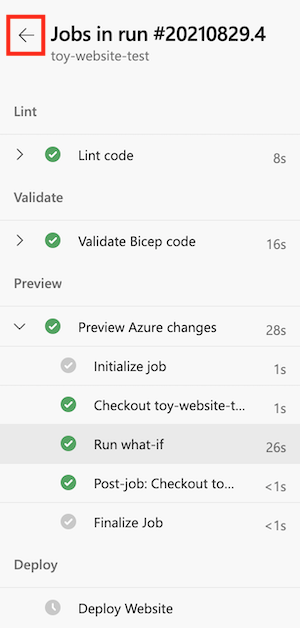
Select the Preview stage.
Select the Run what-if step to inspect the changes that the what-if command reports on.
Notice that the pipeline log provides what-if results that are similar to the following output:
Resource and property changes are indicated with these symbols:
  + Create
  ~ Modify
  = Nochange

The deployment will update the following scope:

Scope: /subscriptions/aaaa0a0a-bb1b-cc2c-dd3d-eeeeee4e4e4e/resourceGroups/ToyWebsiteTest

  ~ Microsoft.Web/sites/toy-website-nbfnedv766snk [2021-01-15]
    + properties.siteConfig.localMySqlEnabled:   false
    + properties.siteConfig.netFrameworkVersion: "v4.6"

  = Microsoft.Insights/components/toywebsite [2020-02-02]
  = Microsoft.Storage/storageAccounts/mystoragenbfnedv766snk [2021-04-01]
  = Microsoft.Web/serverfarms/toy-website [2021-01-15]

Resource changes: 1 to modify, 3 no change.
The what-if operation detected a change to the website resource. However, the changes that it detected are noise. They don't represent real changes to your resource. The Azure team is working to reduce noise. In the meantime, for these two specific properties, you can ignore the detected changes.
You might also see an item in the what-if output for the resource type
microsoft.alertsmanagement/smartDetectorAlertRules/Failure Anomalies - toywebsite. Application Insights creates this resource automatically. The what-if command detects that no change will be made to the resource.
Approve the pipeline run
Select the left arrow to return to the details for the pipeline run.
Select the Review button on the approval panel.
In the Comment box, enter Reviewed what-if results.
Select Approve.

Observe the successful deployment
After you approve the pipeline run, notice that the Deploy stage starts running.
Wait for the stage to finish.
Notice that the pipeline run finishes successfully.