Explore automated deployment
In this unit, you look at how to create all of the resources you created previously, but via automation using Bicep. Bicep is a declarative language that allows us to write infrastructure as code, which then gets converted to JSON in order to build your resources in Azure. You can build automation via Bicep, Terraform, or Azure Resource Manager templates.
To save time writing all of the Bicep code ourselves, you can make use of a landing zone accelerator for Dev Box, which includes all of the Bicep code required to create the required resources outlined in the manual approach unit.
Navigate to Cloud Shell (shell.azure.com) in the Azure portal and ensure you're connected to the right Azure tenant when prompted.
Note
If Cloud Shell is disabled due to policy, you can follow the same steps in your local IDE.
From the Azure Cloud Shell, in the top bar of the Azure portal, ensure you're using the Bash shell. You can find the choice to use the Bash shell in the top left drop-down in the Cloud Shell.
If needed, run ‘az login' to log into the correct Azure tenant. Then check you're in the correct subscription by running ‘az account show'. Set your subscription by running 'az account set -subscription <your_subscription_name>'
Create a new directory with your chosen name. For example, ‘mkdir devbox'
Change directory into the directory you created. ‘cd devbox'
Now you need to clone the GitHub repo that hosts the code you need to use. Run the following - ‘Git clone https://github.com/Azure/DevBoxAccelerator.git'
Now it's time to create the Dev center. The Dev center is the parent resource for all of the Dev Box resources to be hosted in. Change directory into the directory you created, and then into the src folder. For example, ‘cd /devbox/DevBoxAccelerator/src/dev-center'
Change the scripts executable settings by running ‘chmod +x deploy.sh'
Within this folder you see in the config folder, there's a sample JSON file that you can use to specify our configuration. Change the values in this file to suit your requirements. As a minimum, ensure the subscriptionId is valid.
When you're happy with the sample file, run the following command from the dev-center directory you already changed directory to - ‘./deploy.sh -c config/dev-center-contoso.sample.json' - This process should take 5-10 minutes.
Once complete, take note of the resource ID for the Dev center. You need this ID for the next section.
Now that you have a Dev center with your chosen settings, you can proceed to set up the rest of the required resources such as the Dev Box pools.
From your current directory which should be dev-center, change directory to the dev-project directory with the following command - ‘cd ../dev-project'
In this folder you see a config folder with another sample file, this time for the project specific configurations. Open this file and change the config to your specification. Ensure at a minimum you change the subscriptionId, and you input the DevCenterId you captured from the output of the last script. If you need the DevCenterId again, you can go to the Dev center Overview tab in the Azure portal, and clicking on ‘JSON View' in the top right hand corner.
Change the scripts executable settings by running ‘chmod +x deploy.sh'
When you're happy with the sample file, run the following command from the dev-project directory you've already changed directory to - ‘./deploy.sh -c config/dev-project-contoso.sample.json' - This process should take 5-10 minutes.
You now have all the required resources set up to allow you to create a Dev Box.
Create a Dev Box machine
Congratulations! You made it to the end of this module. Now is the exciting part - creating your first Dev Box!
Developers are empowered to create their own Dev Box machines whenever with the guardrails that you set during this module. This reduces the bottleneck of central platform teams and having to wait for a new machine to be provisioned before they can continue their work.
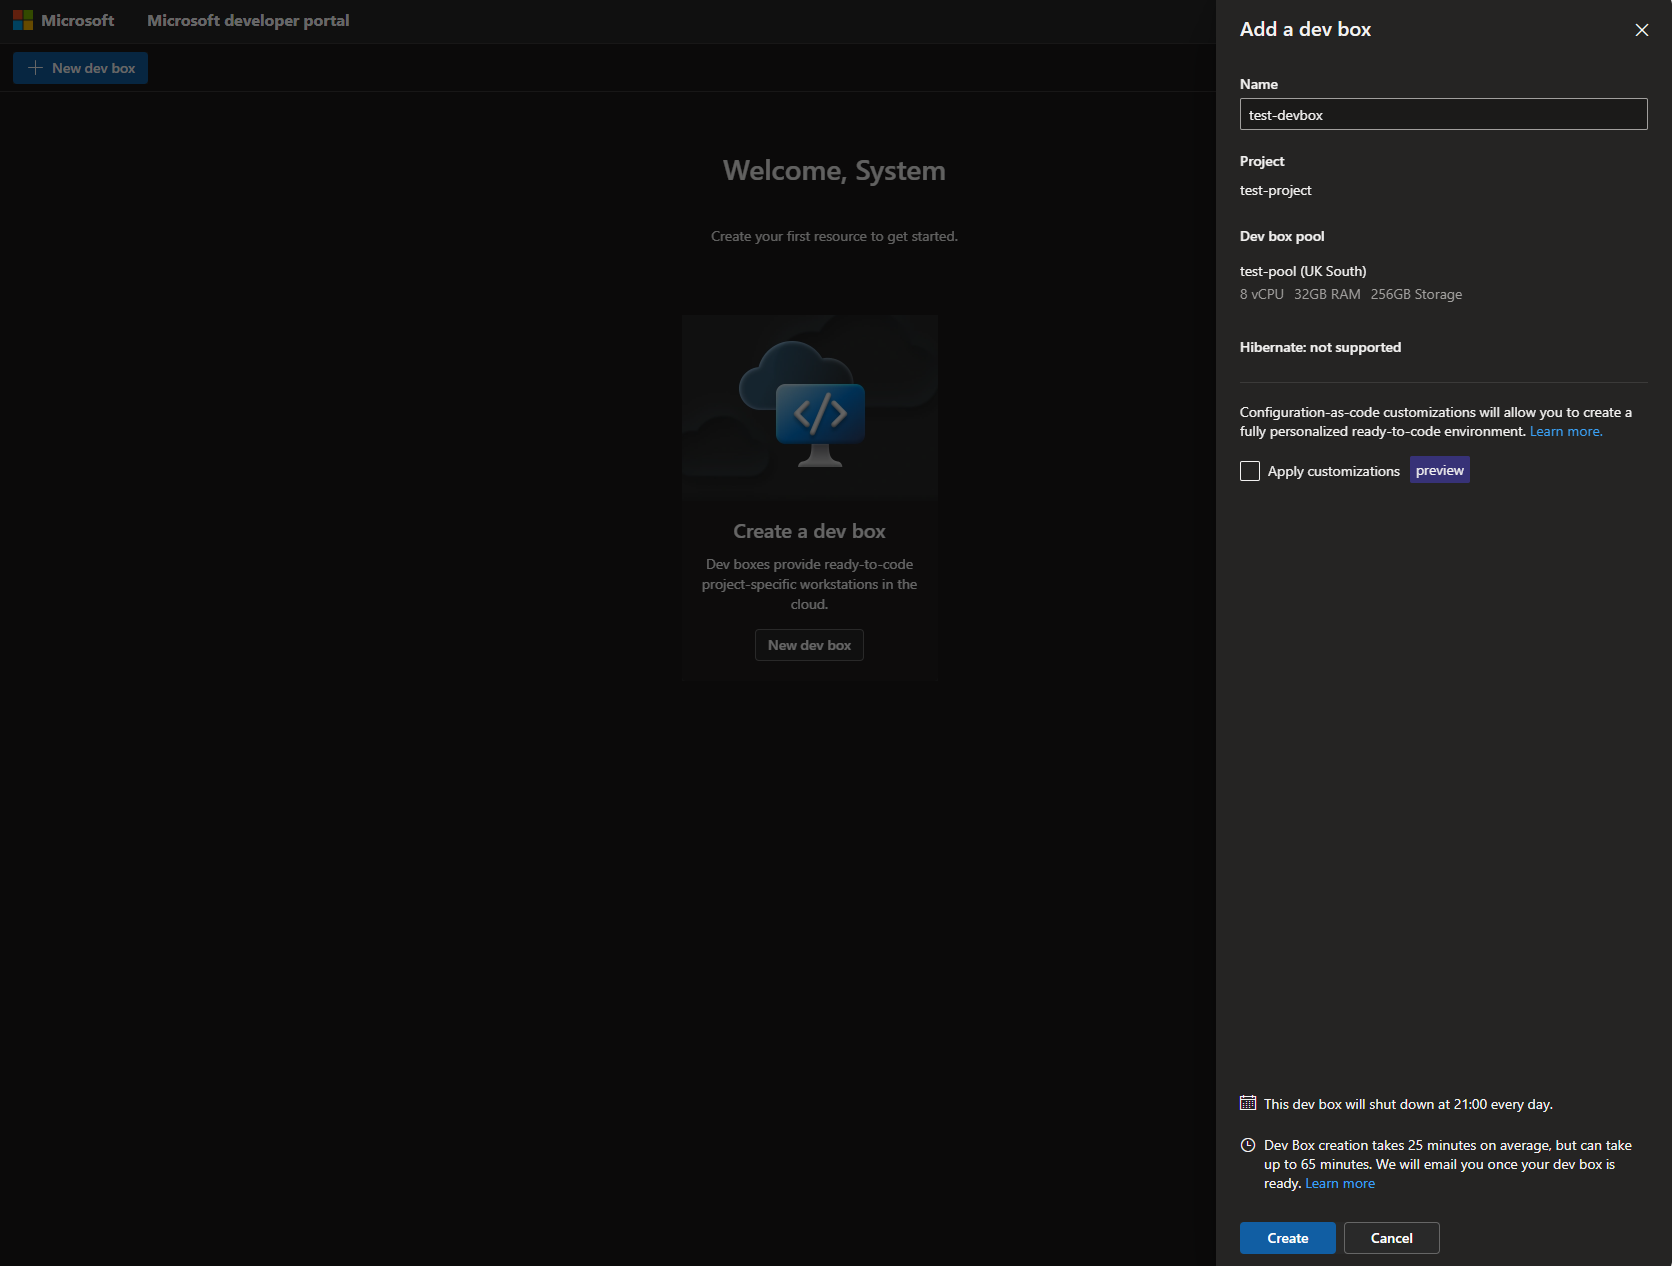
To create your own Dev Box, you need to navigate to the Microsoft Developer Portal and ensure you're signed in with the correct account.
- Navigate to Devportal.microsoft.com and sign in with the correct account.
- Click new Dev Box
- Give your Dev Box a name, and you should see that the other options including project and Dev Box pool have already been filled out for you. This is because you only have one project created, or you only have access to one project. If you receive a drop-down box, it means you have access to multiple.
- Click Create and wait for your Dev Box to finish creating. Dev Box machines can take an average of 25-30 minutes to create initially. If you're using any kind of customizations, they can take longer depending on the amount of installs that is taking place as you create the Dev Box.
- Once your Dev Box machine is created, you're able to see it and connect to it from the homepage of the dev portal. The dev portal is the central place for creating and deleting Dev Box machines.