Learn about manual deployment
In this unit, you begin to explore how to set up the required resources to allow you to deploy Dev Box machines for your developers to use. For reference, you create the following resources:
- Dev center
- Projects
- Dev Box definitions
- Network connections
- Catalogs
You can use the Dev Box resource creation experience, by utilizing a Microsoft-hosted network, to create all the necessary Azure resources to create your first Dev Box machine. All the necessary resources such as Dev center, project, image definition, and the pool are created for you in one swoop using the get started quick experience.
The following steps and instructions guide you to manually create each of the Azure resources for a custom network configuration.
Creating a Dev center
The first resource you need to create as part of the overall deployment is a Dev center resource. Dev center is where all of the other resources for Dev Box live. Dev centers are also used for other resources such as Managed DevOps pools and Azure Deployment Environments, however for the purposes of this module you focus on Dev Box.
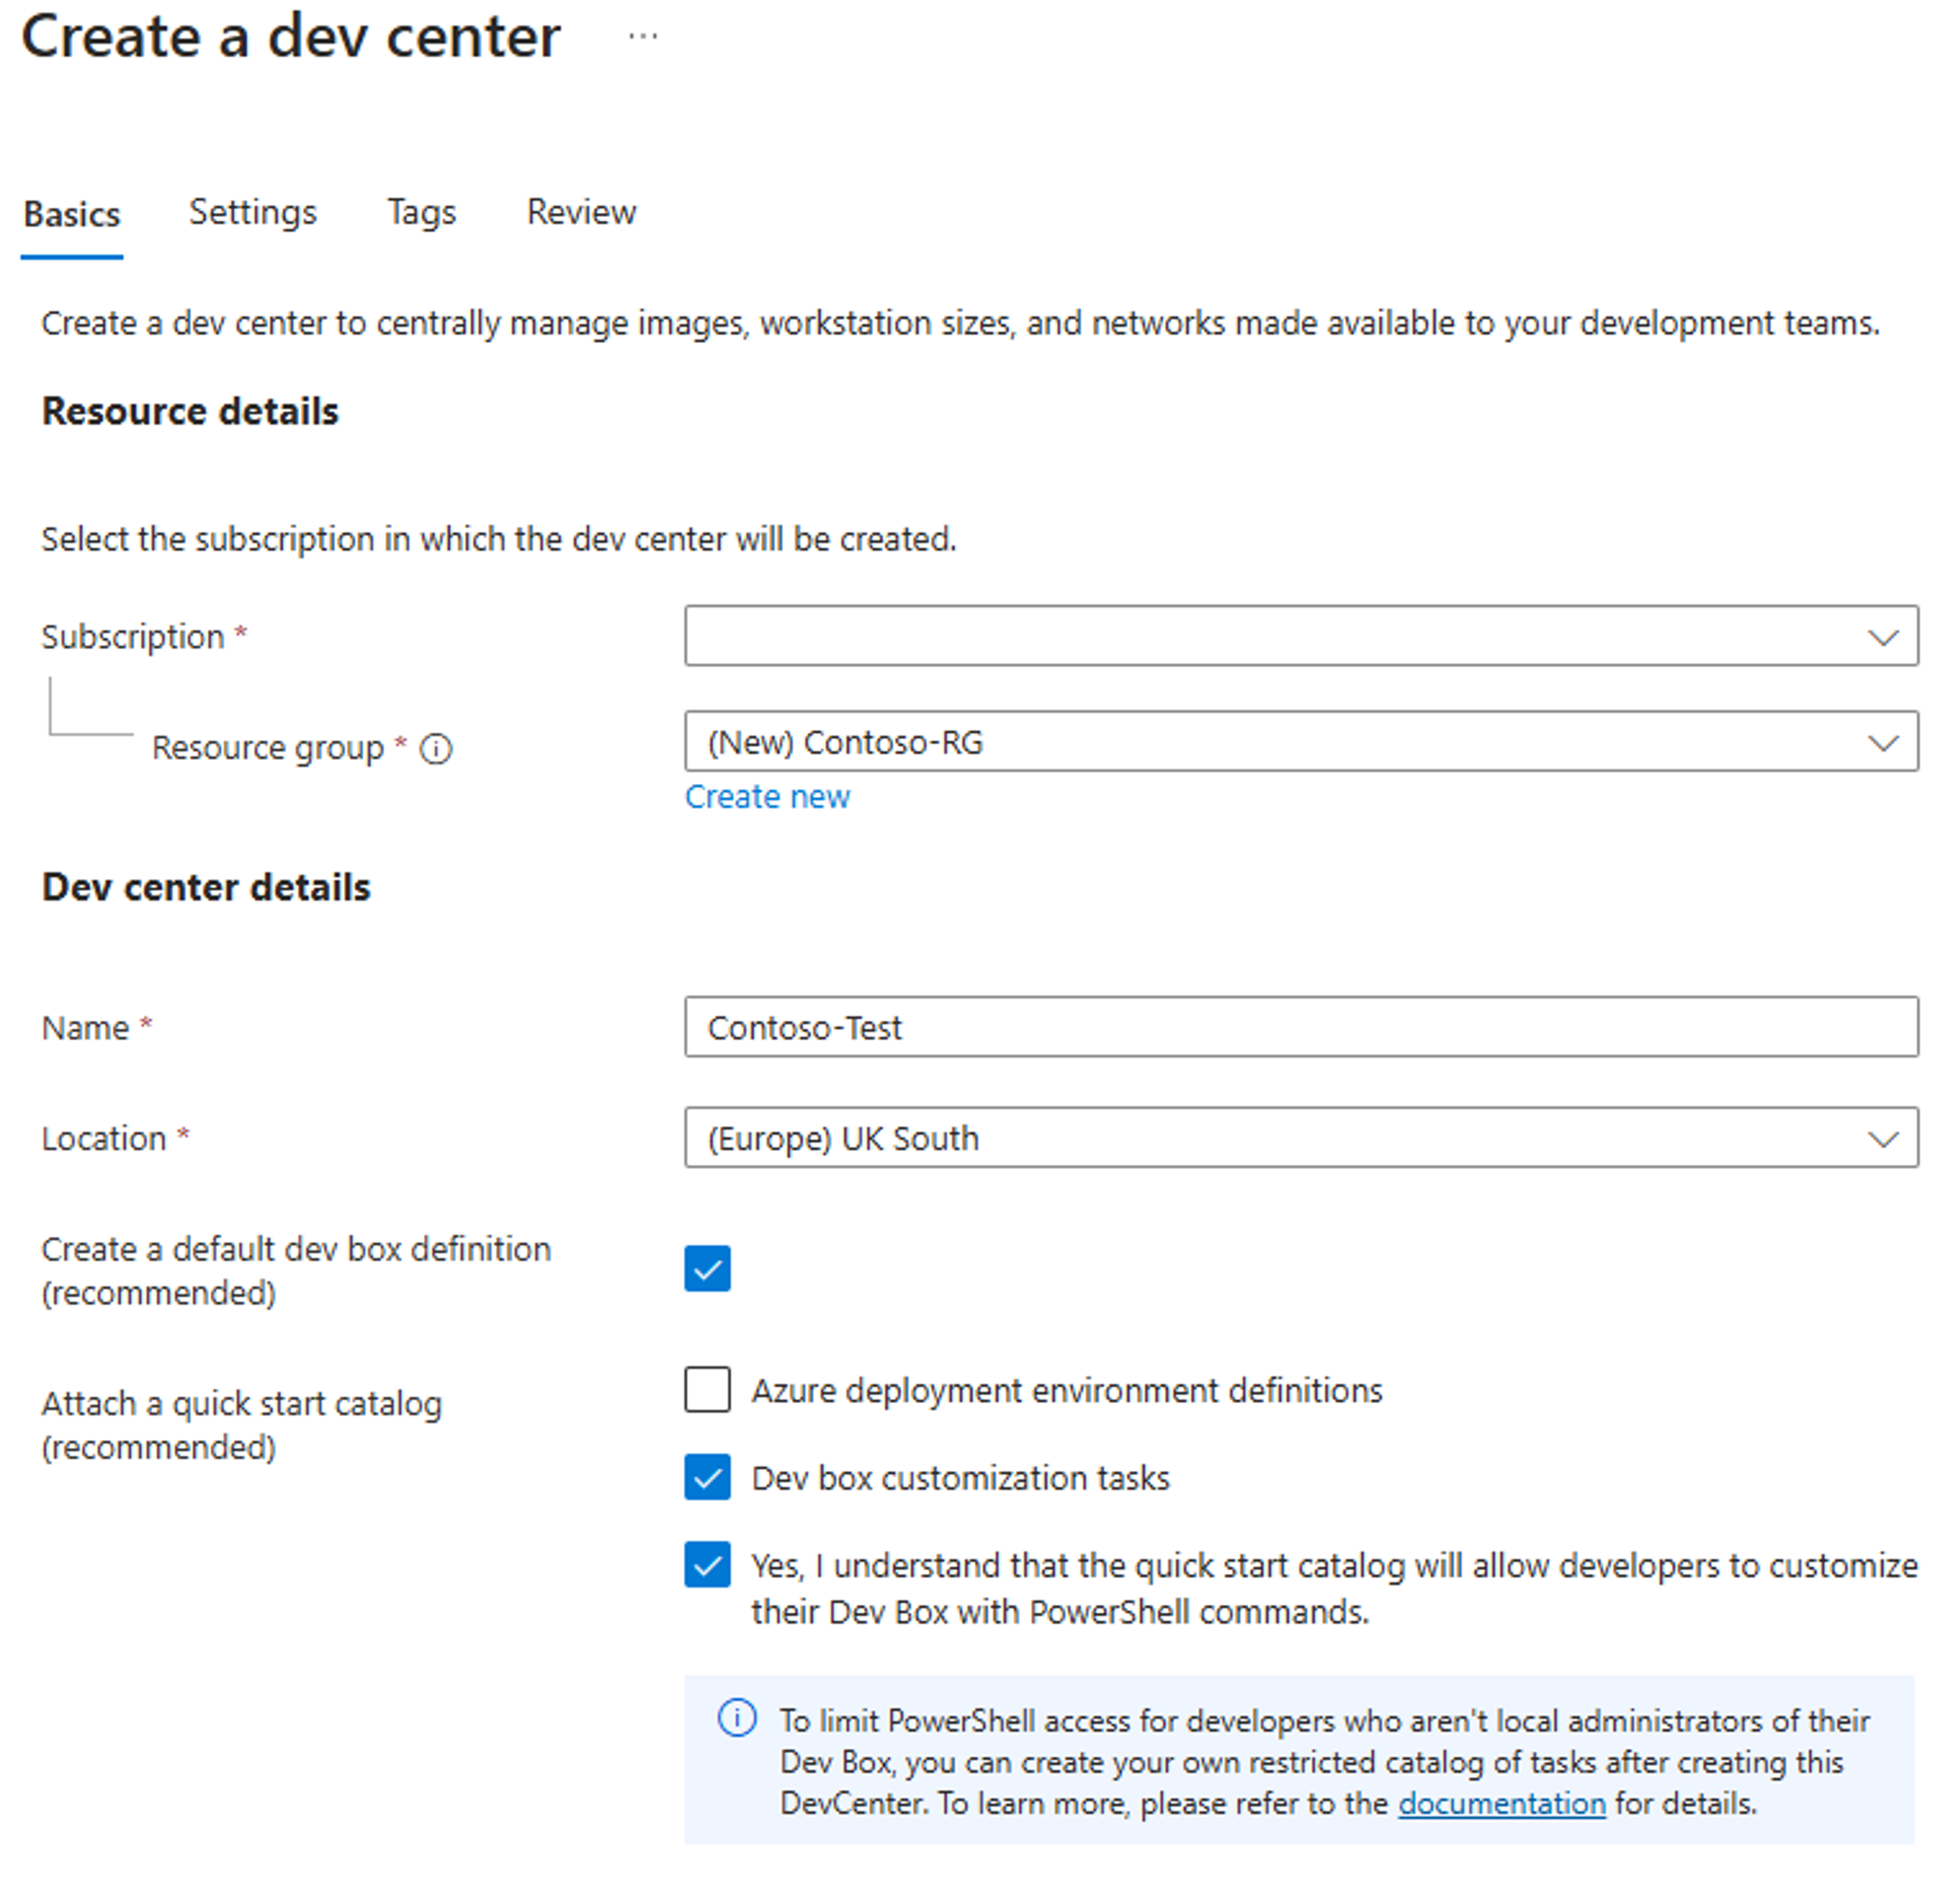
The following steps show you how to create a Dev center resource from the Azure portal.
- Navigate to the Azure portal (portal.azure.com) and in the top search bar, search for Dev center.
- Click Create and enter the following details:
- Subscription: Choose your chosen subscription.
- Resource Group: Choose the resource group or create a new one for deploying the Dev center.
- Name: The name of your Dev center. This doesn't need to be globally unique.
- Location: Choose the region your Dev center will be deployed into. Your Dev Box machines can be created in other regions at a later stage.
- Create a default Dev Box definition: Enabled
- Attach a quick start catalog: Dev Box Customizations Tasks
- Enable catalogs per project: Enabled
- Allow Microsoft hosted network in projects: Enabled
- Enable Azure Monitor agent installation: Enabled
You can then proceed to review and create and wait for your Dev center to create.

Configuring your first Dev Box project
The next step is to create a project within the Dev center that you just created. As a reminder, the idea of projects is to allow separation for teams that are working on different development projects within your organization. For example, you may want to create a project for a team that will be working on the front-end for a new website your business is creating, then a separate project for the back-end team. This way you can separate resources such as software and toolsets and ultimately the Dev Box machines that live within the project.
To begin, navigate to the Dev center that you just created and then go to the Projects tab that resides in the menu on the left-hand side:
- Click Create Project and fill in the required information as shown below:
- Subscription: Choose your chosen subscription.
- Resource Group: Choose the resource group. For simplicity, you deploy everything into one resource group.
- Dev center: Choose the Dev center that you created in the last unit
- Name: Choose a name for your project. This could be the name of the project internally within your organization. For example, E-ShopProject
- Description: Description metadata explaining what the project is being created for.
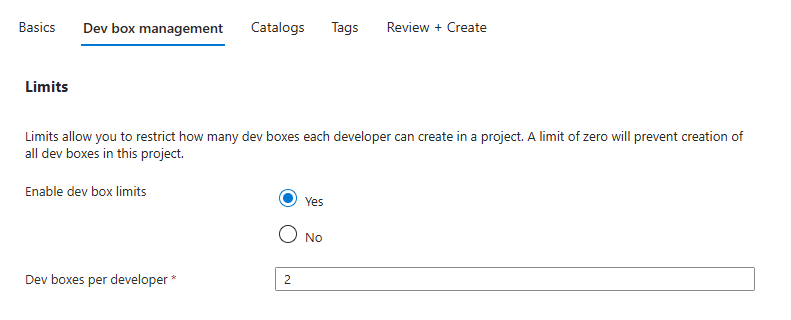
- Enable Dev Box limits: Choose whether you would like to enforce limits on the number of Dev Box machines each developer can create. This setting allows you to control costs, at the same time ensuring developers only create the number of Dev Box machines required for this project.
- Dev Box machines per developer: 2
- Catalogs: In this step you can choose to include both the Deployment environment definitions and/or the Image definitions. For the purposes of this demonstration, you include both.
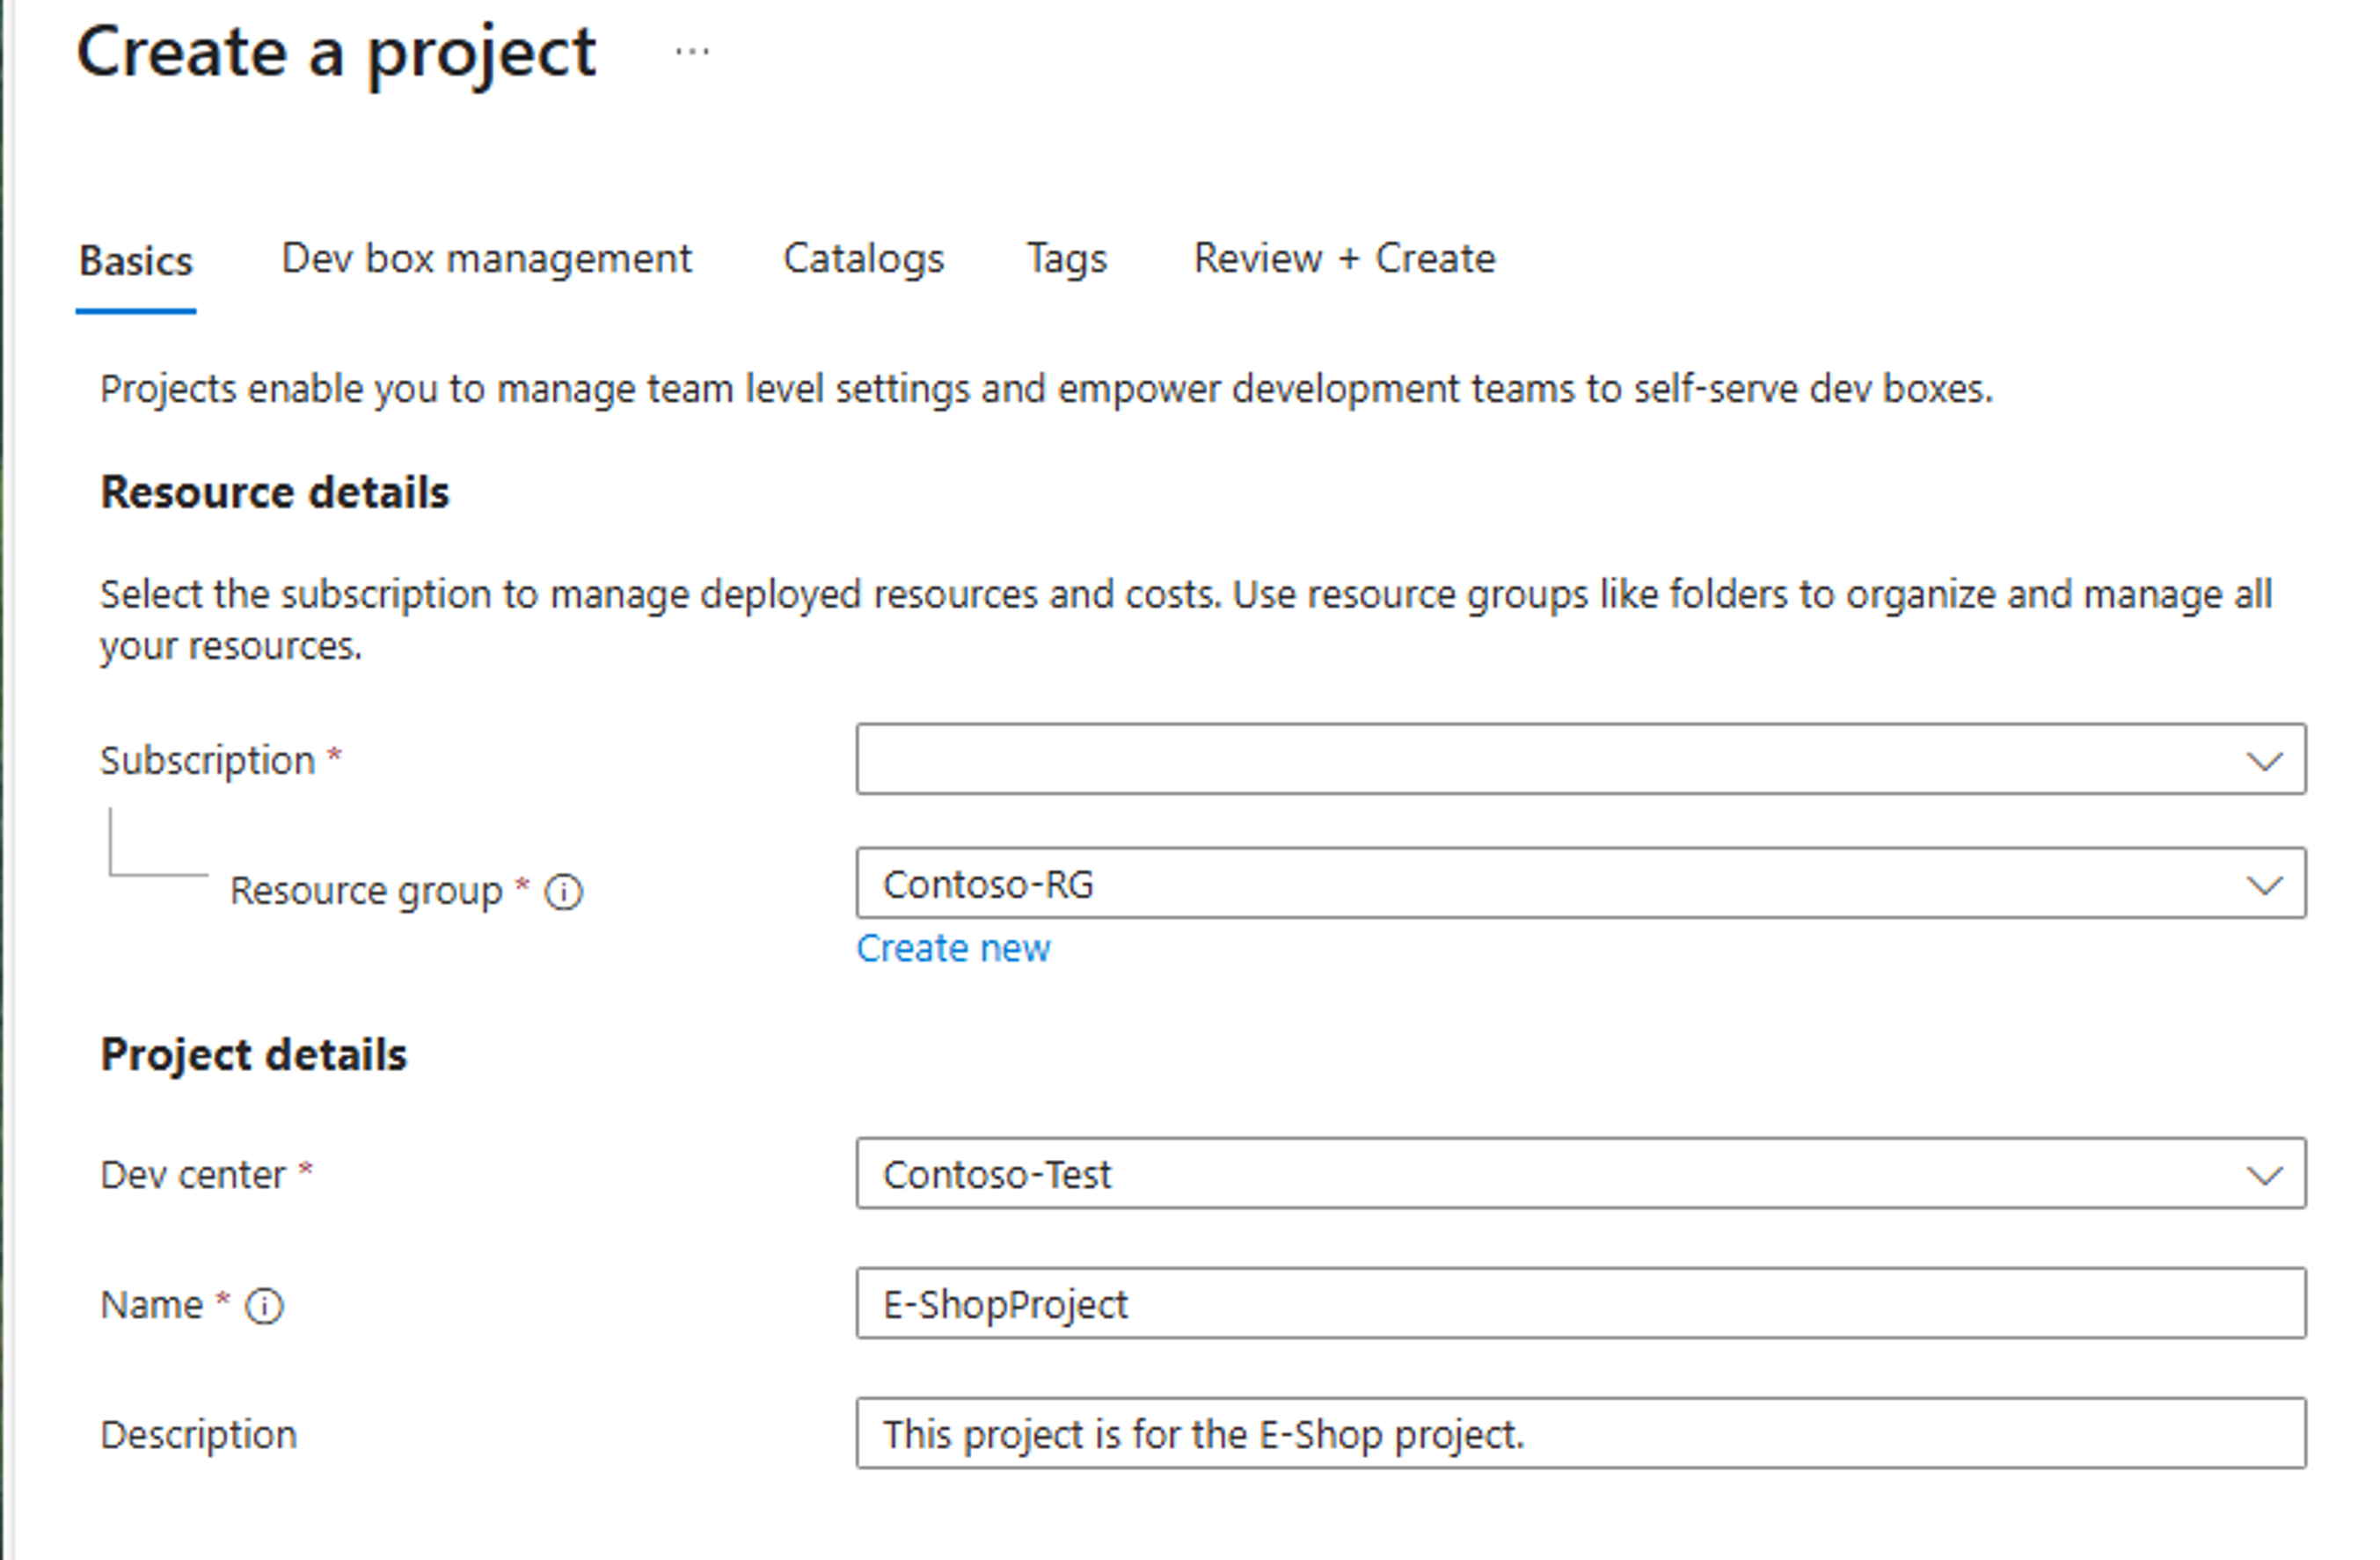

Proceed to Review & Create and create the resource.
Configure your first Dev Box definition
Now that a Dev Box project is created, which relates to a development project in your organization, you can proceed to create a Dev Box definition.
As a reminder, a definition allows us to specify an image that your Dev Box machines choose when they're created later in the developer portal. The definition also allows you to specify a specific version of that image. There are many Marketplace images that can be used for Dev Box. Using Team Customizations feature you can make changes to a Marketplace image and install software packages on top of the image to make it customizable for developers using Dev Box.
However, if you already have a custom image you like to use for Dev Box, you can import the image into the Azure compute gallery and then connect the image to the Dev center. Image definitions is where you import that image to be used in your Dev Box machines.
Definitions are where you can specify the CPU, RAM, and storage you want to assign to each Dev Box that is created.
In this section you create a definition to allow your Dev Box machines to consume it when it is created. From the previous section when you created the Dev center you chose to include a default definition, however it's helpful to create an additional definition to experience the different configurations that you may want to set when creating a Dev Box machine.
You can have multiple definitions within a project. Multiple projects are helpful if you have different developers working on a project that may need different hardware machine configurations, or different images for their role.
To begin with, navigate to the Dev center which you created earlier in this course and select Dev Box Definitions
You'll see that you already have a default definition that you created when you chose the option at the Dev center creation stage. You now proceed to create a definition that aligns with your required configuration.
Select Create on the Dev Box Definitions tab and fill in the following configuration:
- Name: a name for your definition
- Image: Choose the image that you'd like to use as your base image for Dev Box machines when they're created.
- Image Version: Choose whether you want a specific version of this image from the list, or choose latest.
- Compute: Choose the CPU and RAM configuration you would like your Dev Box machines to have when they're created.
- Storage: Choose the amount of storage you would like your Dev Box machines to have when they're created.
- Hibernation: Choose whether you would like to enable hibernation support for your Dev Box machines. Hibernation is a great feature that saves power when you disconnect or close your session to the Dev Box. When your machine is in hibernation mode, you only pay for any storage you're using on the Dev Box and not for the compute.
Hibernation is like closing your laptop's lid at the end of your workday. When you open the laptop again all of your windows and configuration remain the same from when you finished working the previous day.
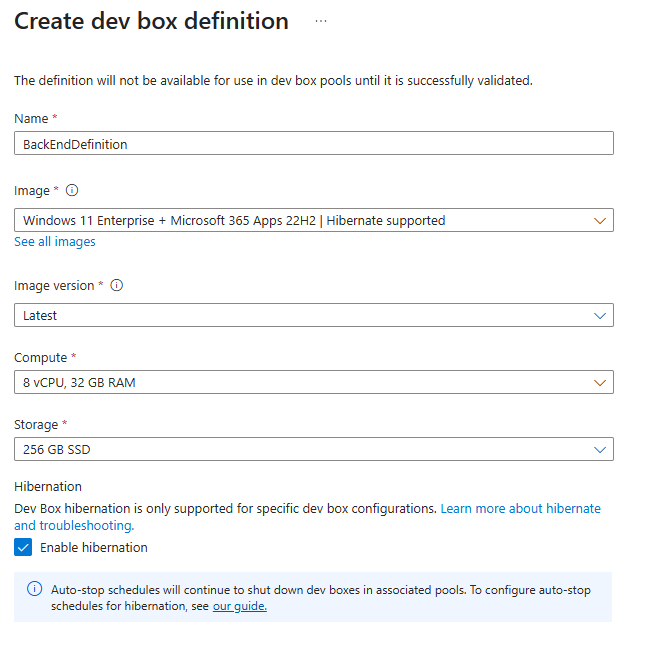
Select Create and wait for the definition to create.
Configure your first Dev Box pool
You're making great progress and are getting close to creating your first Dev Box. So far, you created a Dev center resource, which to recap, acts as a parent resource for all our more specific configuration. You also created a project and a Dev Box definition.
Now it's time to create somewhere for our Dev Box machines to live. For this purpose, you need to create a Dev Box pool.
In the last unit, you created a Dev Box definition which specified the image and compute/storage that you need for our Dev Box machines to consume. You can now create a Dev Box pool, and attach the definition to the pool, to ensure Dev Box machines adopt this definition when they're created.
Just like definitions, you can also have multiple Dev Box pools. The pools allow developers to create Dev Box machines for multiple organizational projects. For example, a developer may need a Dev Box for a front-end website they're working on, which includes software and tools specific to that organizational project along with hardware specifics for the developer machine. On the other hand, a development team working on the backend project will require different software and tools for their machine along with the hardware for their machine.
To create a Dev Box pool, navigate to your Dev Box project that you created earlier in this course, and in the left-hand menu select Dev box pools
- Select Create Dev Box pool and fill in the following configuration:
- Name: Choose a name for your Dev Box pool. This pool will be visible to developers when they choose which pool they want to request a Dev Box from. For example, BackendPool.
- Definition: Choose the definition that you created in the last unit, of which you want to link to this Dev Box pool. This means developers get the base image and the compute/storage that you chose in the last unit, when they request a machine in this pool.
- Network Connection: Choose whether you would like to create Dev Box machines with a Microsoft-hosted network, or a network connection in your organization. For the purposes of this unit, you create a Microsoft-hosted network, which is managed by Microsoft. However, you may choose to use your own network connection if you wanted Dev Box machines to connect to resources in Azure or to your on-premises network. For example, connecting to an Azure Kubernetes Service (AKS) cluster in Azure.
You can also choose which region you'd like the Dev Box to be created in. It's advisable to create the Dev Box in a region closest to where your developers will connect from, thus reducing any latency.
- Enable Single Sign-on: Choose whether you'd like single sign-on for your Dev Box machines.
- Dev Box Creator Privileges: Choose whether developers will receive local admin privileges or Standard User privileges upon creation of their Dev Box. It's advised to disable this, as you can use a feature called ‘Team Customizations' to install packages or extensions in a safe and controlled way later in this course.
- Enable auto-stop on schedule: Choose whether you would like to enable auto-stop or not. You can enable this or choose a schedule of when your Dev Box machines power off at certain times. These settings help you control compute costs.
- Enable hibernate on disconnect: Choose whether you would like your Dev Box machines to hibernate. You can also choose how long you want to wait after disconnection, for the machine to hibernate. This option again will help you reduce compute costs.
- Licensing: Confirm you have the required licenses for the image chosen in the definition created, for example Windows 11.

Click Create and wait for your Dev Box pool to create.
Configure a custom network connection
Up to this point you have used a Microsoft-hosted network for your Dev Box machines to be joined to upon creation. This option is fine if our Dev Box machines don't need access to your other Azure resources or internal on-premises network. However, if you require Dev Box machines to connect to your Azure resources such as an AKS cluster, or an internal app service, you create your own network connection and then configure it to connect to your on-premises network.
Note
For this part of the lab, you need a virtual network that has already been created. You need to ensure that the relevant internet access is permitted to allow connectivity to required Microsoft endpoints. Although using a custom network connection like the one you create here allows you to connect to your Azure resources or on-premises network, you will actually not go through the steps of connecting to an on-premises network.
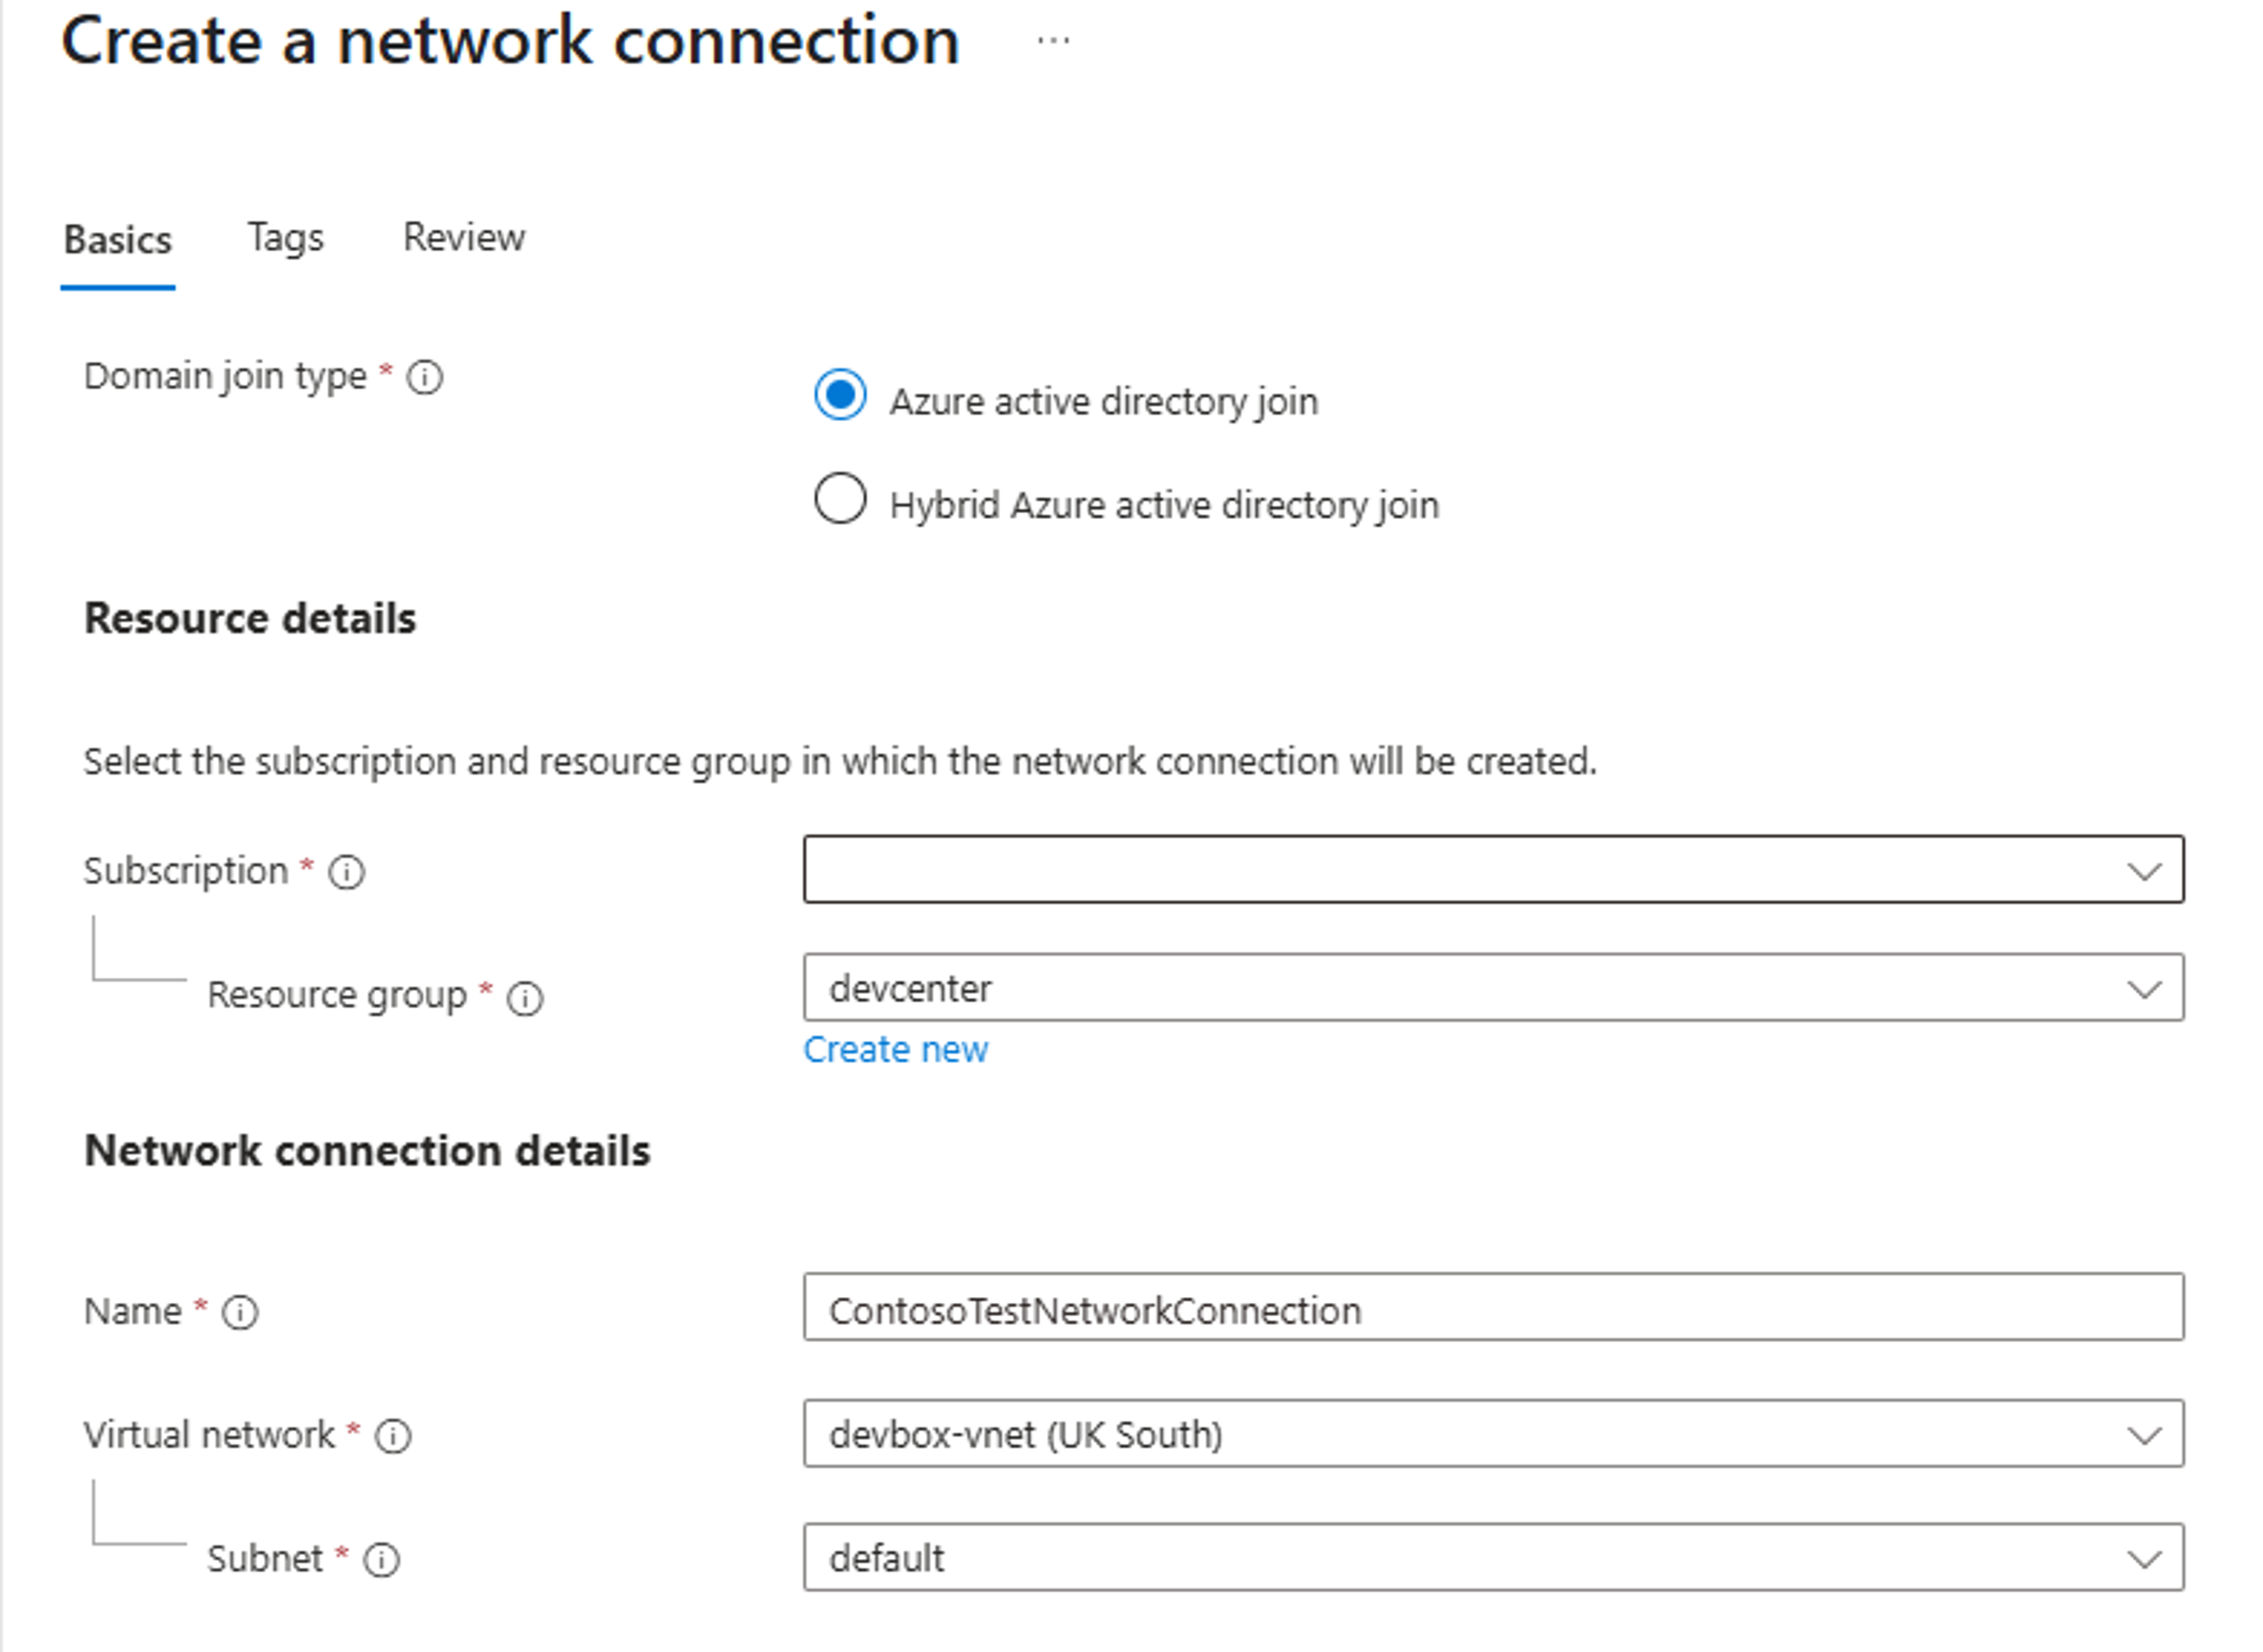
To create your own network connection, navigate to the search bar at the top of the Azure portal and search for Network Connections.
- Click Create and fill in the following configuration:
- Domain Join Type: Azure Active Directory Join
- Subscription: Choose your chosen subscription.
- Resource Group: Choose the resource group. For simplicity, you deploy everything into one resource group.
- Name: The name of your new network connection.
- Virtual Network: The name of your pre-created virtual network that this connection will join.
- Subnet: The name of your pre-created subnet within the virtual network you have chosen.
Click Create and wait for your network connection to create.
Once your network connection has successfully created, you'll need to add it to your Dev center.
- Navigate to your Dev center that you created earlier in this module and in the left-hand menu click Networking.
- Select Add network connection and choose your network connection that you just created. Click Add.
As soon as the status of the network connection within the Dev center shows as Passed, you can continue to the next part.
Now it's time to add your network connection to your Dev Box pool. This allows newly created Dev Box machines to join the new network connection you've configured and therefore have access to the resources to which your network is connected to including another Azure virtual network on your on-premises network.
- Navigate to the Dev Box pool you created earlier in this module and scroll to the right-hand side to click the ellipsis (three dots). Select Edit.
- Under the Network Connection part, choose Deploy to a network connection in my organization and choose the network connection you have just created.
- If you can't see the network connection, look back at the previous steps to ensure you've added it to the Dev center correctly.
Any new Dev Box machines that are created in this Dev Box pool will attach to the new network connection you have just added. Any previously created Dev Box machines won't be affected.