Exercise - Integrate an API plugin with an API secured with a key
API plugins for Microsoft 365 Copilot allow you to integrate with APIs secured with a key. You keep the API key secure by registering it in the Teams vault. At runtime, Microsoft 365 Copilot executes your plugin, retrieves the API key from the vault, and uses it to call the API. By following this process, the API key stays secure and is never exposed to the client.
Create a new project
Start by creating a new API plugin for Microsoft 365 Copilot. Open Visual Studio Code.
In Visual Studio Code:
- In the Activity Bar (side bar), activate the Microsoft 365 Agents Toolkit extension.
- In the Microsoft 365 Agents Toolkit extension panel, choose Create a New App.
- From the list of project templates, choose Copilot Agent.
- From the list of app features, choose Declarative Agent.
- Choose the Add plugin option.
- Choose the Start with a new API option.
- From the list of authentication types, choose API Key (Bearer Token Auth).
- As the programming language, choose TypeScript.
- Choose a folder to store your project.
- Name your project da-repairs-key.
Microsoft 365 Agents Toolkit creates a new project that includes a declarative agent, an API plugin, and an API secured with a key.
Examine the API key authentication configuration
Before you continue, examine the API key authentication configuration in the generated project.
Examine the API definition
First, have a look at how API key authentication is defined in the API definition.
In Visual Studio Code:
Open the appPackage/apiSpecificationFile/repair.yml file. This file contains the OpenAPI definition for the API.
In the components.securitySchemes section, notice the apiKey property:
components:
  securitySchemes:
    apiKey:
      type: http
      scheme: bearer
The property defines a security scheme that uses the API key as a bearer token in the authorization request header.
Locate the paths./repairs.get.security property. Notice that it references the apiKey security scheme.
[...]
paths:
  /repairs:
    get:
      operationId: listRepairs
      [...]
      security:
        - apiKey: []
[...]
Examine the API implementation
Next, see how the API validates the API key on each request.
In Visual Studio Code:
Open the src/functions/repairs.ts file.
In the repairs handler function, locate the following line which rejects all unauthorized requests:
if (!isApiKeyValid(req)) {
  // Return 401 Unauthorized response.
  return {
    status: 401,
  };
}
The isApiKeyValid function is implemented further in the repairs.ts file:
function isApiKeyValid(req: HttpRequest): boolean {
  const apiKey = req.headers.get("Authorization")?.replace("Bearer ", "").trim();
  return apiKey === process.env.API_KEY;
}
The function checks if the authorization header contains a bearer token and compares it against the API key defined in the API_KEY environment variable.
This code shows a simplistic implementation of API key security, but it illustrates how API key security works in practice.
Examine the vault task configuration
In this project, you use Microsoft 365 Agents Toolkit to add the API key to the vault. Microsoft 365 Agents Toolkit registers the API key in the vault using a special task in the project's configuration.
In Visual Studio Code:
Open the ./teampsapp.local.yml file.
In the provision section, locate the apiKey/register task.
# Register API KEY
- uses: apiKey/register
  with:
    # Name of the API Key
    name: apiKey
    # Value of the API Key
    primaryClientSecret: ${{SECRET_API_KEY}}
    # Teams app ID
    appId: ${{TEAMS_APP_ID}}
    # Path to OpenAPI description document
    apiSpecPath: ./appPackage/apiSpecificationFile/repair.yml
  # Write the registration information of API Key into environment file for
  # the specified environment variable(s).
  writeToEnvironmentFile:
    registrationId: APIKEY_REGISTRATION_ID
The task takes the value of the SECRET_API_KEY project variable, stored in the env/.env.local.user file and registers it in the vault. Then, it takes the vault entry ID and writes it to the environment file env/.env.local. The outcome of this task is an environment variable named APIKEY_REGISTRATION_ID. Microsoft 365 Agents Toolkit writes the value of this variable to the appPackages/ai-plugin.json file that contains the plugin definition. At runtime, the declarative agent that loads the API plugin, uses this ID to retrieve the API key from the vault, and call the API securely.
Configure API key for local development
Before you can test the project, you need to define an API key for your API. Then, store the API key in the vault and record the vault entry ID in your API plugin. For local development, store the API key in your project and use Microsoft 365 Agents Toolkit to register it in the vault for you.
In Visual Studio Code:
Open the Terminal pane.
In a command line:
- Restore project's dependencies, by running
npm install. - Generate a new API key by running:
npm run keygen. - Copy the generated key to clipboard.
- Restore project's dependencies, by running
Open the env/.env.local.user file.
Update the SECRET_API_KEY property to the newly generated API key. The updated property looks as follows:
SECRET_API_KEY=your_keySave your changes.
Each time you build the project, Microsoft 365 Agents Toolkit automatically updates the API key in the vault and updates your project with vault entry ID.
Test the declarative agent with the API plugin in Microsoft 365 Copilot
The final step is to test the declarative agent with the API plugin in Microsoft 365 Copilot.
In Visual Studio Code:
In the Activity Bar, activate the Microsoft 365 Agents Toolkit extension.
In the Microsoft 365 Agents Toolkit extension panel, in the Accounts section, be sure you're signed in to your Microsoft 365 tenant with Copilot enabled.

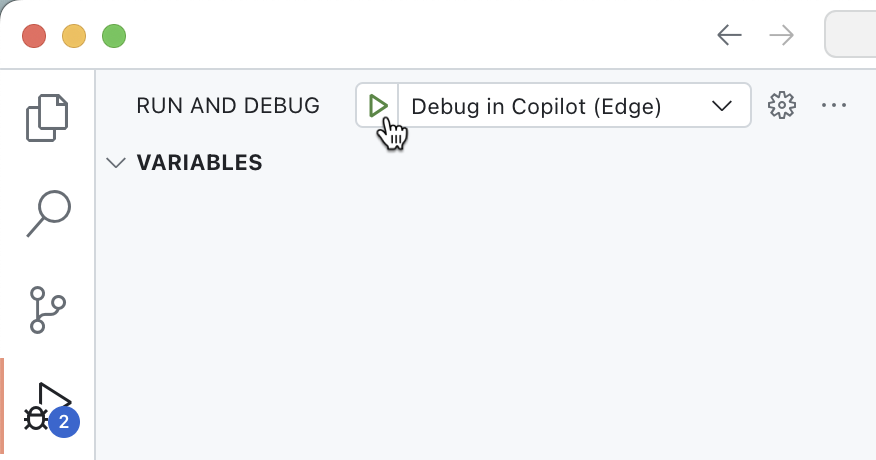
In the Activity Bar, switch to the Run and Debug view.
From the list of configurations, choose Debug in Copilot (Edge) and press the play button to start debugging.
Visual Studio Code opens a new web browser with Microsoft 365 Copilot. If prompted, sign in with your Microsoft 365 account.


In the web browser:
From the side panel, select the da-repairs-keylocal agent.

In the prompt text box, type
What repairs are assigned to Karin?and submit the prompt.Confirm that you want to send data to the API plugin using the Always allow button.

Wait for the agent to respond.


Stop the debugging session in Visual Studio Code when you're done testing.