Note
Access to this page requires authorization. You can try signing in or changing directories.
Access to this page requires authorization. You can try changing directories.
When you create a copilot for a website, it uses the content from the hosting site to generate responses. Microsoft Dataverse indexes site content and configured tables. Copilot Studio summarizes the indexed content and tables to generate responses.
Authenticated site users get tailored, summarized answers aligned with their web roles. Improve the content model for authenticated site users by refining the data with these steps:
In Power Pages, go to the Set up workspace.
Under Copilot, select Add copilot.
Under Refine your data, select Make changes.
Select Choose tables lookup control to choose or clear tables.
- You can select multiple tables in this section. Ensure that every table you choose is used on the site.
- On subsequent pages, specify the page where the table is used to generate the citation URL.
Select Next.
Under Choose tables, select the table that contains the columns and the page link that you want to select. A table appears only if it has at least one multiline column.
You can select only one table at a time.
Under Add page link, select the page where the table is used.
Note
- Ensure that you select the correct page. Otherwise, the bot provides an incorrect citation URL for the answers.
- The page must use
idas the query string parameter. If you use any other parameter name, the citation URL doesn't work correctly.
Under Choose columns, select the columns used on the page. Only columns with multiline text are available for selection.
Select Next, and review your selection.
Select Save to submit the changes.
Customize the copilot appearance
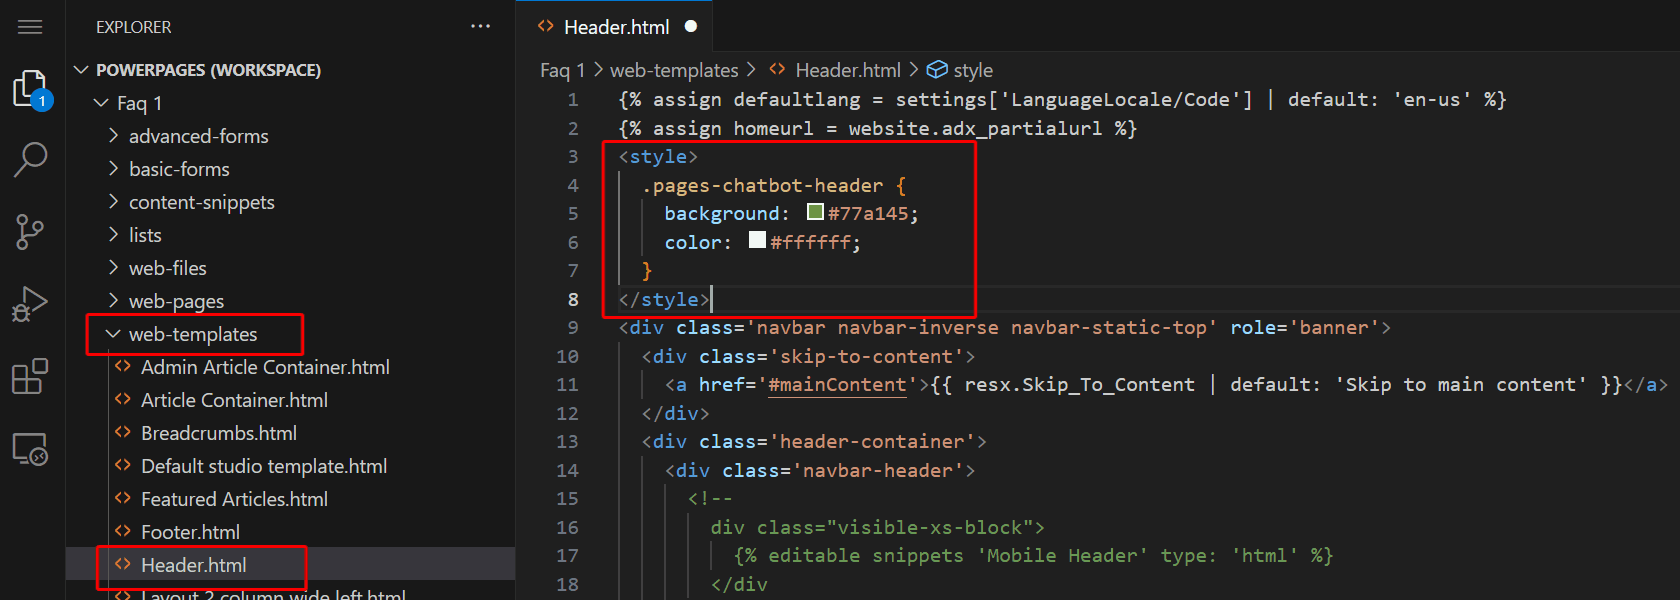
You can customize the copilot's style by overriding the default Cascading Style Sheet (CSS) classes. To do this, add a style element to the header template and override the values by following these steps:
Open the site's code editor.
In the Explorer navigation, expand the web-templates folder.
Open Header.html.
Add your
styleorscriptelement.
Override the appropriate styles.
Copilot widget
Copilot collapsed icon:
.pva-embedded-web-chat-widget {
    background-color: #484644;
    border: 1px solid #FFFFFF;
}
Tooltip:
.pva-embedded-web-chat-widget .pva-embedded-web-chat-widget-tooltip-text {
    background: white;
    color: #323130;
}
Icon image:
<script>
document.addEventListener('DOMContentLoaded', function() {
   var buttons = document.getElementsByClassName("pva-embedded-web-chat-widget");
    buttons[0].innerHTML = '<img src="<image URL>" height= "70px" width = "70px" />';
}, false);
</script>
Note
Replace <image URL> with the actual image source URL. Use an external path or upload an image to the Web File table and use its URL.
Copilot elements
The CSS samples in this section provide examples that show how to customize each of the numbered chatbot elements in the following screenshot.
1. Header
.pages-chatbot-header
{
    background: #77a145;
    color: #ffffff;
}
2. Height and width settings
.pva-embedded-web-chat[data-minimized='false'] {
    height: 80%;
    width: 25%;
    max-width: 400px;
    max-height: 740px;
}
3. Copilot window
.pva-embedded-web-chat-window {
    background: white;
}
4. Bubble from the copilot
Background color:
.webchat__bubble:not(.webchat__bubble--from-user) .webchat__bubble__content {
    background-color: #77a145 !important;
    border-radius: 5px !important;
}
Text color:
.webchat__bubble:not(.webchat__bubble--from-user) p {
    color: #ffffff;
}
5. Bubble from the user
Background color:
.webchat__bubble.webchat__bubble--from-user .webchat__bubble__content {
    background-color: #797d81 !important;
    border-radius: 5px !important;
}
Text color:
.webchat__bubble.webchat__bubble--from-user p {
    color: #ffffff;
}
6. Reference links
.webchat__link-definitions__badge {
    color: blue !important;
}

.webchat__link-definitions__list-item-text {
    color: blue !important;
}

.webchat__render-markdown__pure-identifier {
    color: blue !important;
}
7. Privacy message settings
Background color:
.pva-privacy-message {
    background: #797d81;
}
Text color:
.pva-privacy-message p {
    color: #ffffff;
    font-size: 12px;
    font-weight: 400;
}