Note
Access to this page requires authorization. You can try signing in or changing directories.
Access to this page requires authorization. You can try changing directories.
Use the Demos repo to learn how to use Microsoft Edge to develop webpages and web apps. There are various ways to view, download, and modify these demo webpages, including:
- DevTools in Microsoft Edge.
- Visual Studio Code, with optional DevTools.
- Visual Studio, with optional DevTools.
To view the source code for a rendered demo webpage in DevTools in Microsoft Edge:
In a Readme page, click the Demo link. The live page opens in Microsoft Edge.
Right-click the demo webpage, and then select Inspect to open DevTools.
List of DevTools samples
The following demos demonstrate DevTools features.
A few of these samples are shown below.
To Do demo
This simple To Do list webpage is used to demonstrate various DevTools features. It has an .html file, a .js file, and .css files:

Rendered page: TODO app
Source code: demo-to-do
Demo webpage with accessibility issues
This Animal Shelter demo webpage is useful for exploring various DevTools features, including accessibility testing features.
Open the Demo webpage with accessibility issues in a new window or tab.
Right-click anywhere in the rendered webpage and then select Inspect. DevTools opens next to the demo webpage.

Articles
These articles walk you through using this demo webpage:
Use the Inspect tool to detect accessibility issues by hovering over the webpage - One of several short articles that are derived from sections of the above article.
Accessibility-testing features - A list of accessibility testing features of DevTools, with links to several articles that use the "Demo webpage with accessibility issues".
Source code repo
This is the source code repo and its directory which stores the files for this demo webpage:
MicrosoftEdge/Demos > devtools-a11y-testing - Contains files including:
index.html- The demo webpage, including page sections and input forms that send data to thebuttons.jsJavaScript file. To view the rendered webpage, use the demo webpage link above.buttons.js- Contains the JavaScript code that's used by the demo webpage.styles.css,light-theme.css, anddark-theme.css- CSS files that control the presentation of the demo webpage.Image files that are used in the demo webpage.
Demo webpage: Debugging JavaScript with DevTools
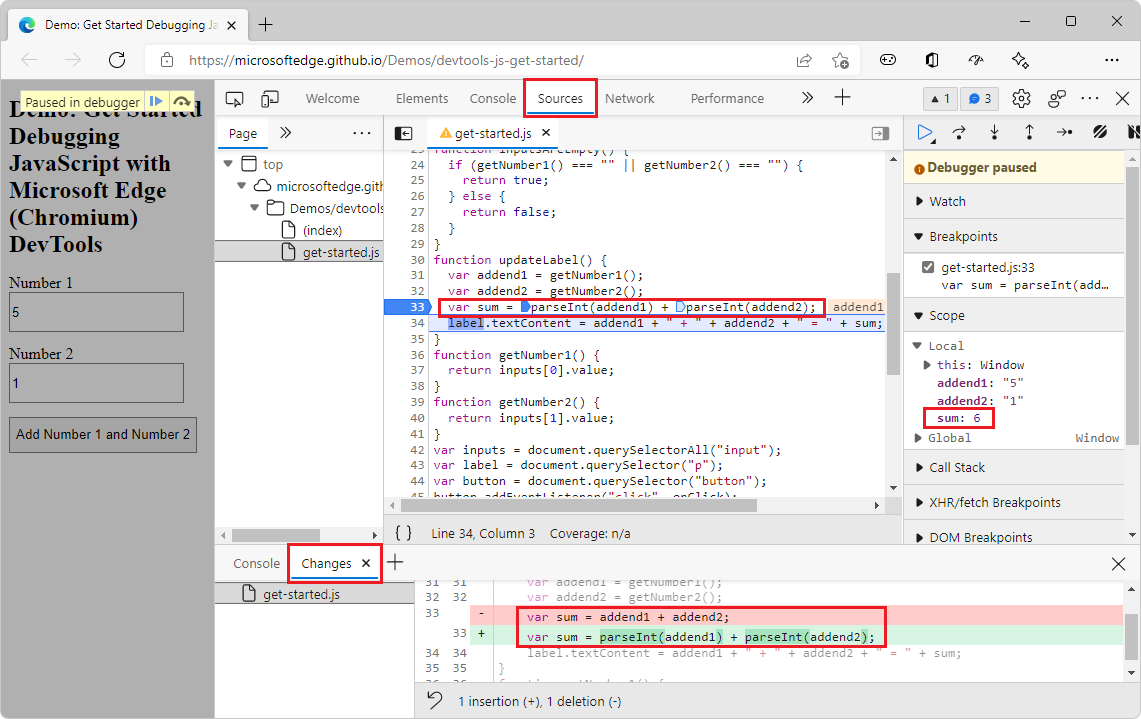
This demo webpage is useful for exploring the Sources tool, especially the JavaScript debugger.
Open the demo webpage Get started Debugging JavaScript with DevTools in a new window or tab.
Right-click anywhere in the rendered webpage and then select Inspect. DevTools opens next to the demo webpage.
Articles
These articles or article sections walk you through using this demo webpage:
The basic approach to using a debugger in Sources tool overview. This article section briefly walks you through the steps to use the JavaScript debugger in the Sources tool, to find the bug in the demo webpage. To fix the bug, you convert the input strings to numbers before adding them.
Get started debugging JavaScript - A more in-depth walkthrough of using the demo webpage along with the debugger, demonstrating various features of the debugger, and setting different kinds of breakpoints.
Source code repo
This is the source code repo and its directory which stores the files for this demo webpage:
MicrosoftEdge/Demos > devtools-js-get-started - Contains the files:
README.md- Contains links to the rendered demo webpage and the in-depth tutorial article about using the demo webpage.index.html- The webpage with an input form that sends data to the JavaScript file, and that displays the result of the JavaScript.get-started.js- The JavaScript file that's used by the form in the demo webpage.
Clone the Edge Demos repo to your drive
The Microsoft Edge / Demos repo is useful for following the various DevTools documentation. You can clone the repo, start a localhost web server within a folder of the cloned repo, and then edit the demo files directly within DevTools, or within an editor such as VS Code.
Cloning the repo is recommended over downloading the repo, so that you can pull updates of the repo and fully participate in the repo.
To clone the MicrosoftEdge / Demos repo to your local drive:
In a command prompt, enter
gitto check whether git is installed.If not done already, Download git and install it.
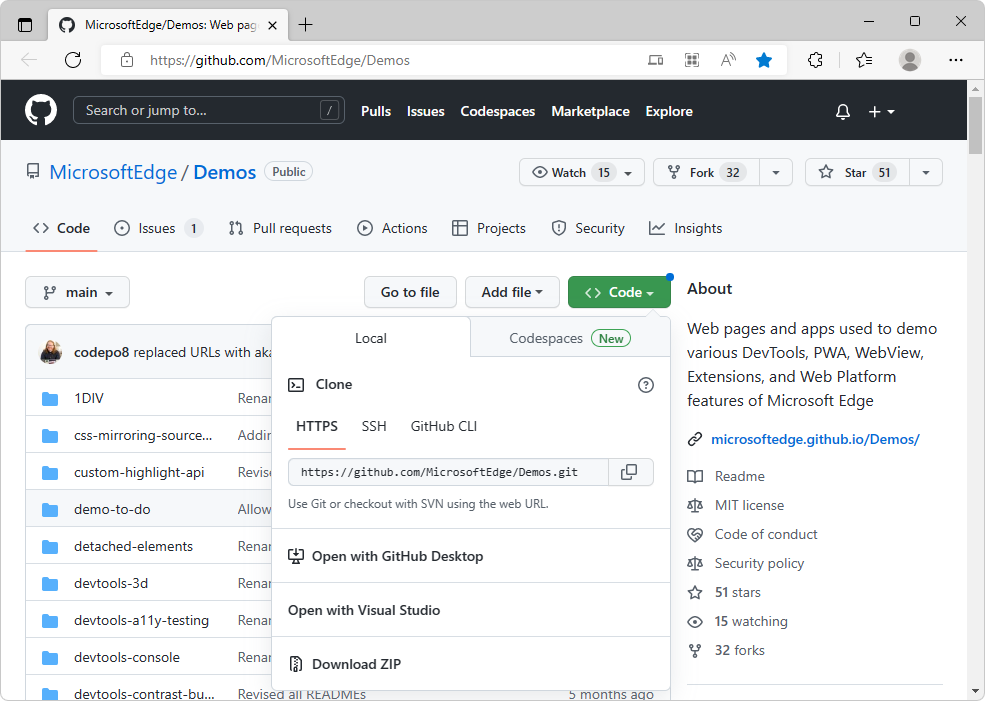
Go to MicrosoftEdge / Demos in a new window or tab.
Click the Code drop-down button, and then click the Copy url to clipboard button.
The URL is copied to the clipboard:
https://github.com/MicrosoftEdge/Demos.gitOr, if you have GitHub Desktop installed, click Open with GitHub Desktop to clone the repo, and skip the command prompt step below.
Open a command prompt, such as git bash.
Clone the repo to your local drive, entering the URL string that you copied from the GitHub repo. If you use a command prompt:
# example ___location where the repo directory will be added:
cd ~/GitHub
cd c:/users/localAccount/GitHub/  # alt format
git clone https://github.com/MicrosoftEdge/Demos.git
For details about cloning a repo, see:
- Cloning a repository - GitHub docs.
Continue with the next section.
Clone the Edge Demos repo to your drive by using VS Code
To clone the MicrosoftEdge / Demos repo to your local drive:
Go to MicrosoftEdge / Demos in a new window or tab.
Click the Code dropdown button, and then click Open with Visual Studio if it appears. A list of Handler Selector items is offered, one per Visual Studio instance installed. This option appears only if you're logged in.
In Visual Studio Code, in the Activity Bar, click the Source Control (
 ) button, and then click the Clone Repository button.
In the Provide repository URL text box, paste the copied URL: https://github.com/MicrosoftEdge/Demos.git and then press Enter. A folder selection dialog opens.

Navigate to your desired path, such as
C:\Users\localAccount\Documents\GitHuborUsers/username/GitHub, and then click the Select Repository Location button.The message Cloning git repository appears, then you're prompted to open the cloned repository. Click the Open button:

If prompted Do you trust..., click the Yes button. Or, click the No button and continue with most parts of this walkthrough.
The Explorer tree lists many demos, including demo-to-do.
See also:
- Cloning a repository - GitHub docs.
- Clone the WebView2Samples repo in Set up your Dev environment for WebView2.
Tools that support cloning a repo and git commit/pull/push operations
Cloning a repo enables updating your local copy when the repo is updated. Many tools support cloning and syncing with a GitHub repo, such as:
git commands at a command prompt such as the "git bash" shell. This is the main way that's documented here.
GitHub Desktop. Integrates well with GitHub repos and pull requests, and with VS Code.
Visual Studio Code. In the Activity Bar on the left, click Source Control.
Visual Studio > Git Changes tab next to the Solution Explorer tab in the lower right.
The "dot key" version of VS Code within the Edge browser. At Github.com, when viewing a branch or a pull request (PR), press the period (.) key. In the Activity Bar on the left, click:
- Source Control
- GitHub Pull Requests
- GitHub Pull Request
Download the Demos repo
Cloning the repo is recommended over downloading the repo, so that you can pull updates of the repo and fully participate in the repo.
If you want to just download the Demos repo instead of cloning it:
In a new window or tab, go to the MicrosoftEdge / Demos repo.
Click the Code dropdown button, and then click Download ZIP.
The
.zipfile is placed in your download directory. Unzip these webpage source files into a suitable ___location.
To download a single directory of the Demos repo:
Go to https://download-directory.github.io/ and then paste the URL https://github.com/MicrosoftEdge/Demos/tree/main/demo-to-do.
The
.zipfile is placed in your download directory. Unzip these webpage source files into a suitable ___location.
See also:
- Download the WebView2Samples repo in Set up your Dev environment for WebView2.
Open a demo folder from the Workspace tab in the Sources tool
To use this section, first do Clone the Edge Demos repo to your drive, above.
See also:
- Workspace tutorial (Sources tool Workspace tab)
- Approaches compared in Microsoft Edge DevTools extension for Visual Studio Code. Summarizes and compares several options for editing webpage files.
After cloning (or downloading) the Edge Demos repo:
In Microsoft Edge, open a new tab.
Right-click the webpage, and then select Inspect. Or, press Ctrl+Shift+I (Windows, Linux) or Command+Option+I (macOS). DevTools opens.
In DevTools, on the main toolbar, select the Sources tab. If that tab isn't visible, click the More tabs (
 ) button.
In the Sources tab, on the left, select the Workspace tab, which is grouped with the Page tab. If the Workspace tab isn't displayed, click the More tabs (
) button.Click + Add folder to workspace. A folder selection dialog opens.
Select a specific folder, such as demo-to-do, or select the Demos root folder:

Above DevTools, your're prompted "DevTools requests full access to (directory)". Click the Allow button:

Start the localhost server
If you start the localhost server from a specific demo folder, such as \Demos\demo-to-do, and then go to localhost:8080 (or simply open the local file such as C:\Users\localAccount\GitHub\Demos\demo-to-do\index.html in Microsoft Edge), the specific demo immediately is displayed in the browser. You can then add just the specific demo directory, such as C:\Users\localAccount\GitHub\Demos\demo-to-do\, to the Workspace tab of the Sources tool. You then have full functionality for using DevTools as an IDE, for that specific demo.
Starting the server from within a specific demo directory:
$ cd ~/GitHub/Demos/demo-to-do
$ npx http-server
Example directory to add to the Workspace tab of the Sources tool: C:\Users\localAccount\GitHub\Demos\demo-to-do
Result of going to localhost:8080:

Starting the localhost server from the Demos directory
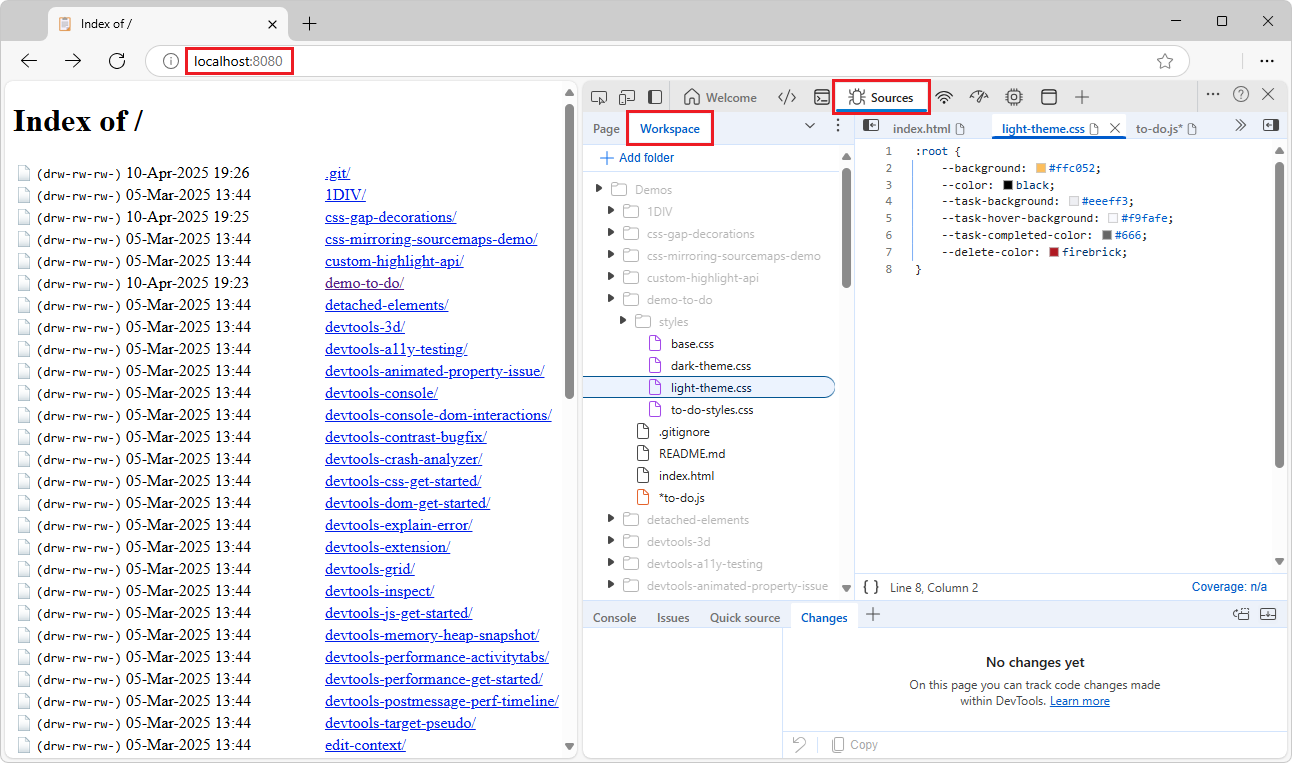
If you start the localhost server from within the entire \Demos\ folder and then go to localhost:8080, you can navigate to each demo from within the browser. You can add the entire cloned /Demos/ folder to the Workspace tab of the Sources tool. You then have full functionality for using DevTools as an IDE.
Starting the server from within the entire \Demos\ directory:
$ cd ~/GitHub/Demos
$ cd "C:\Users\localAccount\GitHub\Demos"  # alt syntax
$ npx http-server
Example directory to add to the Workspace tab of the Sources tool: C:\Users\localAccount\GitHub\Demos
Result of going to localhost:8080:
Opening a local HTML file from File Explorer and editing it in DevTools
To edit files in the Sources tool, before doing the steps in this section, you might need to click the Allow button to grant read/write access by following the steps in Open a demo folder from the Workspace tab in the Sources tool, above.
In File Explorer on Windows, or Finder on macOS, select an HTML file from the local copy of the Demos repo, such as
C:\Users\localAccount\Documents\GitHub\Demos\demo-to-do\index.html.The
.htmlfile is opened and rendered in Microsoft Edge.The Address bar displays: File | C:/Users/localAccount/GitHub/Demos/demo-to-do/index.html
Selecting the URL in the address bar shows the URL format:
file:///C:/Users/localAccount/GitHub/Demos/demo-to-do/index.htmlRight-click the rendered webpage, and then select Inspect.
DevTools opens.
Select the Sources tool, and then select the Page tab or the Workspace tab.
See also:
- Edit and save files in a workspace (Sources tool Workspace tab) - to open a local folder in the Sources tool of DevTools in the browser.
Opening a local HTML file from the browser's File Open dialog and editing it in DevTools
To open an .html file and edit it:
In Microsoft Edge, open a new tab, and then press Ctrl+O (Windows/Linux) or Command+O (macOS). A file selection dialog opens.
Select an HTML file from the local copy of the Demos repo, such as
C:\Users\localAccount\Documents\GitHub\Demos\demo-to-do\index.html. The.htmlfile is opened and rendered in Microsoft Edge.Right-click the webpage, and then select Inspect. Or, press Ctrl+Shift+I (Windows, Linux) or Command+Option+I (macOS). DevTools opens.
In DevTools, on the main toolbar, select the Sources tab. If that tab isn't visible, click the More tabs (
) button.In DevTools, on the left, select the Page tab, and then select the HTML file, such as
index.htmlor (index).Press Esc to open the Quick View panel at the bottom of DevTools.
In the Quick View toolbar, click the More Tools (
 ) button, and then select the Changes tool.
In the middle, editor pane of the Sources tool, edit the
.htmlfile. For example, indemo-to-do/index.htmlfolder, in the<h1>heading line, change My tasks to My modified tasks:<h1>📋 My modified tasks</h1>If editing isn't enabled, click the Allow button to grant read/write access to the folder by doing the steps in Open a demo folder from the Workspace tab in the Sources tool above.
The change is displayed in the Changes tool in the Quick View panel, and an asterisk is added to the file name in the index.html tab in the Sources tool:

Press Ctrl+S (Windows, Linux) or Command+S (macOS) to save the change. The asterisk is removed from the index.html tab in the Sources tool.
Refresh the page. The change is displayed in the rendered webpage; for example, the word modified is added to the title:

Open a demo folder in Visual Studio Code
After cloning (or downloading) the Edge Demos repo:
In Visual Studio Code, in the Activity Bar, click the Explorer (
 ) button. The Explorer pane opens.
In the Explorer pane, click the Open Folder button. The Open Folder dialog opens. Navigate to the
demo-to-dofolder in the Demo repo that you cloned, select the folder or go into it, and then click the Select Folder button:An example of a repo ___location where the Demos repo has been cloned is shown above. The
demo-to-dofolder of the cloned Demos repo opens in the Explorer of Visual Studio Code:
Or, you can open the root folder of the Demos repo, to explore all of the demo folders in the Explorer pane.
See also:
- Microsoft Edge DevTools extension for Visual Studio Code - to open a local folder in Visual Studio Code and use DevTools within Visual Studio Code.
URL patterns for rendered demo webpages and source code
Most of the Readme files in the Demos repo have a link that opens the rendered .html file from the GitHub.io server. Sometimes you have a URL for an HTML source file at GitHub.com, but instead you need to derive the github.io server URL to display the rendered file, rather than displaying the code listing of the .html source code in the GitHub directory.
To convert from the URL for the source code directory at GitHub.com to the URL for a rendered demo webpage at GitHub.io, the pattern is as follows.
Suppose the URL for the webpage's source code at GitHub.com is:
https://github.com/MicrosoftEdge/Demos/tree/main/demo-to-do/
The key components of that GitHub.com URL are:
https://github.com/[org]/[repo]/tree/main/[path]
In contrast, the desired GitHub.io URL pattern is:
https://[org].github.io/[repo]/[path]
To fill in that GitHub.io URL pattern, in this example:
- [org] is
MicrosoftEdge. - [repo] is
Demos. - [path] is
demo-to-do.
Therefore, the resulting GitHub.io server URL for the rendered demo webpage is:
https://MicrosoftEdge.github.io/Demos/demo-to-do/
These URLs aren't case-sensitive.
When you run a localhost server and start it within a cloned repo folder, such as C:\Users\localAccount\GitHub\Demos\workspaces, you typically see localhost:8080 in the browser Address Bar.
See also
Opening and editing files:
- Edit and save files in a workspace (Sources tool Workspace tab) - Use DevTools as an in-browser Integrated Development Environment (IDE).
- Add a local folder to the workspace, to use DevTools to edit files and save changes to disk in Sources tool overview.
- Approaches compared in Microsoft Edge DevTools extension for Visual Studio Code. Summarizes and compares several options for editing webpage files.
- Microsoft Edge IDE integration - Webpage app development using Visual Studio Code or Visual Studio, including Microsoft Edge DevTools.
Downloading and cloning:
- Step 5: Clone the Demos repo in Installing the DevTools extension for Visual Studio Code.
- Cloning a repository - GitHub docs.
Running a local web server:
- Step 6: Set up a localhost server in Installing the DevTools extension for Visual Studio Code.