Note
Access to this page requires authorization. You can try signing in or changing directories.
Access to this page requires authorization. You can try changing directories.
Learn how to use a cloud flow in Copilot Studio by giving an agent the ability to produce a weather forecast on request. In this first example, you create a flow that fetches a weather forecast. In the next example, you set up a topic to call the flow as an action so the agent can respond with the forecast when a customer asks about the weather.
To work as a tool with agents, an agent flow requires the following:
- Have the When an agent calls the flow trigger and a response action of Respond to the agent.
- Be configured to respond in real time, not asynchronously. The Asynchronous reponse toggle must be set to Off under Networking in the Respond to the agent action settings.
- Respond to the agent within the 100 second action limit. Optimize the flow logic, queries, and the amount of data returned so that a typical run is below this 100 second limit. Actions in the flow that need to run longer can be placed after the Respond to Copilot action to continue to run up to the flow run duration limit of 30 days.
When you create an agent flow from Copilot Studio, the required flow trigger and response action are added for you. You can modify an existing flow for use with agents by updating it to use this trigger and this response action.
Prerequisites
- Access to Copilot Studio with a license that includes the use of flows in Copilot Studio.
Create a flow you can use with an agent
Go to the Topics page for your agent.
Open the topic from which you want to call a flow.
Select the Add node icon
 below any node, and select Add a tool.
On the Basic tools tab, select New Agent flow.
The Flows page opens, with a starter flow template open in the agent flows designer for editing.
Now add actions to your flow. In this example, you add an action that fetches the current forecast from MSN Weather.
Select the name of the flow and replace it with "Get weather forecast."
Select the When an agent calls the flow flow trigger and add the following input parameters:
- City (Text)
- ZIP code (Number)
Select the Add icon below the When an agent calls the flow flow trigger.
In Add an action, search for "MSN weather", and select the Get forecast for today action.
In the Get forecast for today panel, in the Location box, enter a slash (
/), select Insert dynamic content, and then select your City input parameter.Proceed in the same fashion to add your ZIP code input parameter.
In the Respond to the agent action, add the following output parameters and variables:
Output parameter Type Variable day_summaryText Day Summary ___locationText Location chance_of_rainNumber Day Rain Chance 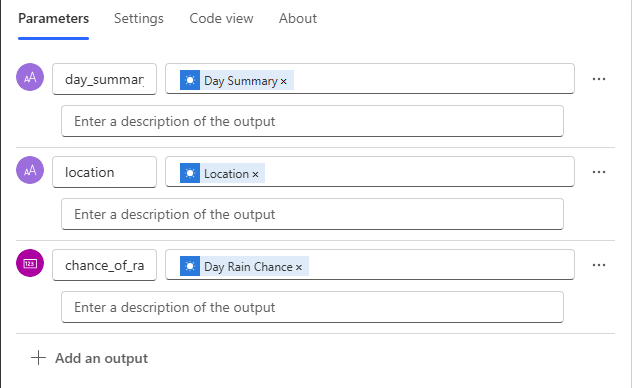
Save and publish the flow. A notification appears when the flow is created successfully.
Select Go back to agent to return to your topic in Copilot Studio.
To continue, follow the instructions in Call an agent flow from an agent.
Manage which connections are used by the flow
In a supported authenticated agent, cloud flows can be configured to use user credentials when they're run as part of a generative orchestration plan or called from a topic. Using the flow in a supported channel doesn't require any special configuration in your agent. Customers are able to manage their connections while using the agent.
Cloud flows in environments using customer-managed keys (CMK) can't yet be run with customer credentials as part of generative orchestration plans or from topics. Ensure the run-only settings for cloud flows in CMK environments are set to specific connections instead of Provided by run-only user.