Note
Access to this page requires authorization. You can try signing in or changing directories.
Access to this page requires authorization. You can try changing directories.
APPLIES TO:  Azure Database for PostgreSQL - Flexible Server
Azure Database for PostgreSQL flexible server with elastic cluster is a managed service that you use to run, manage, and scale highly available PostgreSQL databases in the cloud with horizontal scale-out capability. This Quickstart covers how to create an elastic cluster instance using the Azure portal.
If you don't have an Azure subscription, create a free Azure account before you begin.
Sign in to the Azure portal
Open your web browser and go to the portal. Enter your credentials to sign in to the portal. The default view is your service dashboard.
Create an Azure Database for PostgreSQL server
An elastic cluster, like a flexible server instance are created with a configured set of compute and storage resources. The cluster is created within an Azure resource group. The steps outlined in Create an Azure Database for PostgreSQL flexible server equally apply to elastic clusters. This section outlines the changes in the process.
To create an Azure Database for PostgreSQL flexible server instance, take the following steps:
After filling out basic information, go to the Configure server section.
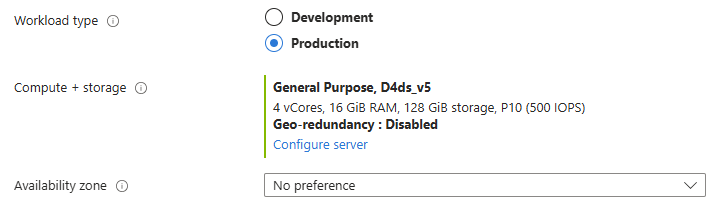
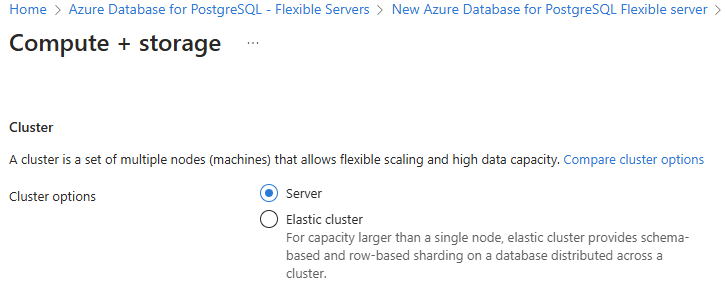
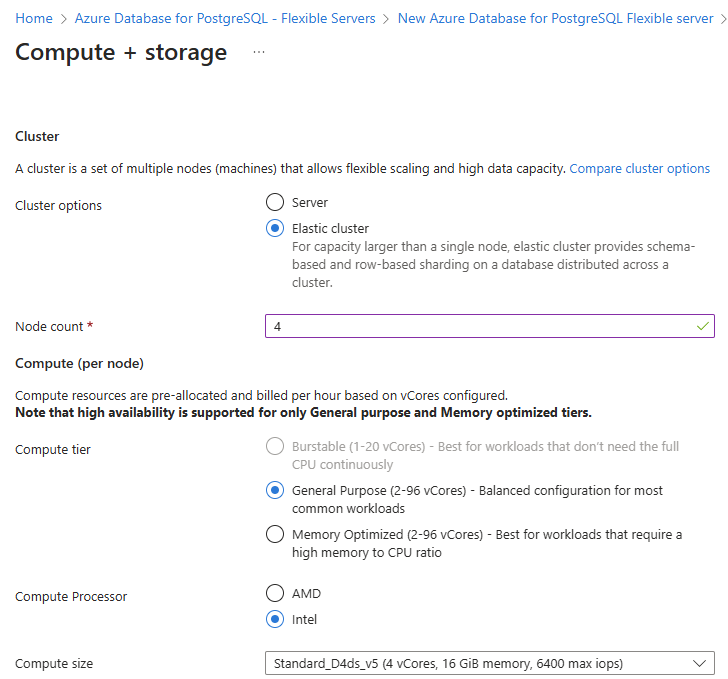
From section Cluster select Elastic cluster radio option.
Provide a desired node count and configure desired compute size.
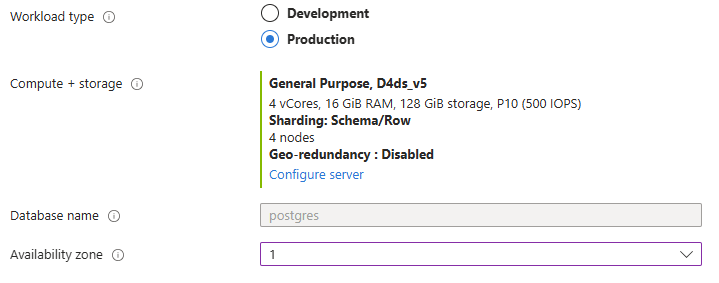
Save changes and verify your choices on the main configuration page.
Select Review + create to review your selections. Select Create to provision the server. This operation can take a few minutes.
You can now monitor the progress of your deployment. Once the deployment is done, you can select Pin to dashboard, which creates a tile for this server on your Azure portal dashboard as a shortcut to the server's Overview page. Selecting Go to resource opens the server's Overview page.

By default, a postgres database is created under your server. The postgres database is a default database meant for users, utilities, and applications. (The other default database is azure_maintenance. Its function is to separate the managed service processes from user actions. You can't access this database.)
Note
Connections to your Azure Database for PostgreSQL flexible server instance communicate over port 5432. When you try to connect from within a corporate network, outbound traffic over port 5432 might not be allowed by your network's firewall. If so, you can't connect to your server unless your IT department opens port 5432. Elastic clusters also use port 7432 for load balanced connections across the cluster nodes and might need to be allow listed in a similar way by your IT department.

Get the connection information
When you create your elastic cluster instance, a default database named postgres is created. To connect to your database server, you need your full server name and admin login credentials. You noted those values earlier in the Quickstart article. If you didn't, you can easily find the server name and login information on the server Overview page in the portal.
Open your server's Overview page. Make a note of the Server name and the Server admin login name. Hover your cursor over each field, and the copy symbol appears to the right of the text. Select the copy symbol as needed to copy the values.

Connect to the Azure Database for PostgreSQL flexible server database using psql
There are many applications you can use to connect to your Azure Database for PostgreSQL flexible server instance. If your client computer has PostgreSQL installed, you can use a local instance of psql to connect to an Azure Database for PostgreSQL flexible server instance. Let's now use the psql command-line utility to connect to the Azure Database for PostgreSQL flexible server instance.
Run the following psql command to connect to an Azure Database for PostgreSQL flexible server instance.
psql --host=<servername> --port=<port> --username=<user> --dbname=<dbname>For example, the following command connects to the default database called postgres on your Azure Database for PostgreSQL flexible server instance mydemoserver.postgres.database.azure.com using access credentials. Enter the
<server_admin_password>you chose when prompted for password.psql --host=mydemoserver-pg.postgres.database.azure.com --port=5432 --username=myadmin --dbname=postgresIn order to connect to a random node in the cluster, use port 7432.
psql --host=mydemoserver-pg.postgres.database.azure.com --port=7432 --username=myadmin --dbname=postgresAfter you connect, the psql utility displays a postgres prompt where you type sql commands. In the initial connection output, a warning might appear because the psql you're using might be a different version than the Azure Database for PostgreSQL flexible server version.
Example psql output:
psql (12.3 (Ubuntu 12.3-1.pgdg18.04+1), server 13.2)
WARNING: psql major version 12, server major version 13.
      Some psql features might not work.
SSL connection (protocol: TLSv1.3, cipher: TLS_AES_256_GCM_SHA384, bits: 256, compression: off)
Type "help" for help.
Tip
If the firewall isn't configured to allow the IP address of your client, the following error occurs:
psql: FATAL: no pg_hba.conf entry for host
<IP address>, user "myadmin", database "postgres", SSL on FATAL: SSL connection is required. Specify SSL options and retry.Confirm your client's IP is allowed in the firewall rules.
Create a blank database called "mypgsqldb" at the prompt by typing the following command:
CREATE SCHEMA mypgsqlschema;At the prompt, execute the following command to make the schema
mypgsqlschemadistributed:SELECT citus_schema_distribute('mypgsqlschema');Type
\q, and then select the Enter key to quit psql.
You connected to the elastic cluster via psql, and you created a blank schema and made it distributed.
Clean up resources
You can clean up the resources that you created in the Quickstart in one of two ways. You can delete the Azure resource group, which includes all the resources in the resource group. If you want to keep the other resources intact, delete only the server resource.
Tip
Other Quickstarts in this collection build on this Quickstart. If you plan to continue working with Quickstarts, don't clean up the resources that you created in this Quickstart. If you don't plan to continue, follow these steps to delete the resources that were created by this Quickstart in the portal.
To delete the entire resource group, including the newly created server:
Locate your resource group in the portal. On the menu on the left, select Resource groups. Then select the name of your resource group in which you created your Azure Database for PostgreSQL flexible server resource.
On your resource group page, select Delete. To confirm deletion enter the name of your resource group in the text box. Select Delete.
To delete only the newly created server:
Locate your server in the portal, if you don't have it open. On the menu on the left, select All resources. Then search for the server you created.
On the Overview page, select Delete.

Confirm the name of the server you want to delete, and view the databases under it that are affected. Enter your server name in the text box, and select Delete.
