Note
Access to this page requires authorization. You can try signing in or changing directories.
Access to this page requires authorization. You can try changing directories.
APPLIES TO: Basic | Standard | Premium
In API Management, you can expose a REST API managed in API Management as a remote Model Context Protocol (MCP) server. Expose one or more of the API operations as tools that MCP clients can call using the MCP protocol.
Using API Management to expose remote MCP servers provides centralized control over authentication, authorization, and monitoring. It simplifies the process of exposing APIs as MCP servers while helping to mitigate common security risks and ensuring scalability.
Note
This feature is currently in preview. It's being released first to the AI Gateway Early update group. After joining the group, it can take 2 hours to access MCP server features.
In this article, you learn how to:
- Expose a REST API in API Management as an MCP server
- Configure policies for the MCP server
- Test the generated MCP server from an MCP client
About MCP servers
AI agents are becoming widely adopted because of enhanced large language model (LLM) capabilities. However, even the most advanced models face limitations because of their isolation from external data. Each new data source potentially requires custom implementations to extract, prepare, and make data accessible for the models.
The model context protocol (MCP) helps solve this problem. MCP is an open standard for connecting AI models and agents with external data sources such as local data sources (databases or computer files) or remote services (systems available over the internet, such as remote databases or APIs).
MCP architecture
The following diagram illustrates the MCP architecture:

The architecture consists of the following components:
| Component | Description |
|---|---|
| MCP hosts | LLM applications such as chat apps or AI assistants in your IDEs (like GitHub Copilot in Visual Studio Code) that need to access external capabilities |
| MCP clients | Protocol clients, inside the host application, that maintain 1:1 connections with servers |
| MCP servers | Lightweight programs that each expose specific capabilities and provide context, tools, and prompts to clients |
| MCP protocol | Transport layer in the middle |
MCP follows a client-server architecture where a host application can connect to multiple servers. Whenever your MCP host or client needs a tool, it connects to the MCP server. The MCP server then connects to, for example, a database or an API. MCP hosts and servers connect with each other through the MCP protocol.
Remote versus local MCP servers
MCP utilizes a client-host-server architecture built on JSON-RPC 2.0 for messaging. Communication between clients and servers occurs over defined transport layers, and supports primarily two modes of operation:
Remote MCP servers - MCP clients connect to MCP servers over the internet, establishing a connection using HTTP and server-sent events (SSE), and authorizing the MCP client access to resources on the user's account using OAuth.
Local MCP servers MCP clients connect to MCP servers on the same machine, using standard input/output as a local transport method.
Prerequisites
- Complete the following quickstart: Create an Azure API Management instance. Currently only the Premium, Standard, and Basic tiers of API Management support MCP servers.
- Make sure that your instance manages a REST API that you'd like to expose as an MCP server. To import a sample API, see Import and publish your first API.
Note
Only HTTP APIs from API Management can be exposed as MCP servers.
- To test the MCP server, you can use Visual Studio Code with access to GitHub Copilot.
Expose API as an MCP server
In the Azure portal, access the MCP server preview at the following URL:
https://portal.azure.com/?Microsoft_Azure_ApiManagement=mcpNavigate to your API Management instance.
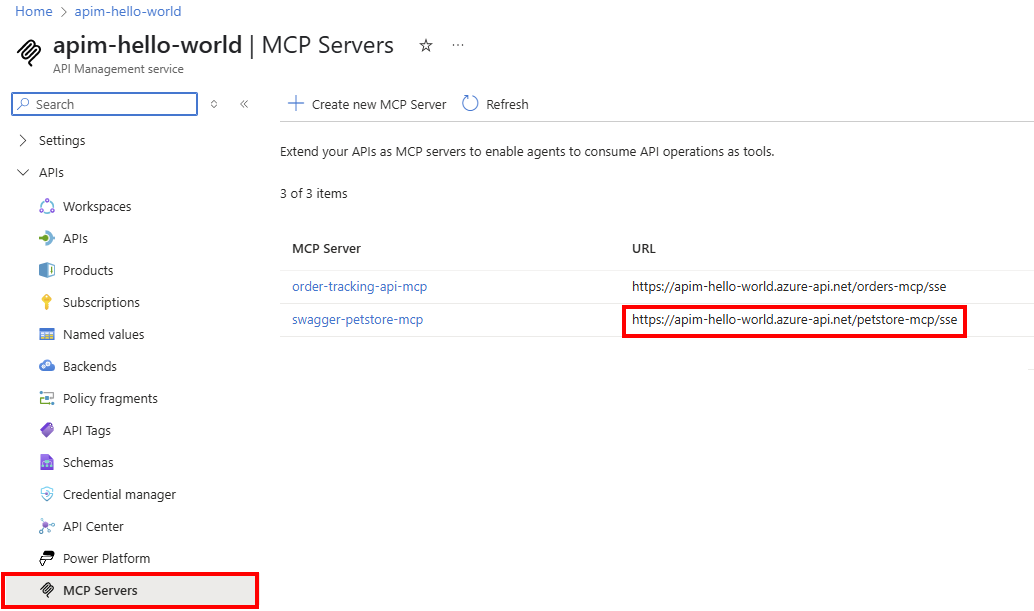
In the left menu, select APIs > MCP Servers > + Create new MCP Server.
In API, select a REST API to expose as an MCP server.
Select one or more API Operations to expose as tools. You can select all operations or only specific operations.
Select Create.

The MCP server is created and the API operations are exposed as tools. The MCP server is listed in the MCP Servers pane. The URL column shows the endpoint of the MCP server that you can call for testing or within a client application.
Configure policies for the MCP server
Configure one or more API Management policies to help manage the MCP server. The policies are applied to all API operations exposed as tools in the MCP server and can be used to control access, authentication, and other aspects of the tools.
For a tutorial on how to configure policies, see Transform and protect your API.
To configure policies for the MCP server:
In the portal, under APIs, select MCP Servers.
Select the MCP server you created.
In the left menu, under MCP, select Policies.
In the policy editor, add or edit the policies you want to apply to the MCP server's tools. The policies are defined in XML format. For example, you can add a policy to limit calls to the MCP server's tools (in this example, 5 calls per 30 second per client IP address).
<rate-limit-by-key calls="5" renewal-period="30" counter-key="@(context.Request.IpAddress)" remaining-calls-variable-name="remainingCallsPerIP" />

Test and use the MCP server
To verify that the MCP server is working, you can use Visual Studio Code to send requests to the MCP server tools.
In Visual Studio Code, use GitHub Copilot chat in agent mode (preview) to add the MCP server and use the tools. For background about MCP servers in Visual Studio Code, see Use MCP Servers in VS Code (Preview).
Add the MCP server in Visual Studio Code
To add the MCP server in Visual Studio Code:
Use the MCP: Add Server command from the Command Palette.
When prompted, select the server type: HTTP (HTTP or Server Sent Events).
Enter the URL of the MCP server in API Management. Example:
https://<apim-service-name>.azure-api.net/<api-name>-mcp/sse(for SSE endpoint) orhttps://<apim-service-name>.azure-api.net/<api-name>-mcp/mcp(for MCP endpoint)Enter a server ID of your choice.
Select whether to save the configuration to your workspace settings or user settings.
Workspace settings - The server configuration is saved to a
.vscode/mcp.jsonfile only available in the current workspace.User settings - The server configuration is added to your global
settings.jsonfile and is available in all workspaces. The configuration looks similar to the following:
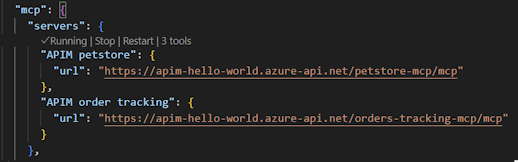
Add fields to the JSON configuration for settings such as authentication header. The following example shows the configuration for an API Management subscription key passed in a header as in input value. Learn more about the configuration format

Use tools in agent mode
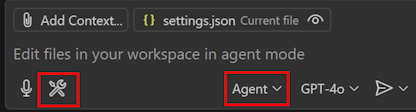
After adding an MCP server, you can use tools in agent mode.
In GitHub Copilot chat, select Agent mode and select the Tools button to see available tools.
Select one or more tools from the MCP server to be available in the chat.

Enter a prompt in the chat to invoke the tool. For example, if you selected a tool to get information about an order, you can ask the agent about an order.
Get information for order 2Select Continue to see the results. The agent uses the tool to call the MCP server and returns the results in the chat.
