Note
Access to this page requires authorization. You can try signing in or changing directories.
Access to this page requires authorization. You can try changing directories.
APPLIES TO: Developer | Basic | Basic v2 | Standard | Standard v2 | Premium | Premium v2 | Isolated
APIs and operations in API Management can be configured with response caching. Response caching can significantly reduce latency for API callers and backend load for API providers. This article describes how to add caching to your APIs.
Important
Built-in cache is volatile and is shared by all units in the same region in the same API Management instance. Regardless of the cache type used (internal or external), if cache-related operations fail to connect to the cache because of the volatility of the cache or for any other reason, the API call that uses the cache-related operation doesn't raise an error, and the cache operation completes successfully. In the case of a read operation, a null value is returned to the calling policy expression. Your policy code should be designed to ensure that there's a fallback mechanism to retrieve data that's not found in the cache.
For more detailed information about caching, see API Management caching policies and Custom caching in Azure API Management.
In this article you:
- Add response caching for your API
- Verify that caching is working
Note
Internal caching isn't available in the Consumption tier of Azure API Management. You can use an external Azure Cache for Redis instead. You can also configure an external cache in other API Management service tiers.
Prerequisites
Add caching policies
With the caching policies shown in this example, the first request to a test operation returns a response from the backend service. This response is cached, keyed by the specified headers and query string parameters. Subsequent calls to the operation, with matching parameters, will return the cached response until the cache duration interval expires.
Sign in to the Azure portal.
Go to your API Management instance.
Select APIs > APIs in the menu on the left.
Select an API for which you want to configure caching.
At the top of the screen, select the Design tab.
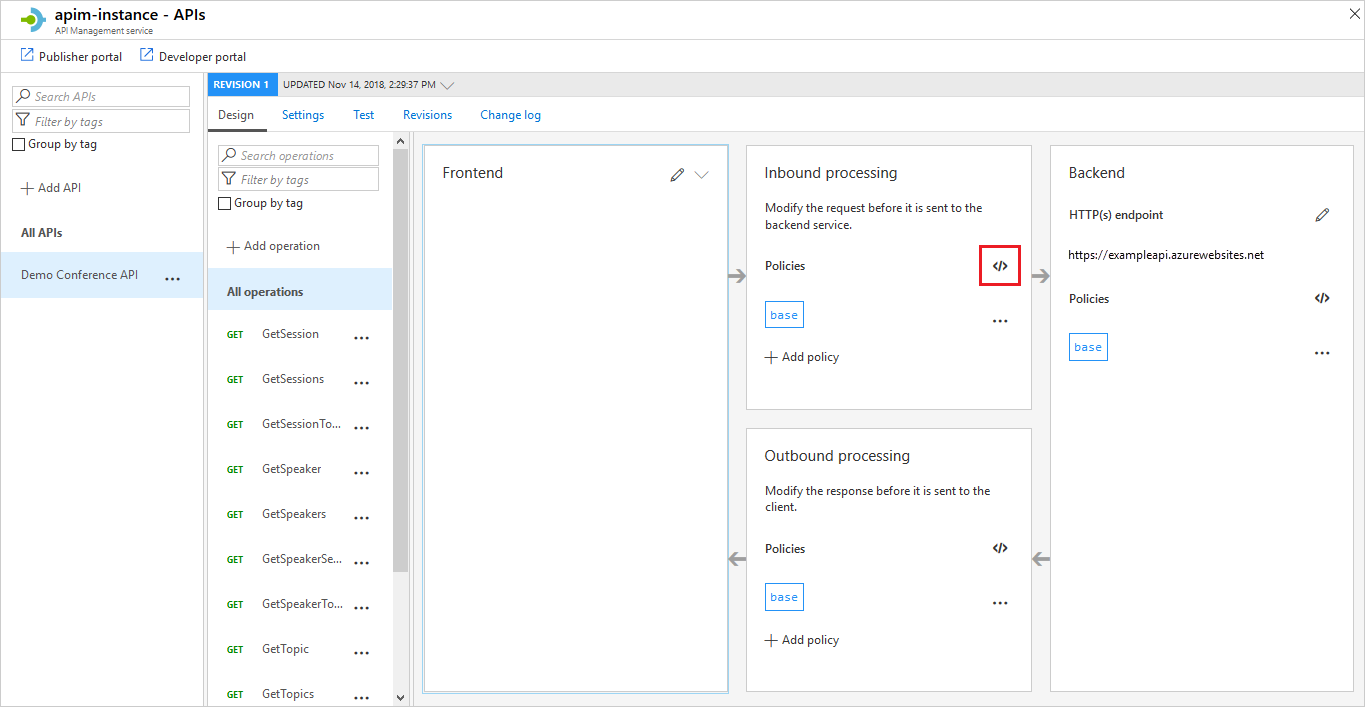
In the Inbound processing section, select the </> icon:
In the
inboundelement, add the following policy:<cache-lookup vary-by-developer="false" vary-by-developer-groups="false"> <vary-by-header>Accept</vary-by-header> <vary-by-header>Accept-Charset</vary-by-header> <vary-by-header>Authorization</vary-by-header> </cache-lookup>In the
outboundelement, add the following policy:<cache-store duration="20" />In this policy,
durationspecifies the expiration interval of the cached responses. The interval is 20 seconds.Select Save.
Tip
If you're using an external cache, as described in Use an external Azure Cache for Redis in Azure API Management, you might want to specify the caching-type attribute of the caching policies. See API Management caching policies for more information.
Call an operation to test the caching
To test caching, call an operation in the portal.
- In the Azure portal, go to your API Management instance.
- Select APIs > APIs in the menu on the left.
- Select the API to which you added caching policies.
- Select an operation to test.
- Select the Test tab at the top of the window.
- Select Trace two or three times in quick succession.
- Under HTTP response, select the Trace tab.
- Jump to the Inbound section and scroll to the
cache-lookuppolicy. You should see a message similar to the one in the following screenshot, which indicates a cache hit:
Related content
- For more information about caching policies, see Caching policies in the API Management policy reference.
- For information on caching items by key by using policy expressions, see Custom caching in Azure API Management.
- For more information about using external Azure Cache for Redis or Azure Managed Redis, see Use an external Azure Cache for Redis in Azure API Management.

