Note
Access to this page requires authorization. You can try signing in or changing directories.
Access to this page requires authorization. You can try changing directories.
This article shows how to provide enterprise developers access to the Azure API Center portal view in the Visual Studio Code extension for Azure API Center. Using the portal view, developers can discover APIs in your Azure API center, view API definitions, and optionally generate API clients when they don't have access to manage the API center itself or add APIs to the inventory. Access to the API Center portal view is managed using Microsoft Entra ID and Azure role-based access control.
Tip
The Visual Studio Code extension provides more features for API developers who have permissions to manage an Azure API center. For example, API developers can register APIs in the API center directly or using CI/CD pipelines. Learn more
Prerequisites
For API center administrators
An API center in your Azure subscription. If you haven't created one already, see Quickstart: Create your API center.
Permissions to create an app registration in a Microsoft Entra tenant associated with your Azure subscription, and permissions to grant access to data in your API center.
For app developers
Azure API Center extension for Visual Studio Code
Note
Where noted, certain features are available only in the Azure API Center extension's pre-release version. When installing the extension from the Visual Studio Code Marketplace, you can choose to install the release version or a pre-release version. Switch between the two versions at any time by using the extension's Manage button context menu in the Extensions view.
The following Visual Studio Code extensions are optional:
- Microsoft Kiota extension - to generate API clients
- GitHub Copilot and GitHub Copilot Chat, provided with access to GitHub Copilot - to use language model tools in agent mode for discovering APIs
Steps for API center administrators to enable access to API Center portal view
The following sections provide steps for API center administrators to enable enterprise developers to access the API Center portal view.
Create Microsoft Entra app registration
First configure an app registration in your Microsoft Entra ID tenant. The app registration enables the API Center portal to access data from your API center on behalf of a signed-in user.
API Center can set up the app registration automatically, or you can create the app registration manually.
Set up the app registration automatically
To set up the app registration automatically, follow these steps:
- In the Azure portal, navigate to your API center.
- In the left-hand menu, select API Center portal > Settings.
- On the Identity provider tab, select Start set up.
- Select Save + publish.
Set up the app registration manually
If you want to create the app registration manually, follow these steps:
In the Azure portal, navigate to Microsoft Entra ID > App registrations.
Select + New registration.
On the Register an application page, set the values as follows:
- Set Name to a meaningful name such as api-center-portal
- Under Supported account types, select Accounts in this organizational directory (Single tenant).
- In Redirect URI, select Single-page application (SPA) and set the URI.
Enter the URI of your API Center portal deployment, in the following form:
https://<service-name>.portal.<___location>.azure-api-center.ms. Replace<service name>and<___location>with the name of your API center and the ___location where it's deployed, Example:https://myapicenter.portal.eastus.azure-api-center.ms. - Select Register.
Configure additional redirect URIs for VS Code extension
When enabling the API Center portal view in the Visual Studio Code extension for API Center, also configure the following redirect URIs in the app registration:
In the Azure portal, navigate to your app registration.
On the Manage > Authentication page, select Add a platform and select Mobile and desktop applications.
Configure the following three custom redirect URIs:
https://vscode.dev/redirect
http://localhost
ms-appx-web://Microsoft.AAD.BrokerPlugin/<application-client-id>Replace
<application-client-id>with the application (client) ID of this app. You can find this value on the Overview page of the app registration.
Enable sign-in to API Center portal view by Microsoft Entra users and groups
Enterprise developers must sign in with a Microsoft account to see the API Center portal view for your API center. If needed, add or invite developers to your Microsoft Entra tenant.
To enable sign-in, assign the Azure API Center Data Reader role to users or groups in your organization, scoped to your API center.
Important
By default, you and other administrators of the API center don't have access to APIs in the API Center portal. Be sure to assign the Azure API Center Data Reader role to yourself and other administrators.
For detailed prerequisites and steps to assign a role to users and groups, see Assign Azure roles using the Azure portal. Brief steps follow:
- In the Azure portal, navigate to your API center.
- In the left menu, select Access control (IAM) > + Add role assignment.
- In the Add role assignment pane, set the values as follows:
- On the Role page, search for and select Azure API Center Data Reader. Select Next.
- On the Members page, In Assign access to, select User, group, or service principal > + Select members.
- On the Select members page, search for and select the users or groups to assign the role to. Click Select and then Next.
- Review the role assignment, and select Review + assign.
Note
To streamline access configuration for new users, we recommend that you assign the role to a Microsoft Entra group and configure a dynamic group membership rule. To learn more, see Create or update a dynamic group in Microsoft Entra ID.
After you configure access to the portal, configured users can sign in to the portal and view the APIs in your API center.
Note
The first user to sign in to the portal is prompted to consent to the permissions requested by the API Center portal app registration. Thereafter, other configured users aren't prompted to consent.
Steps for enterprise developers to access the API Center portal view
Developers can follow these steps to connect and sign in to an API Center portal view using the Visual Studio Code extension. Settings to connect to the API center need to be provided by the API center administrator. After connecting, developers can discover and consume the APIs in the API center.
Connect to an API center
In Visual Studio Code, in the Activity Bar on the left, select API Center.

Use the Ctrl+Shift+P keyboard shortcut to open the Command Palette. Type Azure API Center: Connect to an API Center and hit Enter.
Answer the prompts to input the following information:
The runtime URL of your API center, in the format
<service name>.data.<region>.azure-apicenter.ms(don't prefix withhttps://). Example:contoso-apic.data.eastus.azure-apicenter.ms. This runtime URL appears on the Overview page of the API center in the Azure portal view.The application (client) ID from the app registration configured by the administrator in the previous section.
The directory (tenant) ID from the app registration configured by the administrator in the previous section.
Tip
An API center administrator needs to provide the preceding connection details to developers, or provide a direct link in the following format:
vscode://apidev.azure-api-center?clientId=<Client ID>&tenantId=<tenant ID>&runtimeUrl=<service-name>.data.<region>.azure-apicenter.msAfter you connect to the API center, the name of the API center appears in the API Center portal view.
To view the APIs in the API center, under the API center name, select Sign in to Azure. Sign-in is allowed with a Microsoft account that is assigned the Azure API Center Data Reader role in the API center.

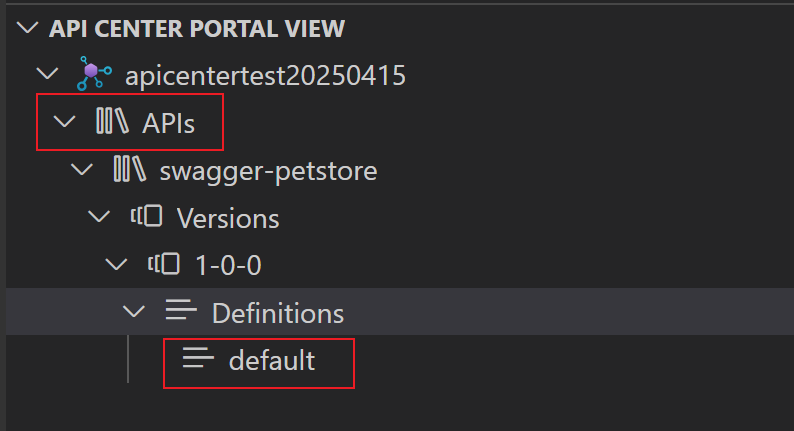
After signing in, select APIs to list the APIs in the API center. Expand an API to explore its versions and definitions.
Repeat the preceding steps to connect to more API centers, if access is configured.
Discover and consume APIs in the API Center portal view
The API Center portal view helps enterprise developers discover API details and start API client development. Developers can access the following features by right-clicking on an API definition in the API Center portal view:
- Export API specification document - Export an API specification from a definition and then download it as a file
- Generate API client - Use the Microsoft Kiota extension to generate an API client for their favorite language
- Generate Markdown - Generate API documentation in Markdown format
- OpenAPI documentation - View the documentation for an API definition and try operations in a Swagger UI (only available for OpenAPI definitions)
Use language model tools
In the pre-release version of the Azure API Center extension, developers with access to the API Center portal view can add API Center language model tools to use in GitHub Copilot's agent mode. Learn more about using tools in agent mode.
The API Center tools can be used in agent mode to help search for APIs and API versions, API definitions and specifications, deployments, and more using natural language prompts.
To add and use API Center language mode tools in GitHub Copilot's agent mode:
Connect to an API center as described in a previous section.
Open GitHub Copilot Chat in Visual Studio Code.
Set the mode of GitHub Copilot Chat to Agent.
Select the Tools icon in the chat window.

Select one or more API Center tools to be available in the chat.

Enter a prompt in the chat window to use the available tools. For example:
Find potential MCP servers for a project I'm working on. I need the deployment URLs from my API center of any MCP servers that can run code snippets.Review the responses from GitHub Copilot Chat. Continue with the conversation to refine the results or ask follow-up questions.
Troubleshooting
Unable to sign in to Azure
If users who have been assigned the Azure API Center Data Reader role can't complete the sign-in flow after selecting Sign in to Azure in the API Center portal view, there might be a problem with the configuration of the connection.
Check the settings in the app registration you configured in Microsoft Entra ID. Confirm the values of the application (client) ID and the directory (tenant) ID in the app registration and the runtime URL of the API center. Then, set up the connection to the API center again.