Note
Access to this page requires authorization. You can try signing in or changing directories.
Access to this page requires authorization. You can try changing directories.
前回は OSS アプリのパッケージング方法についてご紹介しました。今回は Web Application Gallery への登録手順 3つのうち、2番目の「パッケージのテスト」方法を WordPress 3.1 英語版のパッケージを例にご紹介申し上げます。
■ テストに必要なもの
パッケージのテストには Web Platform Installer のシステム要件を満たす PC が必要です。
また、下記のソフトウェアを予めインストールしてください。
- Web Platform Installer:インストール方法はこちらに記載しています。
- Microsoft File Checksum Integrity Verifier (SHA-1 ハッシュ 生成 プログラム) : こちらからインストールしてください。
■ テスト手順
テストの手順については、下記のように実施してください。
- Web Platform Installer 用カスタムフィードの作成
- カスタムフィードを Web Platform Installer に組み込む
- Web Platform Installer で IIS 環境にインストール
- Web Platform Installer で IIS Express 環境にインストール
- WebMatrix で発行作業の実施
以下、各ステップについてご紹介します。
■ Web Platform Installer 用カスタムフィードの作成
カスタムフィードは、下記のソースをコピー&ペーストしてください。
<?xml version="1.0" encoding="utf-8"?> <feed xmlns="https://www.w3.org/2005/Atom"> <version>1.0.0.0</version> <title>Sample Application for WebPI v3 RTW Feed</title> <updated>2011-03-1T00:000:00Z</updated> <author> <name>Sample Application Builder</name> <uri></uri> </author> <entry type="application"> <productId>sampleapp</productId> <title>Sample Application</title> <id>https://www.microsoft.com/web/webpi/3.0/SampleAppJa</id> <summary>Application Sample</summary> <longSummary>Application Sample</longSummary> <version>1.0</version> <images><icon></icon></images> <updated>2009-10-5T18:30:02Z</updated> <published>2009-10-5T18:30:02Z</published> <author> <name>Sample Application</name> <uri></uri> </author> <keywords> <keywordId>oss</keywordId> <keywordId>PHP</keywordId> <keywordId>MySQL</keywordId> </keywords> <dependency> <and> <dependency idref="PHPApp" /> <dependency> <productId>MySQLConnector</productId> </dependency> <dependency> <productId>StrawberryPerl</productId> </dependency> </and> </dependency> <installers> <installer> <id>1</id> <languageId>ja</languageId> <osList idref="SupportedAppPlatforms" /> <installerFile> <fileSize>10240</fileSize> <installerURL>記載してください </installerURL> <sha1>記載してください</sha1> </installerFile> <helpLink></helpLink> <msDeploy> <startPage></startPage> </msDeploy> </installer> </installers> </entry> <!-- Tabs and Keywords --> <tabs> <tab> <keywordTab> <id>oss</id> <name>Sample App</name> <description>Select from sample applications:</description> <keywords> <keywordId>oss</keywordId> </keywords> </keywordTab> </tab> </tabs> <keywords> <keyword id="oss">OSS Apps</keyword> </keywords> <oses> <os id="PreVistaNoHomeBasic"> <maximumVersion> <osMajorVersion>5</osMajorVersion> </maximumVersion> <osTypes> <Server /> <HomePremium /> <Ultimate /> <Enterprise /> <Business /> </osTypes> </os> <os id="VistaSP1PlusNoHomeBasic"> <minimumVersion> <osMajorVersion>6</osMajorVersion> <osMinorVersion>0</osMinorVersion> <spMajorVersion>1</spMajorVersion> </minimumVersion> <osTypes> <Server /> <HomePremium /> <Ultimate /> <Enterprise /> <Business /> </osTypes> </os> </oses> <osLists> <!-- support xp sp2+ (no server core) --> <osList id="SupportedAppPlatforms"> <os> <minimumVersion> <osMajorVersion>5</osMajorVersion> <osMinorVersion>1</osMinorVersion> <spMajorVersion>2</spMajorVersion> </minimumVersion> <osTypes> <Server /> <Client /> </osTypes> </os> <os idref="PreVistaNoHomeBasic" /> <os idref="VistaSP1PlusNoHomeBasic" /> </osList> </osLists> <dependencies> <!-- We do not support PHP for IIS 5.1 anymore --> <dependency id="IISForPHP"> <or> <!--IIS 6.0--> <dependency> <and> <!--IIS--> <dependency> <productId>IIS60</productId> </dependency> <!--FastCGI--> <dependency> <productId>FastCGIIIS6</productId> </dependency> </and> </dependency> <dependency> <and> <dependency> <productId>StaticContent</productId> </dependency> <dependency> <productId>DefaultDocument</productId> </dependency> <dependency> <productId>DirectoryBrowse</productId> </dependency> <dependency> <productId>HTTPErrors</productId> </dependency> <dependency> <productId>HTTPLogging</productId> </dependency> <dependency> <productId>LoggingTools</productId> </dependency> <dependency> <productId>RequestMonitor</productId> </dependency> <dependency> <productId>RequestFiltering</productId> </dependency> <dependency> <productId>StaticContentCompression</productId> </dependency> <dependency> <productId>IISManagementConsole</productId> </dependency> <dependency> <productId>CGI</productId> </dependency> <!--URL Rewriter--> <dependency> <or> <dependency> <productId>UrlRewrite2</productId> </dependency> <dependency> <productId>UrlRewrite</productId> </dependency> <dependency> <productId>UrlRewrite10</productId> </dependency> <dependency> <productId>UrlRewrite2Beta</productId> </dependency> </or> </dependency> </and> </dependency> </or> </dependency> <dependency id="PHPApp"> <and> <dependency> <or> <dependency> <and> <dependency idref="IISForPHP" /> <dependency> <productId>PHP52</productId> </dependency> <dependency> <productId>WinCache52</productId> </dependency> </and> </dependency> <!-- PHP on IIS Express dependency --> <dependency> <and> <dependency> <or> <dependency> <productId>WebMatrix</productId> </dependency> <dependency> <productId>WebMatrix_v1Refresh</productId> </dependency> </or> </dependency> <dependency> <productId>PHP52ForIISExpress</productId> </dependency> </and> </dependency> </or> </dependency> <dependency> <or> <dependency> <productId>WDeployNOSMO</productId> </dependency> <dependency> <productId>WDeploy_v2</productId> </dependency> <dependency> <productId>WDeploy</productId> </dependency> </or> </dependency> </and> </dependency> </dependencies> </feed> |
カスタムフィードのうち、<installerURL>、<sha1> の値を入力してください。以下に、入力方法を記載します。
- <installerURL>: パッケージの URL、もしくは絶対パス
- <sha1>: SHA-1 ハッシュの値。コマンドプロンプトで Microsoft File Checksum Integrity Verifierを実行してください。
(コマンド) fciv –add [パッケージのパスとファイル名] –sha1
入力が完了しましたら、.xml 形式でファイルを保存します。
■カスタムフィードを Web Platform Installer に組み込む
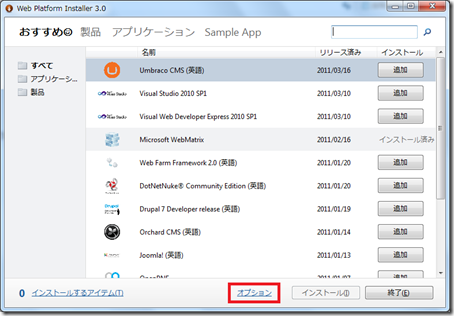
(1) Web Platform Installer を起動し、画面下の[オプション] をクリックしてください。
(2) 「追加シナリオを表示」の下にあるテキストボックスにカスタムフィードの URL (file:// の記述も可能) を入力し、[フィードの追加]ボタンをクリックしてください。
(3) 下記の画面のようにカスタムフィードが追加されている事を確認して、[OK] ボタンをクリックしてください。
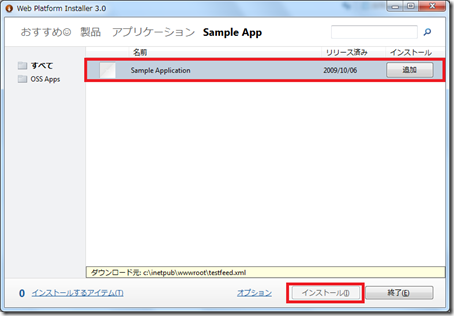
(4) 下記の画面のように画面上部に「Sample App」の文字が表示されれば、カスタムフィードの組み込みは完了です。
■Web Platform Installer で IIS 環境にインストール
(1) Web Platform Installer を起動し、画面下の[オプション] をクリックしてください。
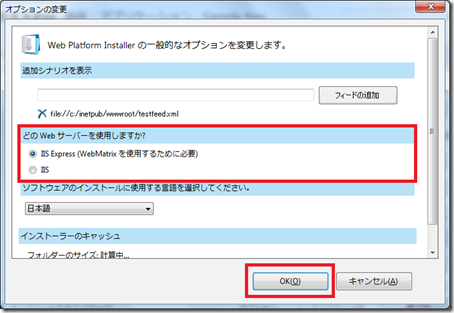
(2) 「どの Web サーバーを利用しますか?」下の [IIS] のラジオボタンをクリックして、[OK] ボタンをクリックしてください。
(3) 画面上部の「Sample App」をクリックしてください。
(4) Sample Application の [追加] ボタンをクリックしてから、[インストール] ボタンをクリックしてください。
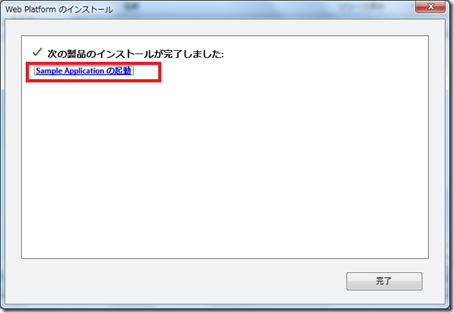
(5) Web Platform Installer に従い、パッケージのインストール作業を完了させてください。インストール完了後、 [Sample Application の起動]をクリックしてください。
(6) OSS アプリのインストーラーが起動しますので、OSS アプリのインストールを完了させてください。
以上で、IIS 環境へのテストは終了です。上手くいかなかった箇所は適宜パッケージを修正してください。
■Web Platform Installer で IIS Express 環境にインストール
(1) Web Platform Installer を起動し、画面下の[オプション] をクリックしてください。
(2) 「どの Web サーバーを利用しますか?」下の [IIS Express] のラジオボタンをクリックして、[OK] ボタンをクリックしてください。
(3) 画面上部の「Sample App」をクリックしてください。
(4) Sample Application の [追加] ボタンをクリックしてから、[インストール] ボタンをクリックしてください。
(5) Web Platform Installer に従い、パッケージのインストール作業を完了させてください。インストール完了後、 [起動]をクリックしてください。
(6) WebMatrix が起動しますので、[実行] ボタンをクリックしてください。
(7) OSS アプリのインストーラーが起動しますので、OSS アプリのインストールを完了させてください。
以上で、IIS Express 環境へのテストは終了です。上手くいかなかった箇所は適宜パッケージを修正してください。
■WebMatrix で発行作業の実施
手順はこちらに記載しておりますので、ご覧ください。発行の後に発行済みサイトからのダウンロードも実施して問題ないことをご確認ください。
- [MEMO] WebMatrix から ExpressWeb に発行方法 ~ Geeklog 編 ~ (1) 発行準備
- [MEMO] WebMatrix から ExpressWeb に発行方法 ~ Geeklog 編 ~ (2) 発行
以上でパッケージのテスト作業は完了です。
武田正樹


