Model Development and Execution
This section describes the analytical models available in Predictive Learning and the development process for creating models.
This documentation includes descriptions and step-by-step instructions for:
- Validating a New Model
- Importing a Model
- Model Management Actions
- Executing a Model
- Advanced Docker Model Settings
- Scheduled Model Execution
Model Types and Definitions
An analytical model consists of Jupyter notebooks or packaged scripts within Docker images.
Supported Model Types
PrL supports the following model types:
- Jupyter Notebook
- Docker Image
Model Listing and Overview
The Models page displays a table containing information about accessible models. Each model entry shows details and action icons for performing various model operations.
Note
Model upload file size is limited to 10 MB maximum.
Available Model Actions
Action icons appear on the right side of the models table. The following operations are available:
- Launch icon: Click to open a model.
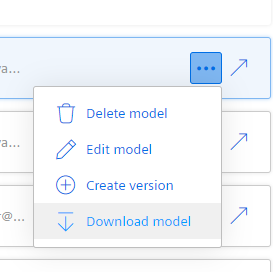
- Ellipses icon: Click to access additional actions:
- Deleting a model: Displays a confirmation dialog to prevent accidental deletions.
- Editing a model: Opens a dialog for updating name and description. Model type cannot be changed.
- Creating a version: Choose between minor or major version (major = 2.0; minor = 1.1), set expiration date and model type, then upload a model file up to 10MB.
- Downloading a model: Downloads the model to your local system.
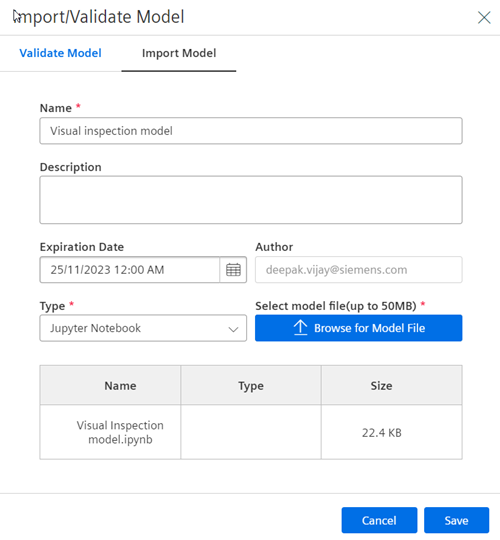
Model Import Process
To import an existing model, complete these steps:
- Click Import/Validate Model on the Models page. The Import/Validate Model dialog opens.
- Click the Import Model tab.
- Enter a name and description.
- Select an expiration date using the built-in calendar.
- Select a model type from the Type dropdown list, or click Browse to locate and select a model file.
- Click Save.
Your imported model appears in the Models list.
Docker Image Import Process
When selecting Docker Image as the model type, the Browse for Model File button is replaced with the Generate Token button. This change is necessary due to Docker image import requirements. Docker images can be developed locally or imported from external sources.
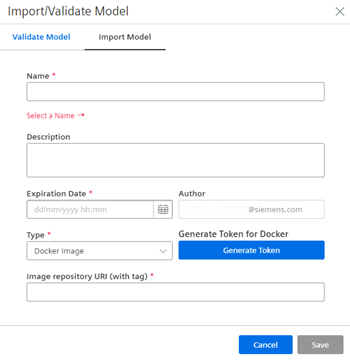
Clicking Generate Token provides temporary session credentials for uploading Docker images to the Docker registry. This process ensures secure and high-performance access to your Docker image. After upload, the system stores a secure private copy accessible only by your tenant. The system also attaches execution metadata, maps inputs and outputs, and enables log display during execution. Click Generate Token:
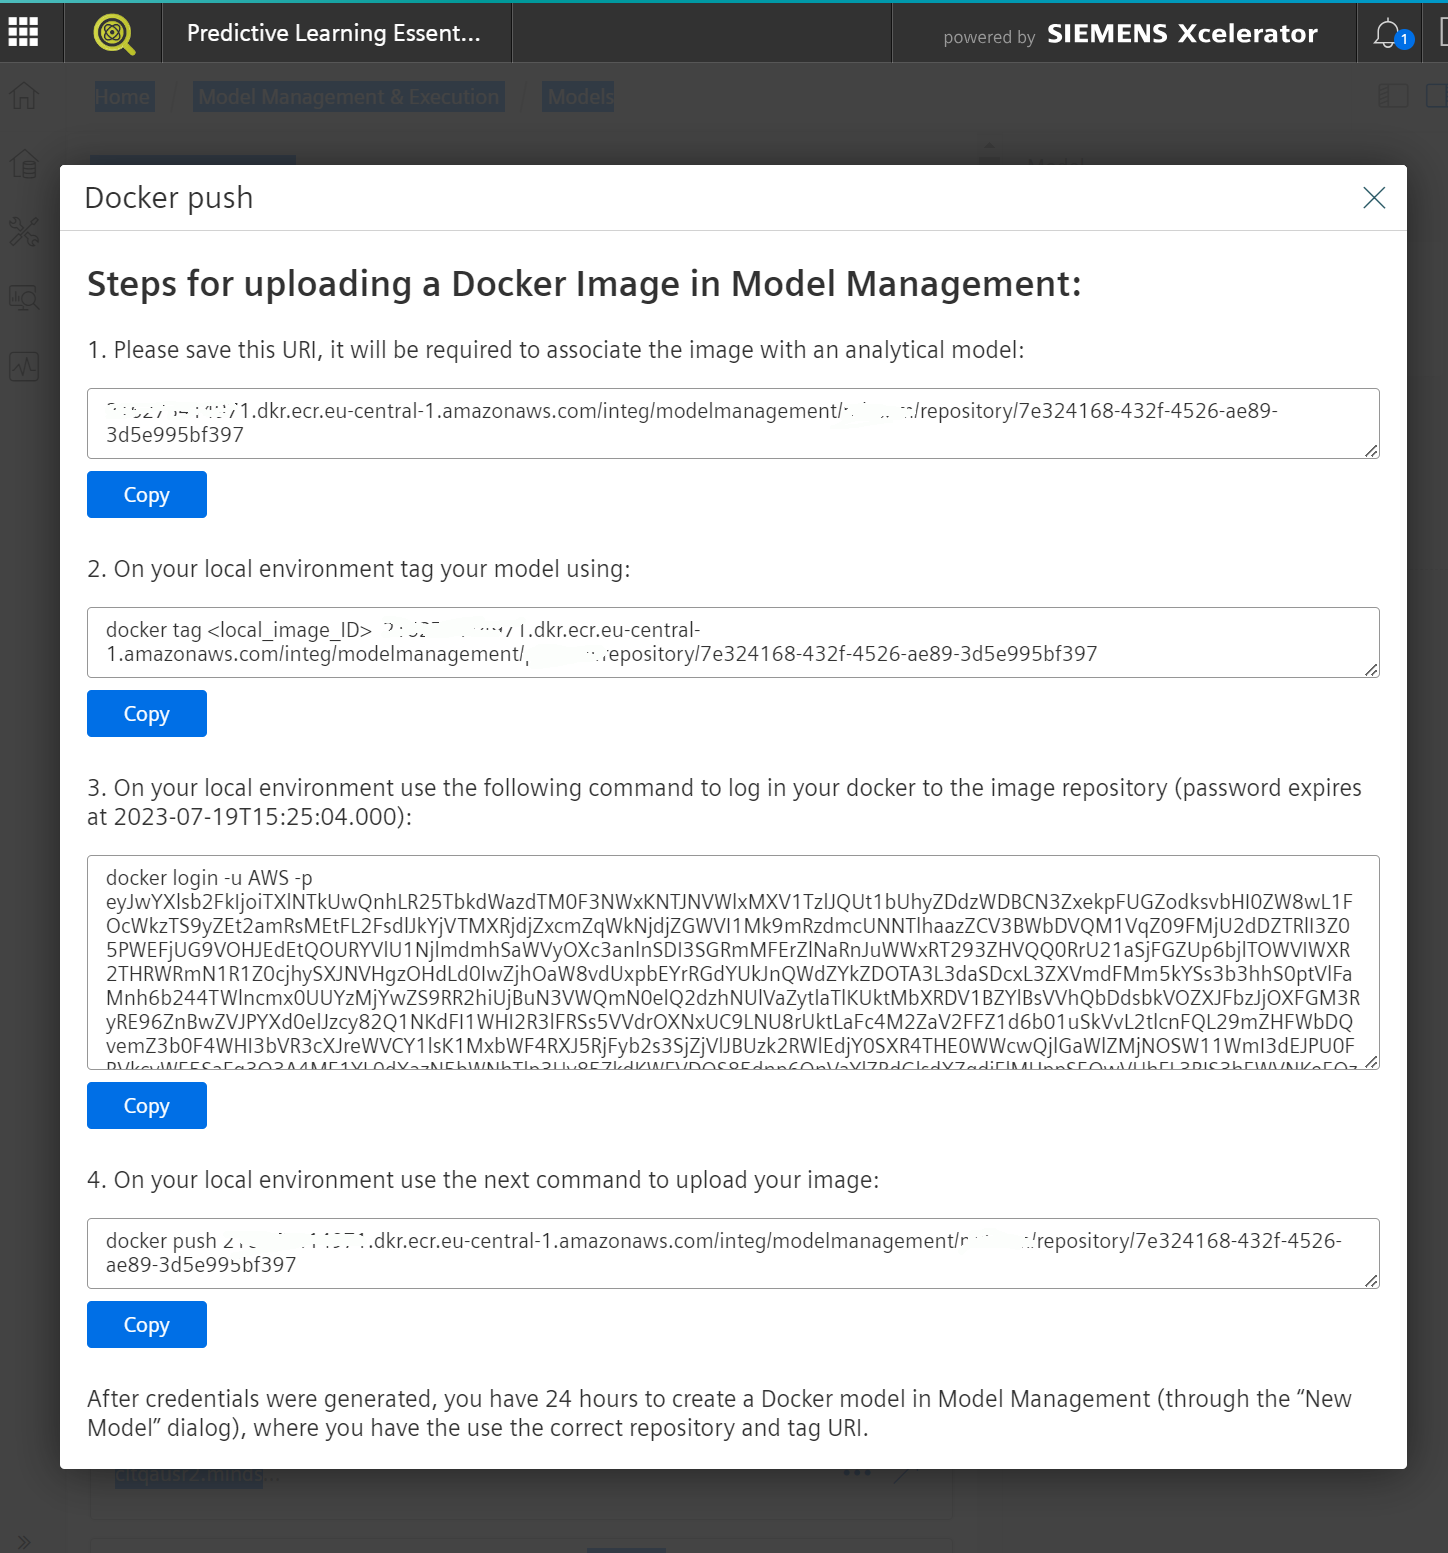
Docker images are typically large files containing complete operating system setups with custom additions. This structure enables environment replication and execution across external environments including public or private cloud platforms. Docker images use hierarchical layers and contain metadata for external interaction and container engine communication. Images are built using Docker-compliant engines following instructions in a Dockerfile. The Docker engine compiles these instructions into distributable images that can be instantiated as containers by any compliant engine. Image building typically uses command line interfaces, and the same Docker-compliant command line is required for system uploads. The popup instructions target Docker CLI usage.
Explanation of Popup Fields
- Reference URI: The system designates a URI indicating your Docker image upload destination. This URI is immutable - changing it prevents the system from locating your uploaded image.
- Local image tag: Tag your local image following the provided instructions. Replace
<local_image_ID>with your actual IMAGE_ID found using the "docker images" command under the IMAGE_ID column. - Registry login: Log into the Docker registry using the provided command. Expand the textbox containing the session string to view the registry destination.

- Push image: After successful login, upload your local Docker image to the registry using the command from this step.
Close the popup after completing the upload.
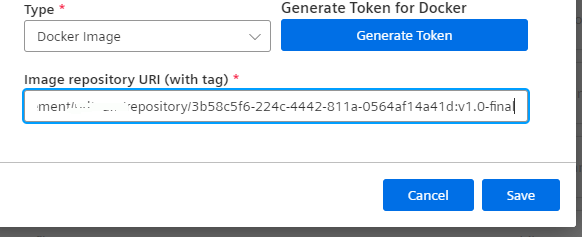
Your local image may include a tag (the string following the URL after a colon, such as "URL:tag"). Tags help denote versions like "v1.0.1" or "final-v1.0". If your tagged image from step 2 includes this tag, paste the complete URL from step 1 into the "Image Repository URI (with tag)" field after closing the popup, including the tag as shown below.
Click Save only after completing the Docker image upload.
Clicking Save instructs the system to verify the Docker image existence in the registry and validate its integrity.
Docker Image Download Process
Download previously uploaded Docker images using similar steps to the upload process. Instead of pushing, you can download (pull) Docker images after establishing a valid temporary session with the Docker registry. From the Models list, click the ... button and select Download model from the action menu. This downloads an access session as a JSON file rather than the actual image. The JSON file contains the keys needed for registry login.
Use Docker CLI with a command like docker login -u AWS -p <password> <registry> where <password> and <registry> are provided in the downloaded file. After logging in, use docker pull <uri> where <uri> is also provided in the downloaded JSON file.
The JSON file contains two authentication set of keys for two interfaces:
- Docker credentials: Located under the "credentials" key, contains "user" and "password" for Docker CLI registry connection.
- AWS credentials: Located under "providerCredentials", contains "accessKey", "secret", and "sessionToken" for AWS CLI.
The second option enables AWS CLI tools for image interaction, providing additional but AWS ECR-limited functionality compared to Docker CLI (such as docker image scanning). Explore capabilities directly through AWS CLI after registry login.
New Model Validation Process
Model validation begins with the Import/Validate Model dialog.

To develop a new model, complete these steps:
- Click Add/Develop Model on the Landing or Models page. The Import/Develop a Model dialog opens.
- Ensure you are on the Develop a New Model tab.
- Select an environment from the dropdown list and click Start.
- When the environment configuration shows Running status, click the arrow icon. Your environment opens in Jupyter Notebook.
Model Execution Process
Model execution involves running analytical models against source data within specific environments. This process is also referred to as "running a job" in Predictive Learning.
Basic PrL job execution requires configuring:
- Input: Source ___location from which PrL reads job data
- Output: Destination ___location where PrL writes job results
- Model: Mathematical model that processes the input data
- Environment: Start and stop environments for job execution
File System Restrictions for Model Validation and Job Execution
- Users cannot create files or folders in Jupyter notebooks and Docker containers during model validation and job execution, except in specific directories.
- The file system operates in read-only mode during model validation and job execution, with the exception of the
/tmpdirectory. - All new files or folders created during model validation and job execution must be placed in the
/tmpdirectory only.
PrL Model Execution Steps
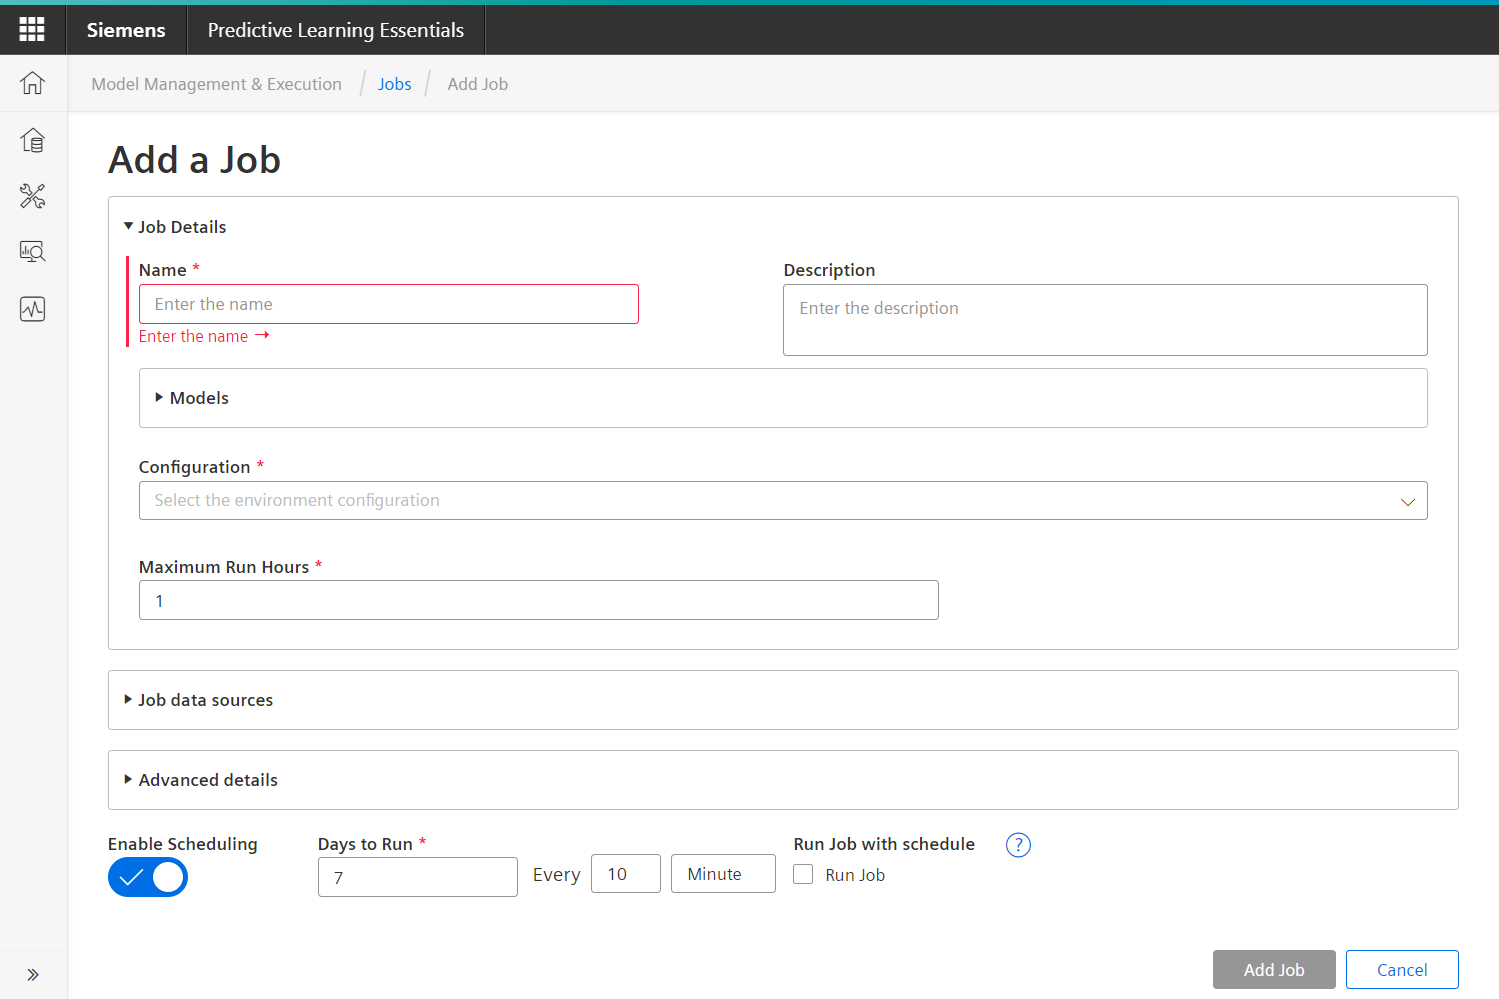
To execute your model, complete these steps:
- Click Add Job in Quick Actions.
- Enter a name and optional description.
- Select a model from the dropdown list.
- Select an environment configuration from the dropdown list.
- Select data sources for input and output.
- Before clicking Add Job, refer to Adding a Schedule to a Job if you want to schedule the job.
- Click Add Job.
Note
In LPC environments, each model runs in its own pod with no maximum limit based on resource availability within kubernetes cluster nodes.
A known limitation occurs when pods cannot start due to node unavailability, remaining in "Pending" state, which impacts operational efficiency and application performance.
Scheduled Model Execution
PrL jobs can run on-demand or on scheduled intervals for specific durations. Schedule configuration must be completed during job creation.
Schedule Configuration for Jobs
The Enable Scheduling toggle is located at the bottom of the Add a Job page.
To add a schedule to a job during creation, complete these steps:
- Slide the Enable Scheduling toggle to the right.
- Enter a number in the Days to run field.
- Select a time increment from the dropdown list.
- Click Add Schedule.
Note
- Quick boot-up environments support a minimum 5-minute scheduling interval, while moderate boot-up environments require a minimum 1-hour interval.
- Scheduling functionality is available on AWS platform only.
Advanced Docker Model Configuration
Docker models support additional customization through these settings:
- External reference IDs
- Start Command
- Maximum Run Hours
- Environment Variables (key/value pairs)
- Entry Point
- Scheduling
Docker Job Advanced Settings Configuration
All advanced option fields are optional except Maximum Run Hours. To configure advanced options for a job, complete these steps:
- Click Advanced Details.
- Enter an optional external reference ID.
- Click the icon in the Environment Variables field to add Key/Value pairs in the popup window.
- Click OK.
- Enter a Start Command and Entry point.
- Enter a number in the Maximum Run Hours field.
- Click Add Job.
Except where otherwise noted, content on this site is licensed under the Development License Agreement.