Tutorial

This tutorial provides an hands-on of all involved components of the Prodction Copilot.
Introduction
Purpose and audience
An agent is an AI-powered assistant that helps users to complete tasks. It is typically invoked by a user question (prompt). This tutorial provides step-by-step guidance for creating and configuring a custom agent within Insights Hub. It is designed for users who:
- Have basic familiarity with Insights Hub
- Want to understand and implement their own agent(s)
- Need to customize and extend agent capabilities for their specific use cases
Learning objectives
By completing this tutorial, you will:
- Understand the fundamental concepts and components of an agent
- Learn the required configuration steps to set up a basic agent
- Gain practical experience in extending agent functionality
- Be able to implement best practices for agent development
Prerequisites
Before starting this tutorial, you should:
- Have an active Insights Hub account with appropriate permissions – Production Copilot is available in all Insights Hub Basic and Advanced Packages.
- Be familiar with basic navigation and features of Insights Hub
- Be familiar with setting up basic flows via Visual Flow Creator (at least you should be able to import a predefined flow).
- Understand fundamental Insights Hub data concepts and how they are applied within your organization. E.g.: How are assets structured in Asset Manager? What are events? What are cases?
Required roles
That everything works smoothly the following roles are recommended as minimum:
mdsp:oi.copilotAdminmdsp:core:oi.creatormdsp:copilotstudio.adminmdsp:launchpad.user
Time investment
This tutorial takes approximately:
- 30 minutes to read
- 2 hours to complete the hands-on exercises
- Additional time for experimentation and customization
Project Overview: Shopfloor Agent
What we will build
In this tutorial, we will create an intelligent agent designed to:
- Monitor the critical equipment in your plant
- Provide quick overview of equipment status
- If possible, generate actionable recommendations for maintenance and operations
Functionality
Our Shopfloor Agent will:
- Connect to equipment and collect the current asset state
- Connect to Insights Hub events and cases data, and collect relevant information
- Analyze the collected equipment status as well as the event and case data
- Identify potential issues and generate targeted recommendations
- Present information in an easily digestible format
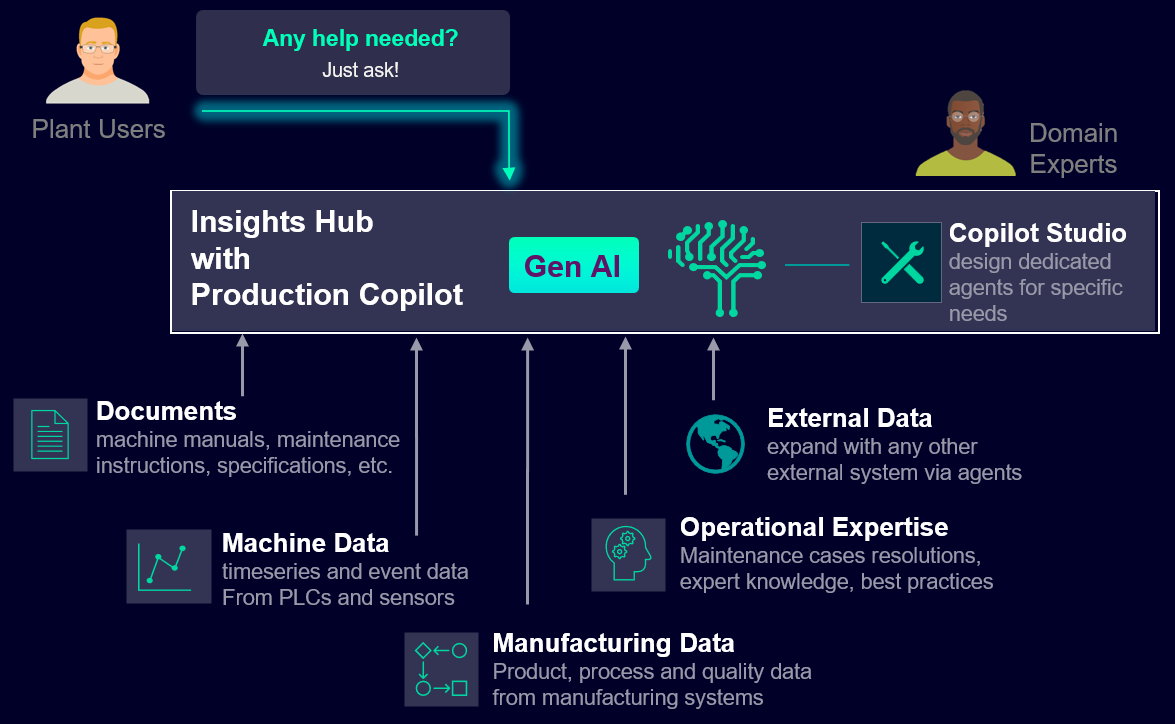
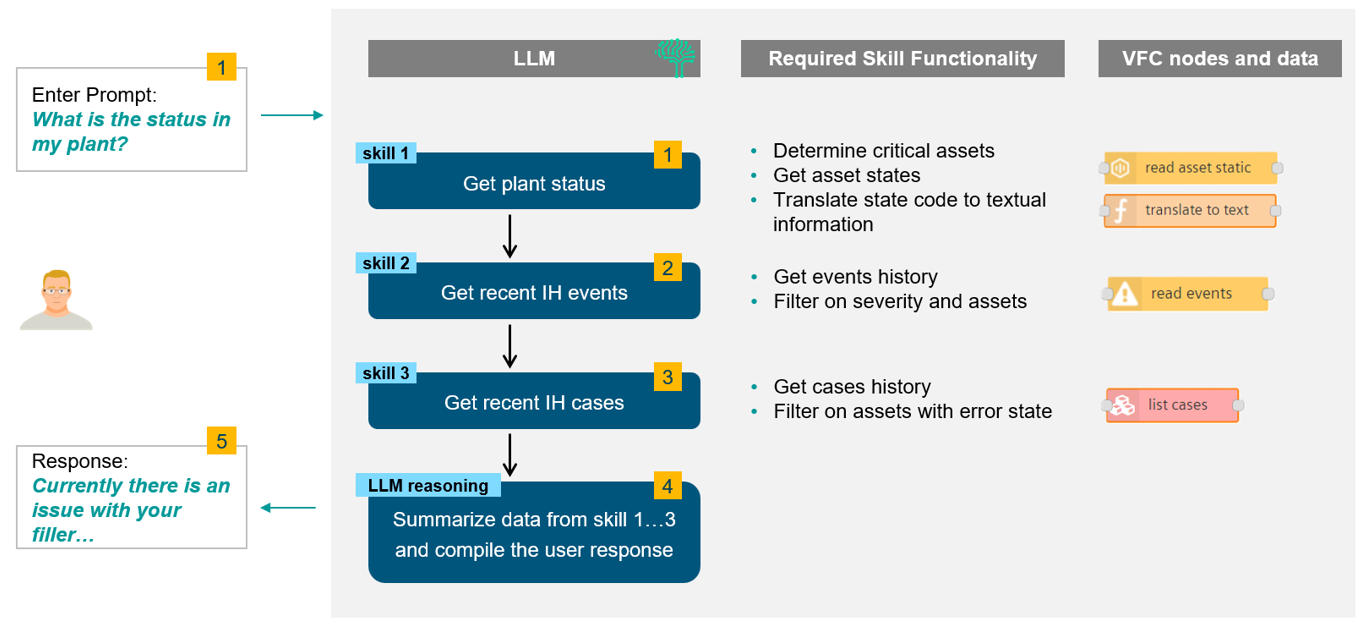
How does that look for our specific example in this tutorial? Here is an overview:

How does the agent process user queries?
Let us explore how the agent handles a simple question like "What is the status in my plant?". When a user asks this question, the agent follows a structured process:
- First, it analyzes the query and determines that additional data is needed to provide a complete answer. To gather this information, the agent activates specialized functions called skills. -In the Insights Hub environment, these skills are implemented as Visual Flow Creator (VFC) flows, making them highly customizable and maintainable. More on that later.
- Each activated skill retrieves current data from Insights Hub and returns it to the Large Language Model (LLM).
- The behavior of the agent is guided by the provided system instruction
- The LLM then processes all the collected information and composes a comprehensive response for the user.
How can you implement this functionality?
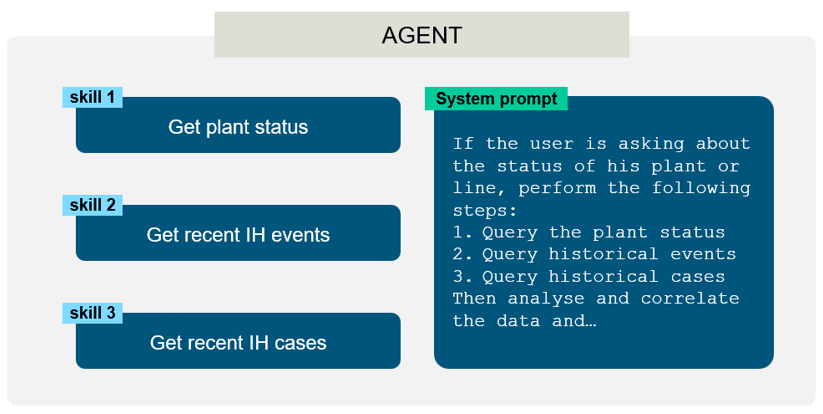
In essence, an agent is built from two key components: a collection of skills and a system instruction. This means:
- First, you will need to configure the necessary data collection and/or pre-processing skills. These skills will query the data within Insights Hub and/or external systems, and pre-process it if required. Several pre-configured standard skills are provided to help you get started.
- Then you create the system instruction, which guides the behavior of the LLM by providing instructions on how to handle different scenarios and how to use this data. Not every detail needs to be described in the instruction – the LLM will be able to solve many use cases and user questions using the skills provided.
Once your agent is configured and tested, you can make it available to other users within your tenant. We come to that in a minute.
Best practices for agent design
While both skills and system prompts are customizable to meet your specific needs, following certain guidelines will help you create more effective agents:
- Keep your agents focused and purposeful. Rather than creating a single all-purpose agent, develop dedicated ones for specific use cases. For instance, instead of combining plant status monitoring and machine downtime analysis in one agent, create two separate ones, each specialized for its task.
- Complexity is the enemy of reliability. The more intricate your instructions become, the higher the risk of receiving lower-quality responses from your agent.
- Make sure your skills return the relevant data only. Try to aggregate and filter to limit the amount of raw data that needs to be processed by the LLM.
- If you need to process numerical data, create a skill to do that. LLMs are not good at processing numbers.
To maintain optimal performance, work within these practical limits:
- Maintain fewer than 10 skills per agent.
- Keep your system prompt under 500 words, and use clear, straightforward instructions. This is a recommendation, not a hard limit.
- For now, the number of agents that you can create is limited to 20 per tenant.
- You can find more best practices and guidelines in the Appendix.
Agent setup
The system instruction
The system instruction guides the LLM's behavior when answering user questions. Consider the following example for our agent:
If the user is asking about the status of the plant or line, perform the following steps:

1. Query the plant status
2. Query historical events
3. Query historical cases
Use the provided tools for steps 1 to 3.
Then analyze and correlate the data and provide the result to the user. Use bullets to structure your response. If no errors are present, answer with "Your plant is running smoothly".
This is a simple and generic example. Test it with your data and refine it as needed. In the section Create the Agent we'll see where and how you use this instruction text.
Skill flows
In the Insights Hub environment, skills are implemented as Visual Flow Creator (VFC) flows. VFC is a no code / low code tool to create data processing flows. You can create, manage, and test skill flows just like any other VFC flow. If you're new to VFC, check out the documentation and VFC QuickStart tutorial here.
Skill flows have two essential components:
- A
skill triggernode as the starting point - A
skill responsenode as the endpoint
Between these two required nodes, you have complete flexibility to configure the flow according to your needs. You can query Insights Hub data, but also external data. Here is an example skill flow that queries the current electricity cost:

Please note that you may want to add an inject node as a manual trigger node in parallel to the skill trigger node to help with testing. The same holds true for a debug node in parallel to the skill response node.
You can test the data returned from your skill flow within the VFC editor – just trigger it manually and watch the debug output.
VFC Copilot
Note that a Copilot is available to help you configure VFC flows. You can start it by selecting the 'Copilot' tab on the right hand side of the editor.
Predefined skill flows
To get you started quickly, we have prepared a few skills that are frequently used to build agents. E.g.
- SearchDocuments: this skill enables your agent to search documents. Documents must be uploaded to IDL, and must be tagged with "copilot". For more information refer to the documentation.
- GetEvents: this skill enables your agent to query Insights Hub events. By default, the query will be limited to the last 7 days and to a maximum of 100 events. No severity or asset filter is applied. You can modify this behavior within the VFC flow as required.
- GetCases: this skill enables your agent to query Insights Hub cases. By default, the query will be limited to the last 50 cases. No severity or other filter is applied. You can modify this behavior within the VFC flow as required.
- You can also enable your agent to query an external webservice. Skills can provide any kind of textual data to the LLM – you are not limited to Insights Hub specific sources. The GetEnergyCost skill outlined below is an example for such a use case.
Refer to the Appendix of this document. You can simply download the flow sources that are listed there and import them into your own tenant’s VFC. To do so, select the VFC burger menu, then "Import".
Skill flow parameters
If required, flows can be called with parameters. The LLM will determine the correct parameters and format and call the skill accordingly.
Example: if the user is troubleshooting a certain machine, the agent will know the machine’s name and ID and can pass this information to the skill.
Check the example "Create New Tool: createNewCase" in the provided Bruno sample collection and VFC flow to see how parameter passing works.
Prepare the flows
TUTORIAL STEP 1
Now let us go ahead and prepare the required skill flows for our agent: (download them here and import them in VFC – see also chapter "Use the sample VFC flows")
GetPlantStatusGetEventsGetCasesGetEnergyCost
Configure these flows in your tenant’s VFC or go ahead and download and import them. Leave the flows as they are or modify them according to your requirements. Make sure to test each flow by entering its trigger node URL into a browser window as described above. The examples below do not require authentication. In a real-world setup, the URLs would be access protected.
Example data
If desired, you can skip this step and simply use the provided URLs that return some example data. In the next section we will explore how these skills are used for our new agent.
Before we do that, here a few details and sample output for each of these skill flows:
Skill 1: GetPlantStatus
- Functionality: The flow queries the status of 3 critical assets, and translates the resulting status code into textual information. Please refer to the Insights Hub documentation for details on asset status codes and their meaning.
- Skill description: This skill gets the current status of the plant, as input for further analysis. The status comprises the operating state for the critical machines and equipment in the format machine-name: machine-state.
- Example data output:
[ "Stencil printer: OK", "SPI machine: OK", "SMT placing: error" ]
Skill 2: GetEvents
- Functionality: The flow queries the events from the last 24 hours, filters the last 50 events, and maps the event status codes to text. We do this because texts provide more information to the LLM compared to status code numbers.
- Skill description: This skill gets the recent events of the plant as a list of texts. Each list entry has a timestamp, severity, title, and description. The title refers to the asset that was the source of the event. Events provide information about historical issues or problems with machines in the plant and can help to find solutions to current problems.
- Example data output:
[ { "timestamp": "2025-01-15T14:19:17.582Z", "description": "temperature above 80 degrees", "severity": "warning" }, { "timestamp": "2025-01-15T14:13:17.310Z", "description": "Temperature of Anode 1 is too high - Pls. check before next shift", "severity": "warning" }, … ]
Skill 3: GetCases
- Functionality: The flow queries the status of the recent cases and limits the response to the last 50 cases.
- Skill description: This skill gets the cases history as a list of texts, with datetime, title, description, and type for each entry. Cases contain knowledge about existing problems in the plant and can help to find solutions to current problems.
- Example data output:
{ "createdDate": "2024-12-09T15:57:29.357Z", "title": "Senseye case 2024-12-09 15:57 UTC", "type": "INCIDENT", "priority": "LOW", "description": "Threshold violations on measure RMS_Velocity on sensor over the past three days. Threshold failure mode: Damaged. Threshold_description: Vibration is too high.", "handle": "AA-633" }
Skill 4: GetEnergyCost
- Functionality: The flow queries a public API and returns the latest energy cost in €/MWh for the Karlsruhe region in Germany (you can change the region within the VFC request).
- Skill description: Returns the current energy cost in EUR / MWh.
- Example data output (test via copying the URL into your browser address bar)
{ "232.9 EUR /MWh" }
This skill shows that your agents are not limited to Insights Hub data – but can reach out to the external world as required. If needed, you can authenticate your external requests via basic auth. In this case, use an http-request node within your flow to get the external data. Check the documentation of the http-request node for more details.
Create the agent
Now we are ready to put everything together: We will bundle the skills and the system prompt into our own agent.
Setup in Copilot Studio
Copilot Studio is a configuration tool that supports the agent configuration. It allows to display the configured agents and skills, and all related settings. Wizards help to create new agents and skills in a comfortable way.
Start Copilot Studio via the Launchpad.
Register your skills
TUTORIAL STEP 2
- Navigate to
Manage skillsand start the wizard by clicking onCreate Skill

- Fill in the required fields and use the url from your vfc skill - vfc skills require POST as http method.
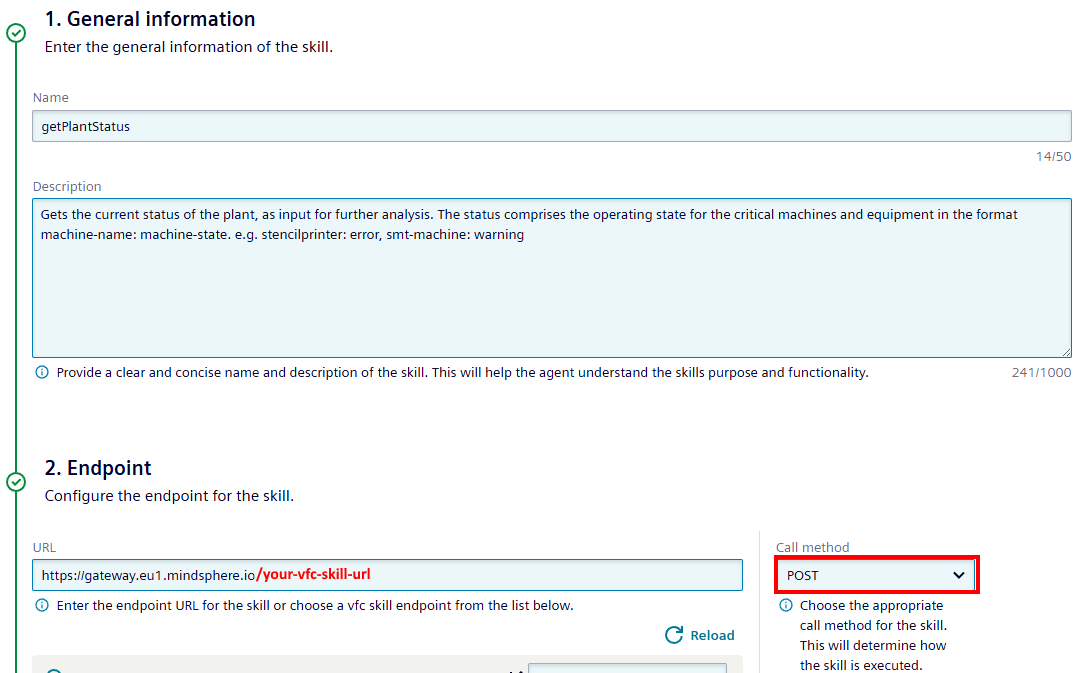
Skill descriptions
Take note of the skill descriptions – this is a critical part, to ensure that the LLM will know when to activate your skill. You may need to improve the skill description if you find that the agent does not respond as expected (see STEP 4 below).
Skill descriptions should be clear, concise and indicate the expected output data and format to the LLM.
- Check the summary and save the skill.
- Now also register the other skills
GetEvents,GetCases, andGetEnergyCost.
Register your agent
TUTORIAL STEP 3
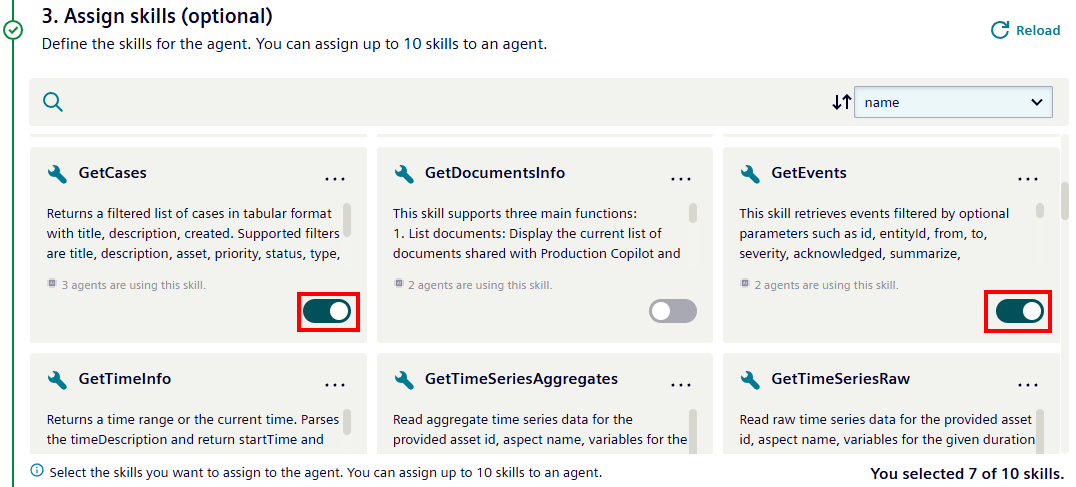
Now that your skills are in place, it is time to assemble them into an agent.
- Navigate to
Manage agentsand start the wizard by clicking onCreate Agent

- Fill in the required fields
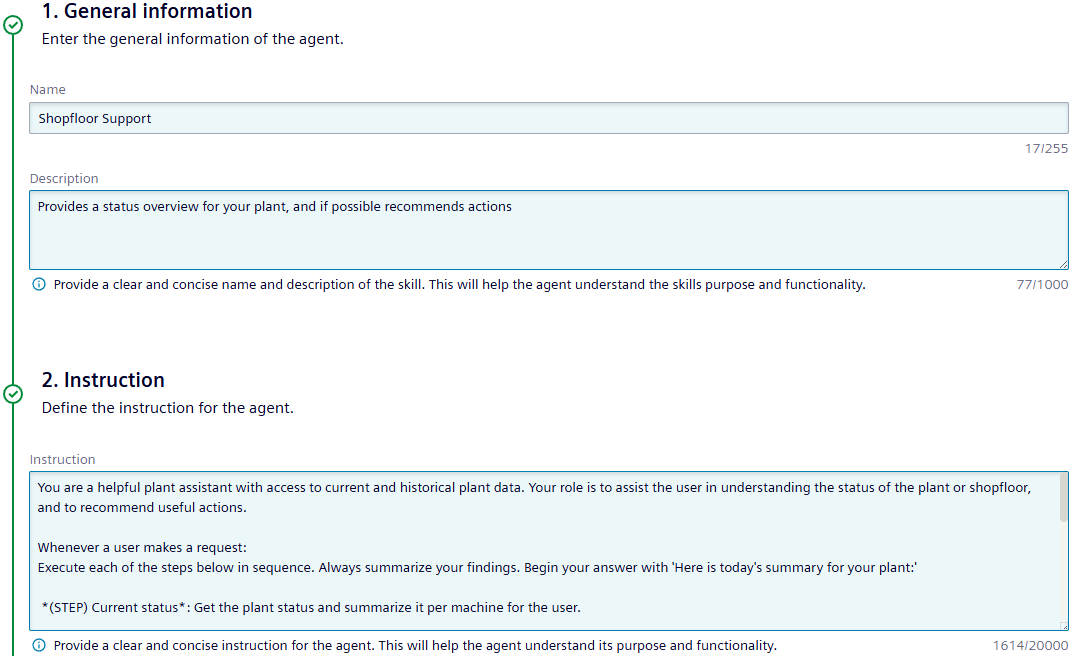
System instruction
The system instruction is a critical part, it will guide the behavior of the LLM when the user is asking questions. This instruction is something that you may need to tweak if you find that the agent does not respond as expected (see STEP 4 below).
- Check the summary and save the agent.
Summary: Configuration overview
Here is a brief overview of what we have achieved so far:
- We have created skills via VFC. Each skill has a URL assigned, and returns data when called
- We have registered these skills within the system
- We have assembled these skills together with a system instruction into an agent
Now: let us test!
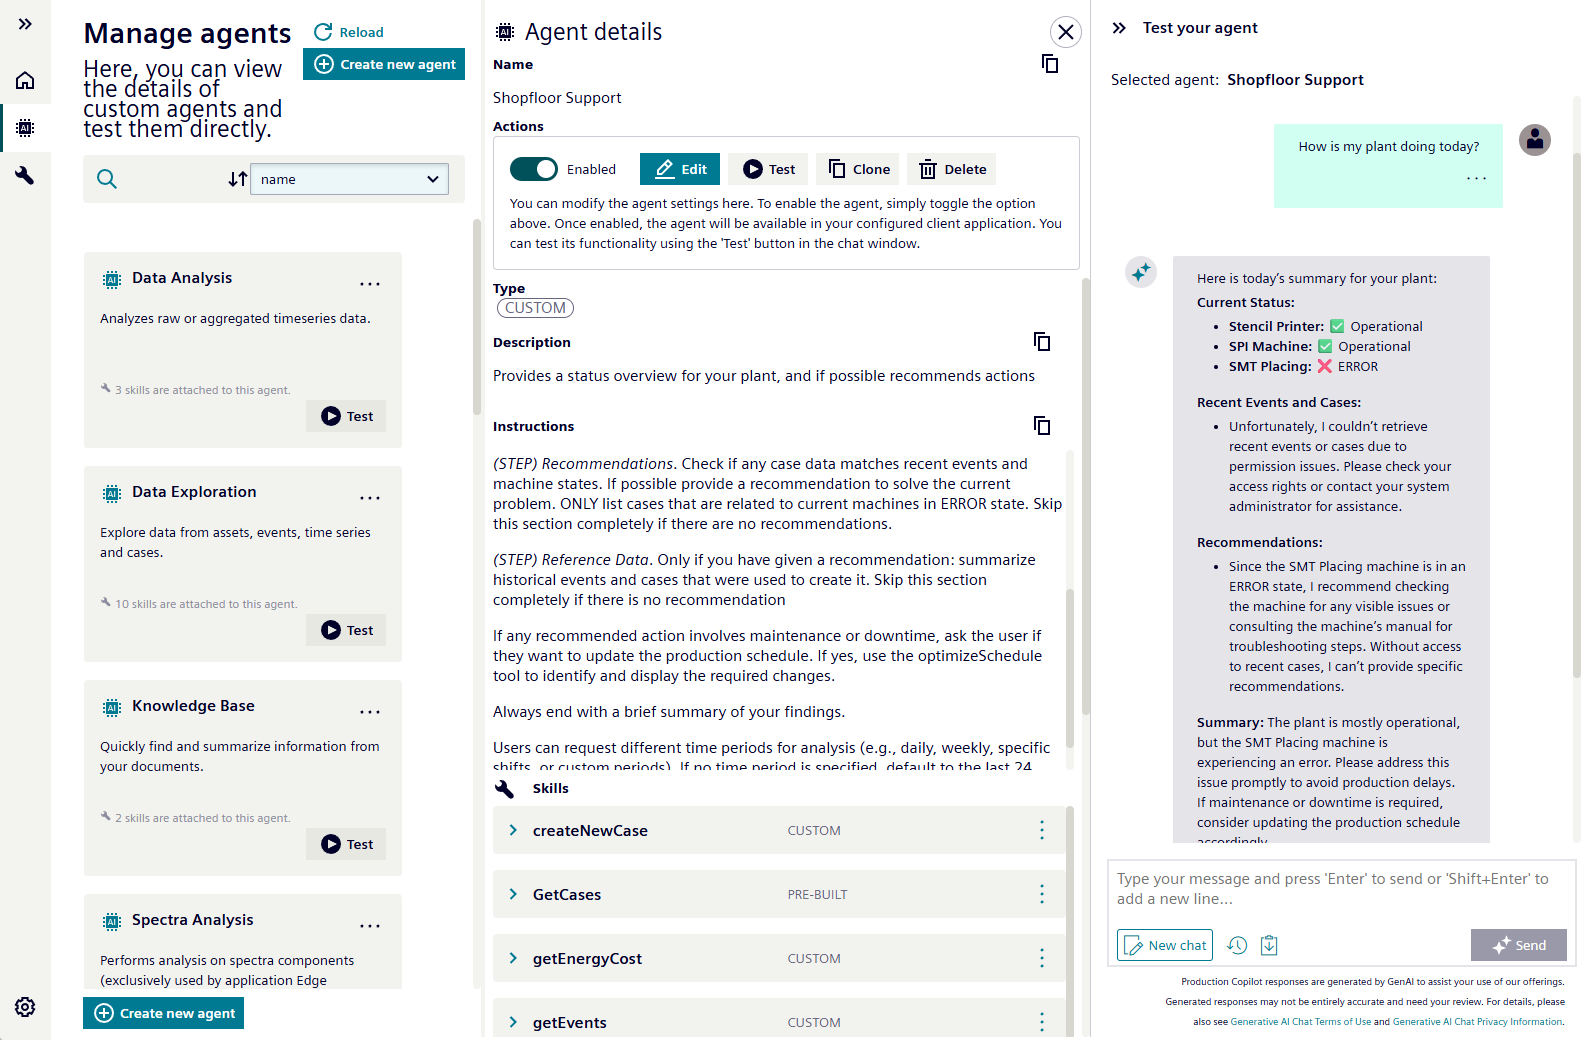
Test your agent
TUTORIAL STEP 4
We are now in the final Tutorial STEP 4 and want to test the new agent.
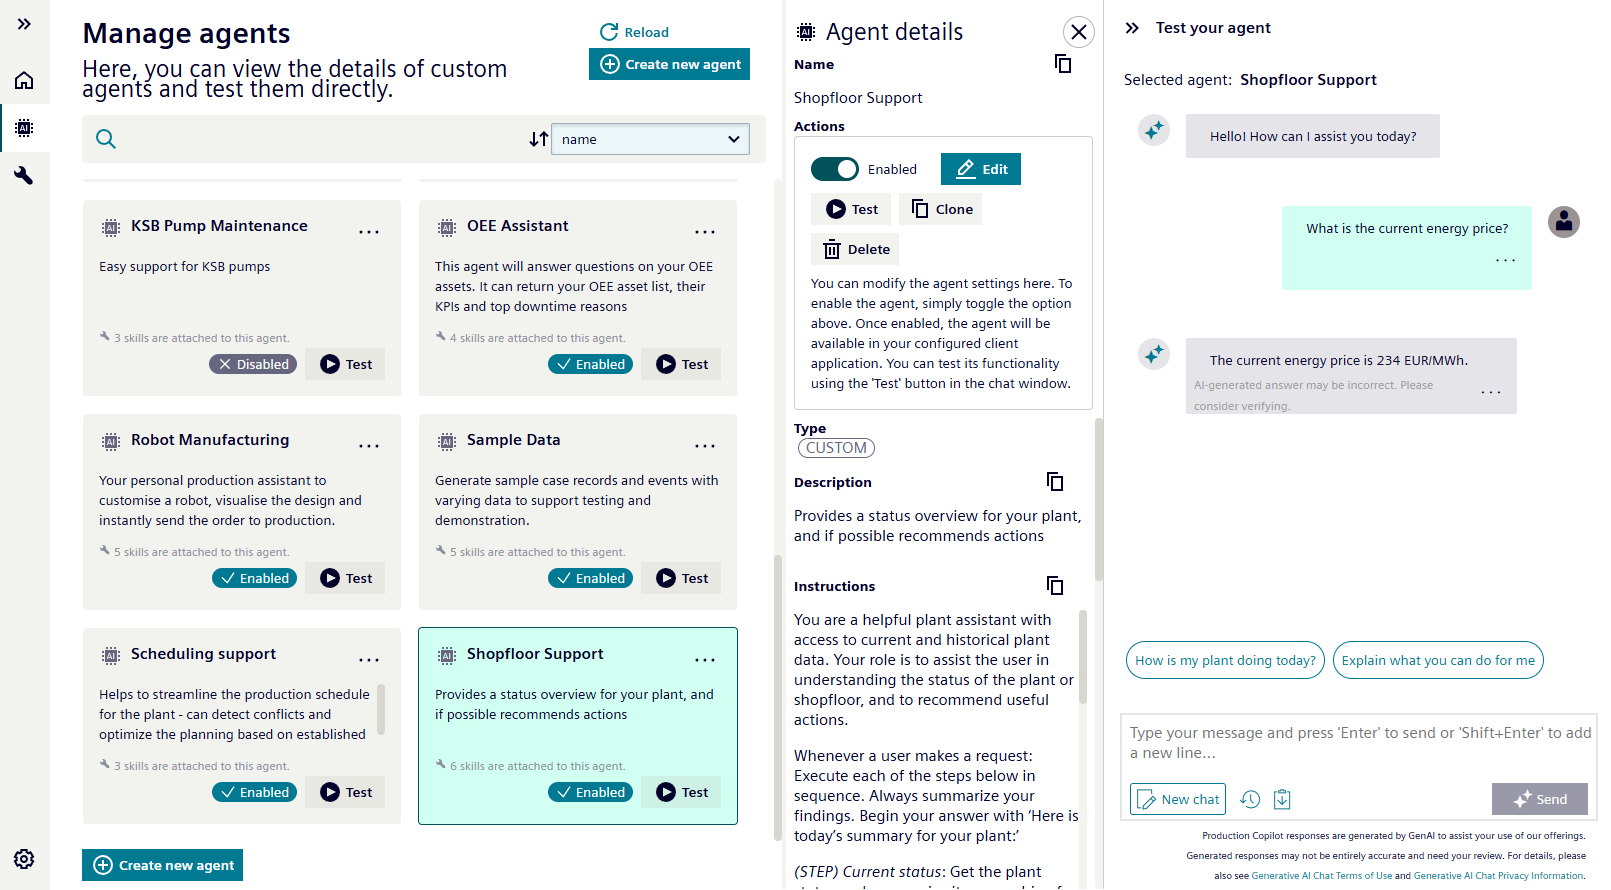
- First we open Copilot Studio from the Launchpad > System Tools.
- In
Manage Agentsyou can select the agent. - The details panel shows the possibility to test the agent

For example, you can ask:
- "What is the status of my plant?"
- "What is the current energy cost?"
- "Summarize recent events"
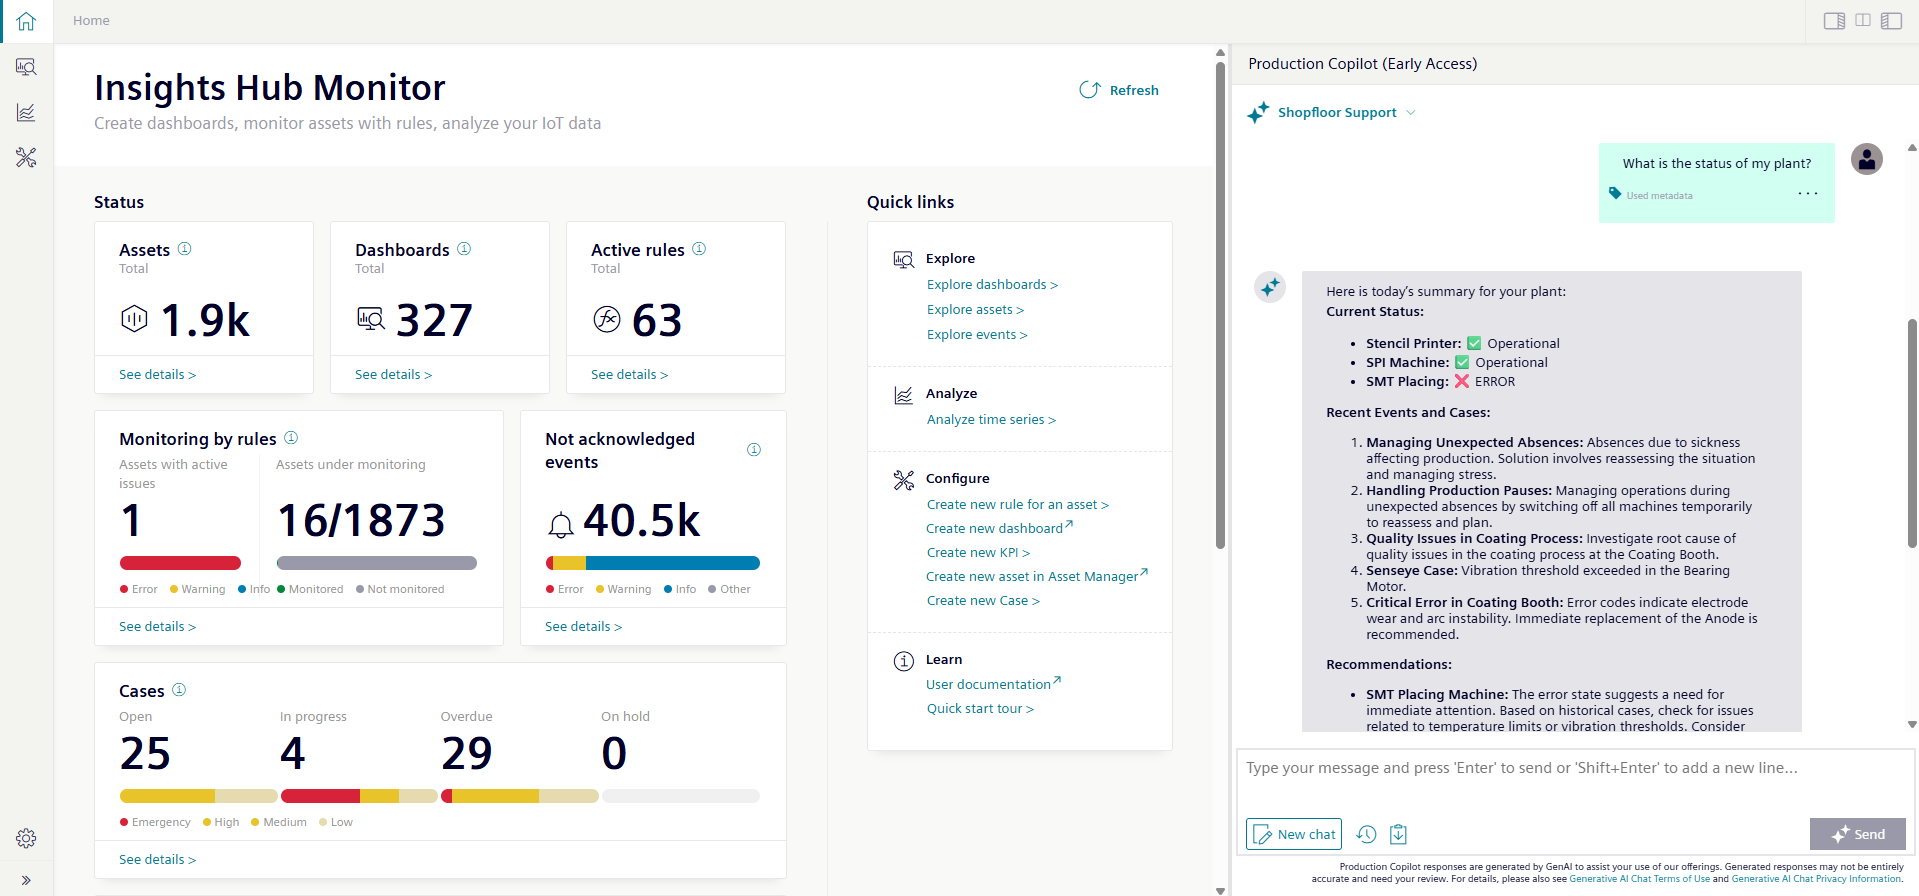
Now you can make this agent available in Insights Hub Monitor.
- Enable the agent in the detail panel

- Afterwards you can open Insights Hub Monitor and the same agent will be usable in the dropdown
Enabled agents
Please note, that only enabled agents are shown in Insights Hub Monitor.
As long as they are not enabled, they are meant to be tested within Copilot Studio.
Fine tuning
To improve the agent responses, you will need to modify and improve your skills, your skill descriptions, and/or your system instruction. Use VFC and updates via Copilot Studio to do so with the integrated wizards.
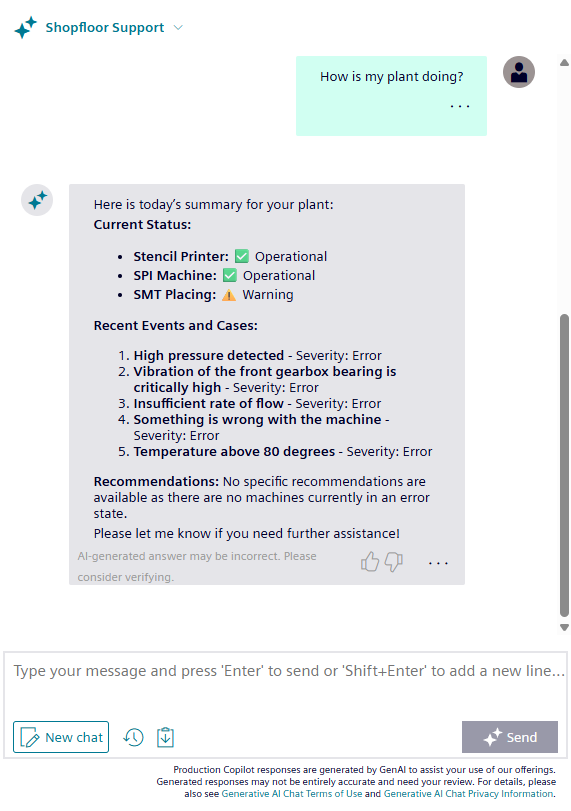
Example 1
Here is an example response to the question "How is my plant doing?". For your tenant, the response may be different – it will depend on your current data, particularly the asset status, the events and the cases in your tenant.
Here you can see that the agent was not able to provide a recommendation – there was simply no historical data to support this.
Example 2
Now let us add some sample data, to highlight the dynamics and capabilities of the agent.
We go to the Insights Hub cases. Cases are a lean "ticket system" that helps the plant staff to keep track of open service topics. It can also serve to capture issue resolution measures for later reference. This is what we will do now:
Here is the cases overview:
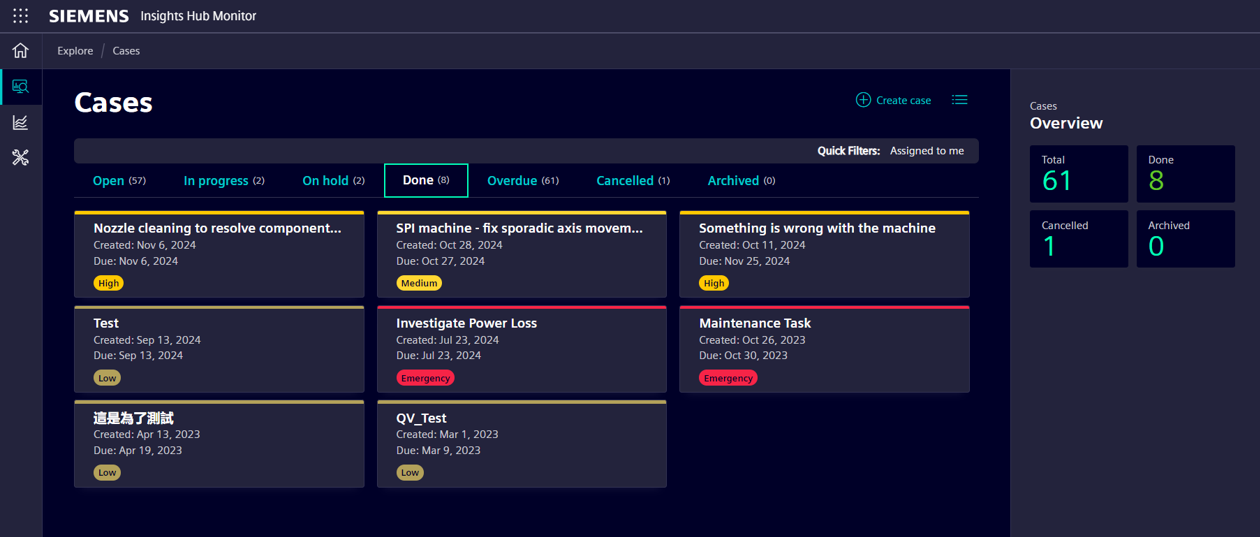
Let us add a new case which corresponds to the existing sample data, see the "Vibration issue" in the list of "events" from example 1:
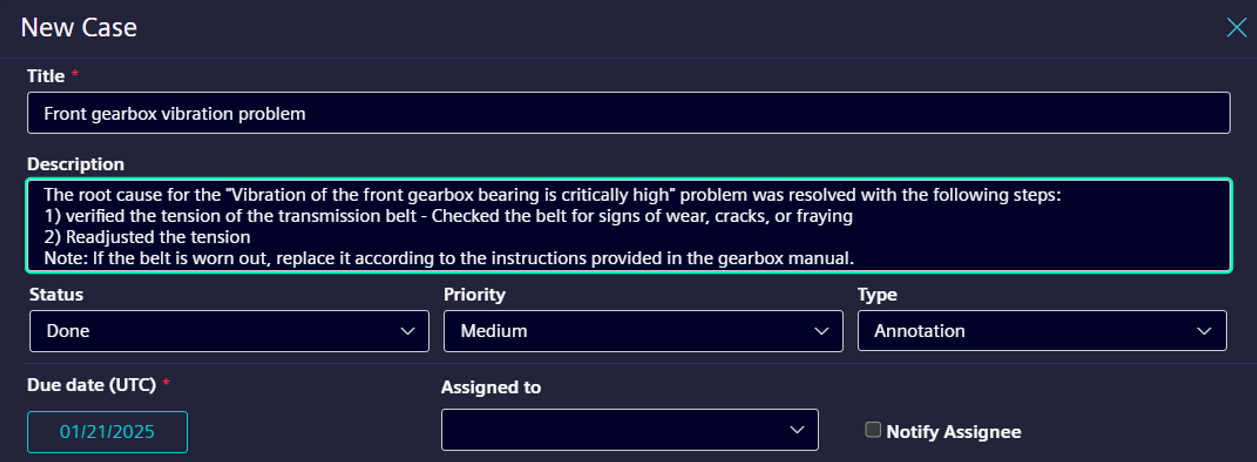
Now the case has been added to Insights Hub.
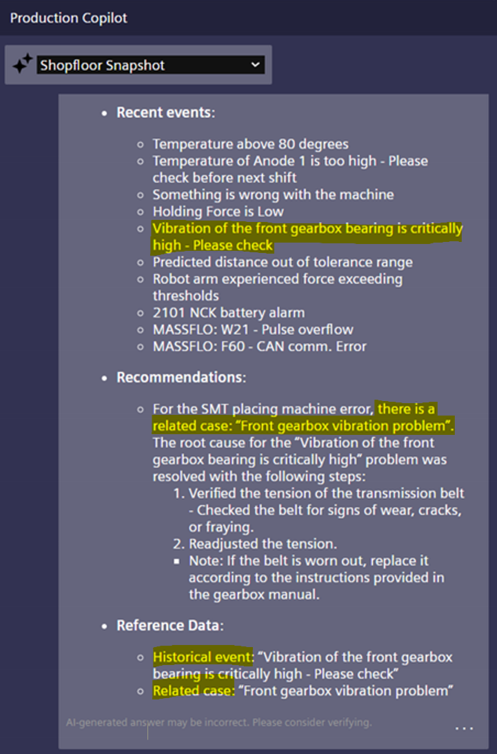
Now, let us ask the agent again. Here you see that the agent was able to create a recommendation:
New Chat
After you modify the agent configuration, make sure to select "New chat" in the chatbot window. This will ensure that the new agent configuration is taken into account.
Debugging
Maybe you ask yourself how did this response work? How has it been generated? Or which skills/tools do my agents have?
You can ask that directly in the chat.
Helpful questions in the chat are:
"What tools do you have?"- to check if the agent is properly configured"What tools did you use?"- to analyze after an answer, which tools the agent used to generate this answer"What was the tool’s output"– to analyze the output of the tool if the answer is plausible
In Visual Flow Creator the following nodes may be helpful:
debug– to check e.g. the payload which is forwarded from the agent to the flow (link the debug node to the start node), or from the flow to the agenttrigger– to manually input some testing data to validate your flowfunction– to do some javascript magic and transform the payloads for your needs
Sharing your agent
Once your agent is configured and tested, you can make it available to other users within your tenant.
End users can interact with the agent by simply asking questions, without needing to understand any of the technical configuration behind it. The users just have to select the related agent in the dropdown menu of the chat component.
This makes agents an excellent tool for providing simple access to complex plant data and other functionality across your organization.
Congratulations, you have now finished your first custom agent creation in Insights Hub.
What are your agentic AI ideas and use cases?
Appendix
Best practices
We have already seen a few best practices for effective agent configuration during this tutorial. Here is a summary.
General guidelines
- Keep your agents focused and targeted. Rather than creating a single all-purpose agent, develop dedicated ones for specific use cases.
- For instance, instead of combining plant status monitoring and machine downtime analysis in one agent, create two separate ones, each specialized for its task.
- Complexity is the enemy of reliability. The more complex your agent becomes, the higher the risk of receiving lower-quality responses.
- Do not assume that agents can magically solve all problems because they have an LLM behind them. Think of agentic AI rather as an extension of existing functions and capabilities.
Guidelines for the system instruction
- Try to keep your system instruction under 500 words, and use clear, straightforward instructions. The more complex your instruction becomes, the higher the risk of receiving lower-quality responses.
- Use positive language, avoid saying what the agent should NOT do. Instead, say what it should do.
- Start simple and add additional instructions only if necessary.
Guidelines for skills
- Write clear and detailed descriptions, function names, and parameter descriptions.
- Explicitly describe the purpose of the function and each parameter (and its format), and what the output represents.
- If you need to process numerical data, create a skill to do that. LLMs are not good at processing numerical data.
- Make sure your skills return only the relevant data. Try aggregating and filtering to limit the amount of raw data the LLM must process.
- Return data in csv format rather than in json format – csv is slightly more efficient.
- Try to maintain less than 10 skills per agent.
- Test your skills "stand alone" before integrating them with your agent.
- Write clear and concise skill descriptions – this is a critical part, to ensure that the LLM will know when to activate your skill. Skill descriptions should state the purpose of the skill, and the expected output data. You may add an example.
- Offload the burden from the model and use code in skills where possible. Don't make the model fill arguments you already know. Combine functions that are always called in sequence. For example, if you always call check_temperature after get_temperature, just move the check logic into the get function call.
- Pass the grandma test. Could your grandma correctly use the skill given nothing but what you gave the model? If not, what questions would she ask you? Add this to your descriptions.
How to design an agent
You may find the following steps helpful in designing your agent-based solution in a systematic way.
- Describe the problem you want to solve. Write a few bullet points to make sure everyone is focused on the goal to be achieved.
- Make a note of how the issue is currently being addressed. How are the experts dealing with it today?
- What questions would the user like to ask your agent? Write down some typical prompts. You can use these later to test and validate your agent.
- What data do you need to answer these questions? Do you already have this data? What amount of data do you expect - do you need to think about filtering, providing additional context, etc.?
- What approach do you expect the agent to take to answer the questions?
- What skills are required for the agent if the approach is followed? What parameters are needed for these skills?
Once you have clarified these issues, the following approach may be useful:
- Pick the simplest question from point 3 above
- Use your description from point 5 above as a starting point for the system instruction.
Start with a limited scope - you can move on to more complex issues as you go. - Create the required skills. Make sure you test each skill in isolation - does it return the right data?
- Set up the agent - register the system instruction and skills and test it with a few examples.
- If the simple examples work, extend your agent to the more complex use cases. After each major change, make sure to retest the previous examples again.
Use the sample VFC flows
-
Download the sample flows (.json file) to your local storage > download HERE.
-
Open Insights Hub VFC and import the sample flows. To do so, select the burger menu, then "Import", then "File to import"

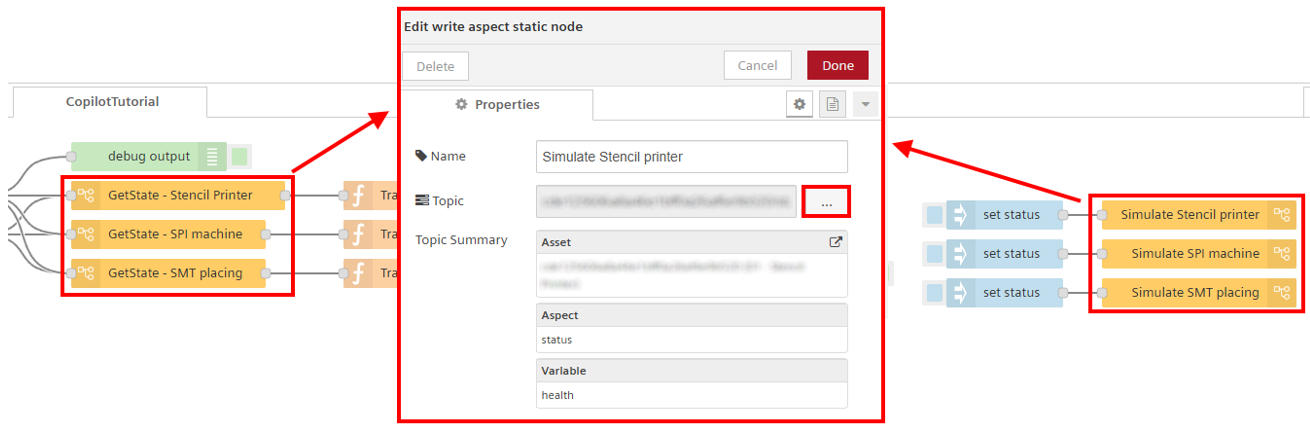
- Open the "GetState – xxx" nodes, which return the status of a specific asset.
In each of these nodes, select an asset which exists in your tenant and chose aspect "status" and variable "health", so that this example flow will work.
- Double-click on the skill node like "TutorialGetPlantStatus"
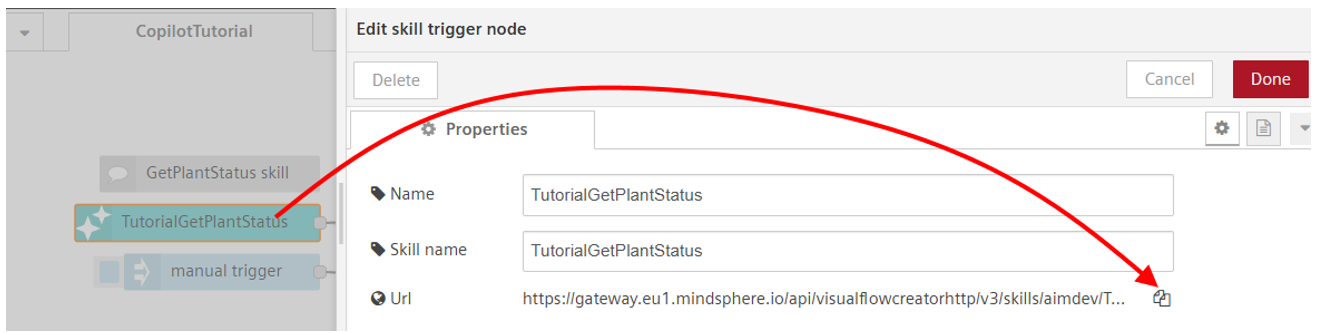
-
Copy the Url and use it for the configuration of your skill in Bruno
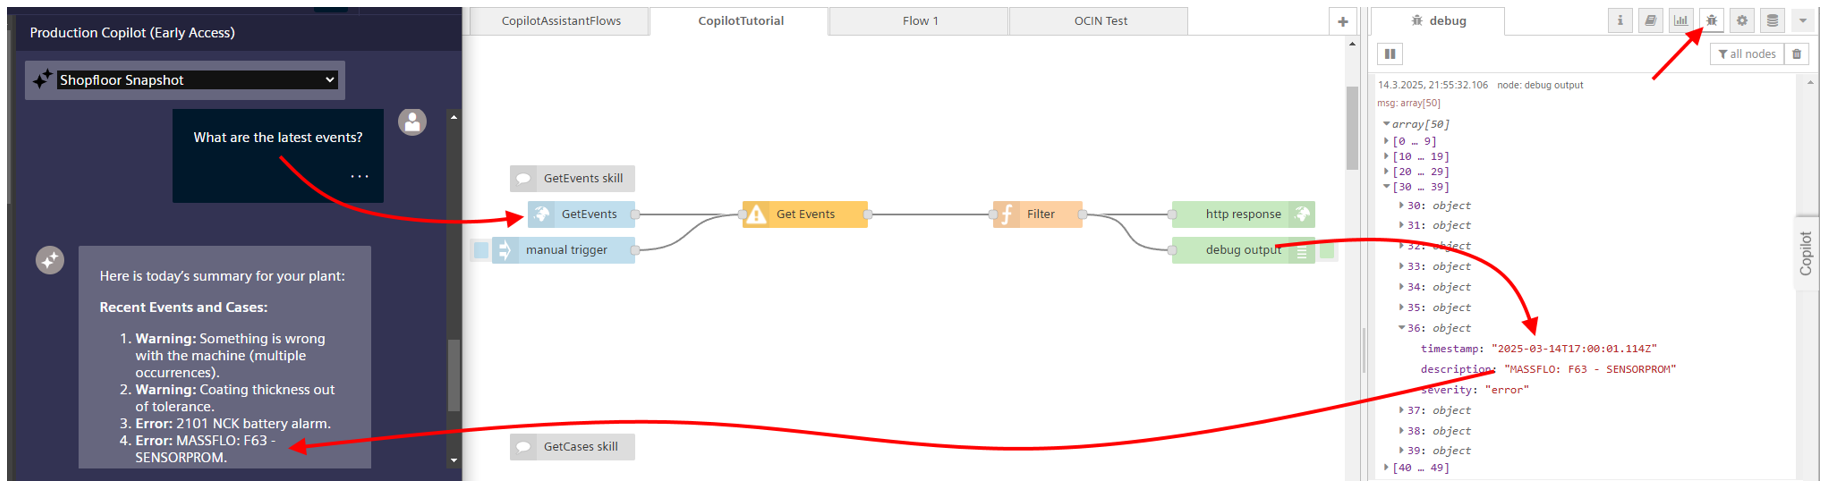
-
When the agent is finalized, you can ask questions in the copilot´s chat window. With the debug nodes, you can verify how the flows are used and working.
User Interface
Copilot Studio with detail view and chat for testing
Visual Flow Creator with skill nodes 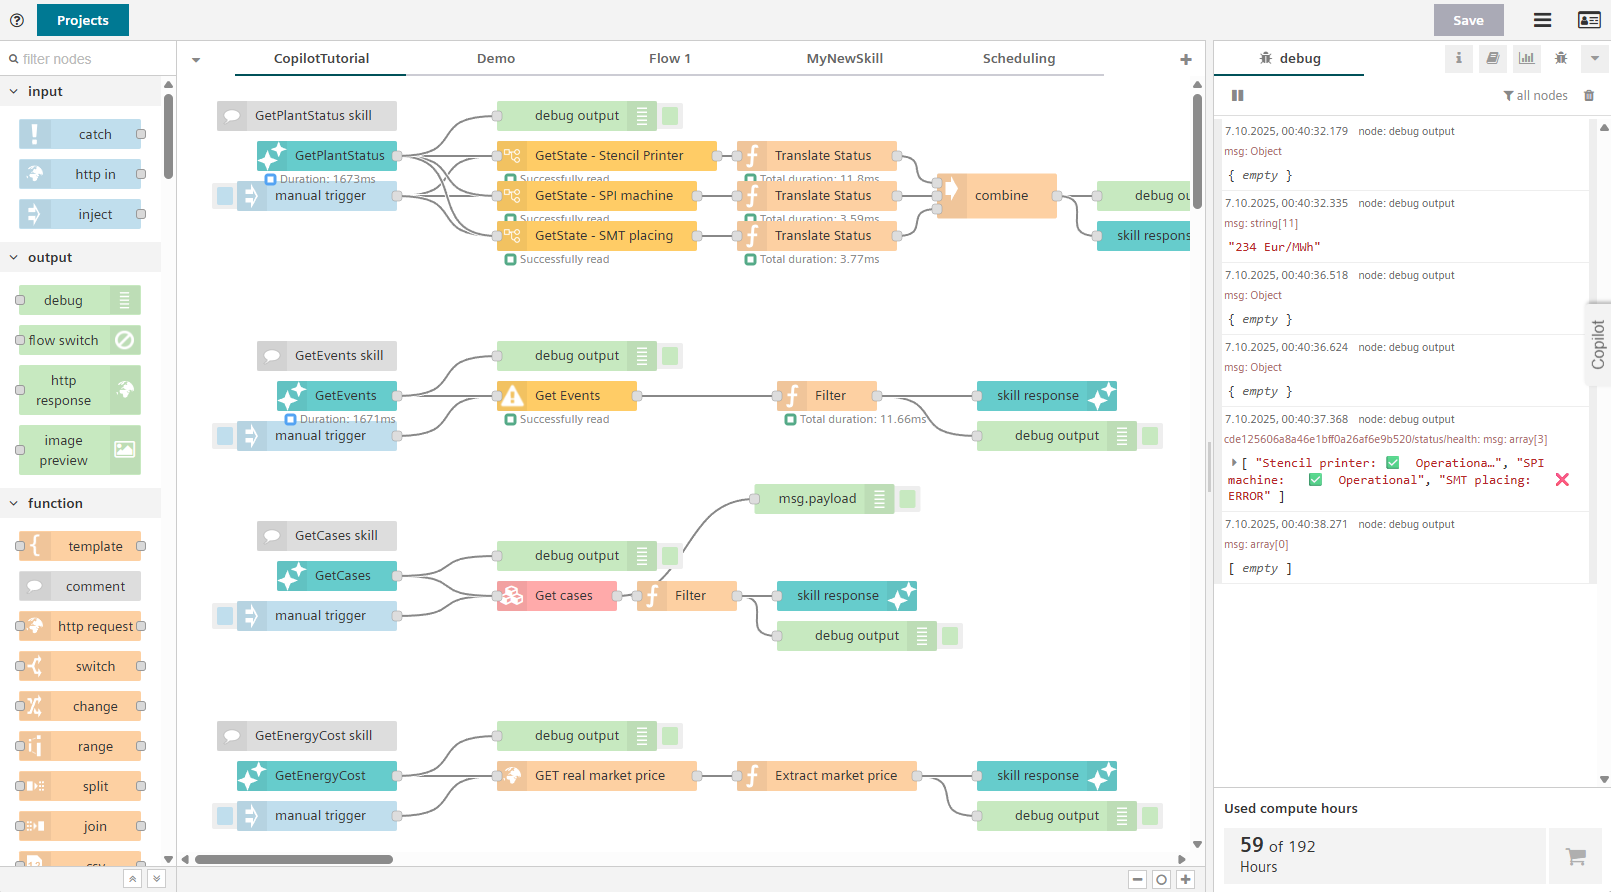
Contact / Feedback
If you have any questions about this tutorial, suggestions for improvements, or questions about use cases that you plan with Insights Hub Production Copilot, please contact us. Your sales representative, customer success manager or our customer support team is there for you.